Tuesday, 20 January 2026

A cat at last!

 When I was a child, I had two cats.

Tilly was a beautiful tortoiseshell whose main goal in life was pretty much just being comfortable and basking in the sun. She had no interest in hunting and only ventured outside when it was nice and sunny and she could roll around on the warm paving slabs of the patio. 


Sunday, 11 January 2026

Prince - 1/9th Scale Poseable Pony!

Introducing...Prince!


Yet another late post, this project was actually done in March 2025, but for me that’s still a pretty good timeframe from completion to blog post. πŸ˜‚ 


One of my long term hobby goals is to make Max a horse. Not just a static statue, but a fully poseable articulated 1/6th scale horse so she can go out on hacks and jump and gallivant to her heart’s content.


(As per usual, I don’t give myself easy projects!)


I’ve made articulated creatures before (obviously Baxter, and a handful of other art dolls from back in the day) but horses are very different beasts, and something I knew would be considerably trickier, especially considering the fact I’d need it to be sturdy enough to support the weight of a doll and tack, whilst still being able to be posed. Once upon a time I made a 1/6 horse; Inky, whose decidedly wobbly and battered body still leans precariously against one of my shelves; her wire core being far too weak for the rest of her. She was a labour of love, and while I do cringe a bit looking at her now, she was a good first attempt all things considered.


I’ve got lots of ideas for a new horse using much improved techniques, but at the moment I don’t have all the materials to get started the way I want, so in the meantime I thought I’d do a test run and start off with a pony. I’ve got a few 1/6 child dolls, so I thought it would be fun to make a Shetland for them to ride. Unfortunately as you’ll see, it ended up not turning into one so I just dropped down a scale to 1/9th (better known in the model horse hobby as Traditional scale) and decided he could be a crossbreed instead. The irony is that I don’t really do much in trad scale, so he’s become something of a rarity in my collection. πŸ˜‚


Anyway, onto the step by step!

Friday, 5 September 2025

Mid Century Modern Furniture!


I’ve been meaning to post this for almost a year but you guys know procrastination is my middle name by now. πŸ˜‚


I was setting up my living room diorama recently and realised that it looked kinda empty. With only one sofa and a big stretch of floor, it really needed somewhere else to sit. I quite like the look of mid-century modern furniture so after a good Pinterest browse for inspiration and what’s probably the most basic planning sketch ever, I started making a chair. 


For some reason I didn’t actually look up any plans or preexisting tutorials so I probably went about it in a much more complicated way than I needed to, and yes, I stupidly did make it literally IN the diorama, and yes I got superglue on the floor. πŸ™ˆ


The legs and arm rests are wooden dowels - the ends of which I sanded down into a taper - and some flat bamboo plant canes along with a couple of BBQ skewers and wood glue to hold them all together. The darker side pieces are layers of mountboard with cereal box card on the sides like ‘veneer’, coloured with alcohol markers and sealed with multiple layers of mod podge.


It’s a little rough in places, but I like to think it was a family heirloom or that they got it secondhand and had it reupholstered. On that note, I really wanted to make the seat green velvet or felt for a real vintage vibe, but I didn’t have enough fabric in the right colour, so I used this dinosaur print I’ve been hoarding for ages instead. The actual seat part I think was either foam or sponge, but I can’t remember which. The cushion is just some fabric from an IKEA face cloth and some wadding. I used another burnt orange face cloth from the same set for a rug as well.


I also realised that there was one whole side of the room that was missing something, and as I was still in a mid-century modern mood, I cobbled together a sideboard out of mountboard, toffee apple sticks and wood effect scrapbook paper. Unfortunately said paper was the wrong colour, more of a very pale pinkish pine, so I went in with alcohol markers to make it more like teak or walnut but sadly it kind of obliterated the wood grain, so I had to improvise with the pen strokes and to be honest I would have been as well to do it all from scratch after all that. πŸ˜‚ 


The handles to the doors are just brass beads with a pin pushed through them. The doors don’t actually open, they’re just decorative, but I’m really pleased with it overall. In hindsight I wish I had made them functional for extra storage and photography potential, but at the time I couldn’t find the small hinges that I know I have in my stash somewhere so I just had to leave them as they were.


I made the lamp too, which seemed to take even longer than the credenza because I wanted it to actually light up, using some small LED balloon lights I have, but it was getting complicated to hold the light up without compromising the shade, so I just gave up and left it as a prop. πŸ˜‚ The base of it is a wood effect light pull I got from a DIY shop years ago, and the shade is just scrap fabric and card.

The plants are my own work too and the candlestick is an old Barbie ‘My Scene’ one I repainted and then replaced the plastic candle with a real one because it had warped and looked ridiculous. πŸ˜‚ The little stone bust I got from a local plant shop but I’ve seen them online along with lots of other carved crystals.


In this next picture the orchid is from one of the ‘Miniverse’ kits, but I used an old shampoo lid for the pot.


Whilst I was in the mood, I also made a coffee table, again out of mountboard and wood effect paper. It’s a little more rustic looking as I made it very quickly and (again) without a plan, but Max and Juno have eklectic taste so I think it still works. πŸ˜‚


^ This is Nadia by the way, she’s one of my favourite dolls but like most of my collection always gets sidelined in favour of Max and Juno when it comes to photoshoots! πŸ™ˆ


There’s still a lot I want to change in the living room diorama - I’m no longer such a fan of the exposed brick walls, and the windows on the right, or the main sofa, but they’re ok for now and redoing it all will take some time.


Friday, 13 June 2025

Baxter 3.0 - 1/6th scale poseable dog tutorial!


Yet another post I started years ago (2022 for this one!) and never got round to actually publishing!

 Here's how I remade my 1/6 scale dog, Baxter, with much better articulation than ever before.


Monday, 24 February 2025

Max Does NaMoPaiMo 2024 - Photostory! IMG INT


What's this, blog activity?! In this economy?! 🀯

I actually shot this photostory last year, but procrastinated to a ridiculous degree in doing the actual writing part, so here we are a whole year later and I'm still finishing it last minute!πŸ˜‚

Anyway, here's when Max reeeeeally struggled to get started with her NaMo pony...


There's a LOT of photos in this btw, and I'm still getting to grips with google photos for hosting instead of Flickr. XD
 

Saturday, 6 April 2024

ADHD and me.


I did this collage a few years ago and it still feels relevant πŸ˜‚

Long time, no blog. The title of this post probably gives you a hint as to why, and might also explain much of my personality if you've known me a while. 

A year ago last week, after nearly three years of patiently waiting for appointments and meetings with doctors, I was FINALLY diagnosed with ADHD. I cannot stress to you the relief that this brought me, as it felt like I could finally start living my life like I was supposed to.

Speaking of which, this is going to be a LONG post, as I have rather a lot to say, so strap in, this isn't exactly a fun one as I'm pretty much putting everything that I've ever struggled with in my life out there which is, well, a lot. This genuinely isn't a plea for sympathy, and that's absolutely not what I want, but I would like to be as transparent as possible because I know that I felt incredibly broken until I realised that other people had the same issues as me, so if this post can help just one person feel less alone, I'll be happy. 

I wrote this post for a variety of reasons, one, to just get it off my chest and out into the world, and two, because ADHD is still so incredibly misunderstood and I know so many of my peers who have been let down by the system as much as I have, so making folk more aware of it as a condition is very important. 

Also, I don't own all the memes, credit to their creators, but I just needed to share some of them because it was honestly so affirming to realise I wasn't alone in feeling so hopeless at times.


Sunday, 6 March 2022

Free Printable 1/6th Scale Miniature Book Covers!

EDIT: YouTube video tutorial now up -here-!

EDIT 2 - It's come to my attention recently that people have found these books for sale on Temu and Amazon, something I absolutely do not condone! I make no money from these, and it really aggravates me that some random stranger is profiting from something I specifically made to be free. So basically, please don't buy these if you see them anywhere and if you can link me to the listings so I can try to get them taken down that would be very much appreciated! :)

I shouldn’t have to say this, but these book covers are free FOR PERSONAL USE ONLY. 

Do not sell, mass produce or profit from these in any way. They are my work, and are not intended for commercial purposes.


I'd always intended to make Max and Juno some bookshelves so they could have things on display, and a while ago I did just that; cobbling together two wooden storage boxes into a kind of weird modernist...thing. It did the job for a while, but it wasn't really what I'd originally intended. A few days ago I made some new ones, using wooden storage boxes with added shelving I painted with acrylics and varnish. They turned out great, which was just as well, because they were the perfect size to hold all the miniature books I've made recently...

Tuesday, 4 January 2022

Finished Julip Stableblock!

 As promised, this post will be pretty word-light and picture heavy!

The Bridle Tree Barn-Raising Challenge 2021!


This project has been a long time coming, and just to warn you, this is one of my biggest blog posts to date, so I'd advise getting yourself a cup of tea and a snack if you're intending on reading the whole thing in one go! (seriously, it's like 10k of tutorial and angst)

Friday, 15 October 2021

A 'spot' of customisation!


Obligatory 'sorry for not posting, I'm useless' introduction, now onto the main topic!

As you may have noticed, I haven't posted any Julip content in a good long while. I don't hate them, nor am I giving up collecting them, they just aren't my main focus these days. With one thing or another I haven't bought a new Julip in years, my last one being a very generous gift I was given last year right before lockdown. I've got several ideas for orders, but who knows when they'll happen!

Anyway, long story short, a few months ago my friend Paul asked me if I'd like to rehome his solitary Julip. He'd been gifted him a number of years ago and while he liked Julips, this particular one didn't really do anything for him as the appaloosa pattern was a bit unrealistic, and he knew I'd be able to give him a more appreciative home. He suggested I customise him and after seeing photos, I definitely agreed. 

With one thing or another, he finally made his way across the pond a couple of weeks ago, and upon opening the box I was greeted to this terrifying sight!

Tuesday, 20 July 2021

I always knew I needed a Needle Neddie...


A couple of years ago, my best pal TomΓ‘s came down to visit for a wee holiday, and while he was here, after we'd all gone to the museum and boot sale and talked horse for hours, he brought out a big bag of wool and some very sharp stabby needles and explained that he'd started needle felting as a hobby. During the course of the week he made two, a very squishy Suffolk and a slightly less so roan, and very kindly gifted the Suffolk to me before he left! She's a little wonky but utterly adorable. <3 I also had a go at a cat, which didn't exactly end well. XD

In the following years, his skills have grown immeasurably, to the stage that he's now making them to order, and after winning a money off voucher in a photo show's raffle recently, I knew I couldn't put off ordering one any longer!

Sunday, 11 July 2021

Meet Petra! - 1/6th scale needlefelted dog! (plus tutorial)


Kirsty has always wanted a dog, and over lockdown finally decided to take the plunge and adopt from a rescue. As soon as she laid eyes on Petra the whippet, she knew she’d found her new best friend!

Friday, 23 April 2021

DIY Tortilla Wrap Tutorial!


It's something I've been wanting to do for years, but now that we at long last have decent internet* and I've found video editing software I like, I can finally start making YouTube video tutorials!

Sunday, 28 March 2021

The Making of Baxter 2.0 - fully articulated dog art doll!


Four years ago I decided Max and Juno needed a dog, so I gathered up some materials and made Baxter.

I love him to bits, but the last few years have taken their toll on him and he's getting a little bit wonky. He's made from mostly wire, and I've been getting worried that they'll eventually snap, not to mention, his fur has got pretty matted and his jaw is getting loose. He's still super cute, but I knew he deserved an upgrade...


Thursday, 25 March 2021

The Little Rider Doll-making Challenge and Copperfox tack!


  There's so many monthly challenges in the hobby right now, it's really good for my motivation!


March's one was The Little Rider Doll Making Challenge, held on Facebook. It isn't a competition, there are no prizes or anything, it's more mutual encouragement than anything else.

As you may have noticed, I do rather a lot with dolls, but I've never really done anything in Traditional scale, and thought now was about time. This isn't going to be much of a tutorial as I didn't take as many photos as I thought I had, lol.

I actually bought this body to use with my 1/6th scale dolls as a small child but when she arrived I realised she had great potential to use with my trads! I got her off Ali Express for under £3, and quality wise,it shows, with pretty lightweight hard ‘tinny’ plastic, but the articulation is really good considering.


The joints are tight and she holds a pose really well and can even do a very nice ‘heels down’ jumping position! I thought she’d make an excellent child/teenager with a bit of work!


Here she is with a Breyer trad rider for scale.


 This particular one came without a head (one of the options did have one but it was massively oversized) so I just stuck on a Breyer Classic head which fits rather nicely. I considered shrinking it but didn't want to risk damaging it as I didn't have any other heads the same size. I did end up altering the neck peg to give it better articulation which worked, but I accidentally broke it later on and had to improvise something else which wasn't ideal.

There's also a smaller version of the same kind of doll that I've used for 1/6th scale toddlers which would also work for 1/9th scale young children I think. I'm tempted to make a leadrein set now...


Forgive the background - horses aren't normally allowed in the house! :P


This one has a vintage Barbie 'Chris' head which I had to adapt the neck peg to accommodate.

The doll came with some pretty hideous plastic shoes and chunky feet and although they allowed her to stand unaided, they were just too wide for the boots I wanted to make for her. Sooo, I raided one of my doll body boxes and sawed off the feet of a barely articulated Barbie Fashionista. (let's face it, they're really only useful for heads and clothes and the occasional limb transplant these days) I drilled into them with my dremel, and inserted a couple of 'ball shape' joints I bought from HobbyLink Japan a while ago. They take a while to get here from Japan, but they're totally worth it when it comes to doll customising.

 This had the advantage of giving the feet a smaller and nicer shape I could build her boots over, as well as increasing the articulation so she could put her heels down properly. Her original feet were pretty well articulated so I've kept them in my stash to use on another doll at some point.


I had some spare Barbie shoes from the Curvy MTM dancer which fitted her new feet pretty well, so I carved off the raised details with a scalpel and took a little off the sole to create a separate heel. I then painted them black and set them aside until it was time to work on her boots. I did consider sculpting boots from scratch, but then I'd have had to make them match and that's way too much effort!


Next I wiped her factory face paint off with acetone, cleaned it with soap and water, then primed it with a couple of layers of Testor's Dullcote. Most doll customisers rave about Mr SuperClear sealant, but it's expensive to get and I've had good results with Dullcote in the past. Her face took two attempts to get right, using watercolour pencils for the most part, but I'm really pleased with how she turned out. I really struggle to get faces symmetrical, especially on sculpts without defined eye sockets like this one, but I took my time and that definitely paid off.

Once I was happy with her faceup, I gave her several layers of sealer to keep the finish safe, then moved onto her hair. I'm not a big fan of the kind of nylon hair fibre most fashion dolls and similar have, as it's awkward to style and never looks quite right, so I decided to go with viscose on this occasion. A hobby friend very generously gave me her stash a few months ago as she wasn't using it, so I had a lot of lovely colours to choose from! (thanks again Chloe! πŸ’—)

I cut the fibre into sections, carefully brushed it out and then glued it onto a poly pocket with Mod Podge/tacky glue to create wefts. Once dry, I peeled the hair off the plastic, trimmed the glued tabs down as short as I could, then started gluing them onto the head from the nape of the neck upwards, using Fabri-Tac glue.


The parting didn't want to cooperate with me, but as she'll be wearing a helmet most of the time, it wasn't much of a big deal.

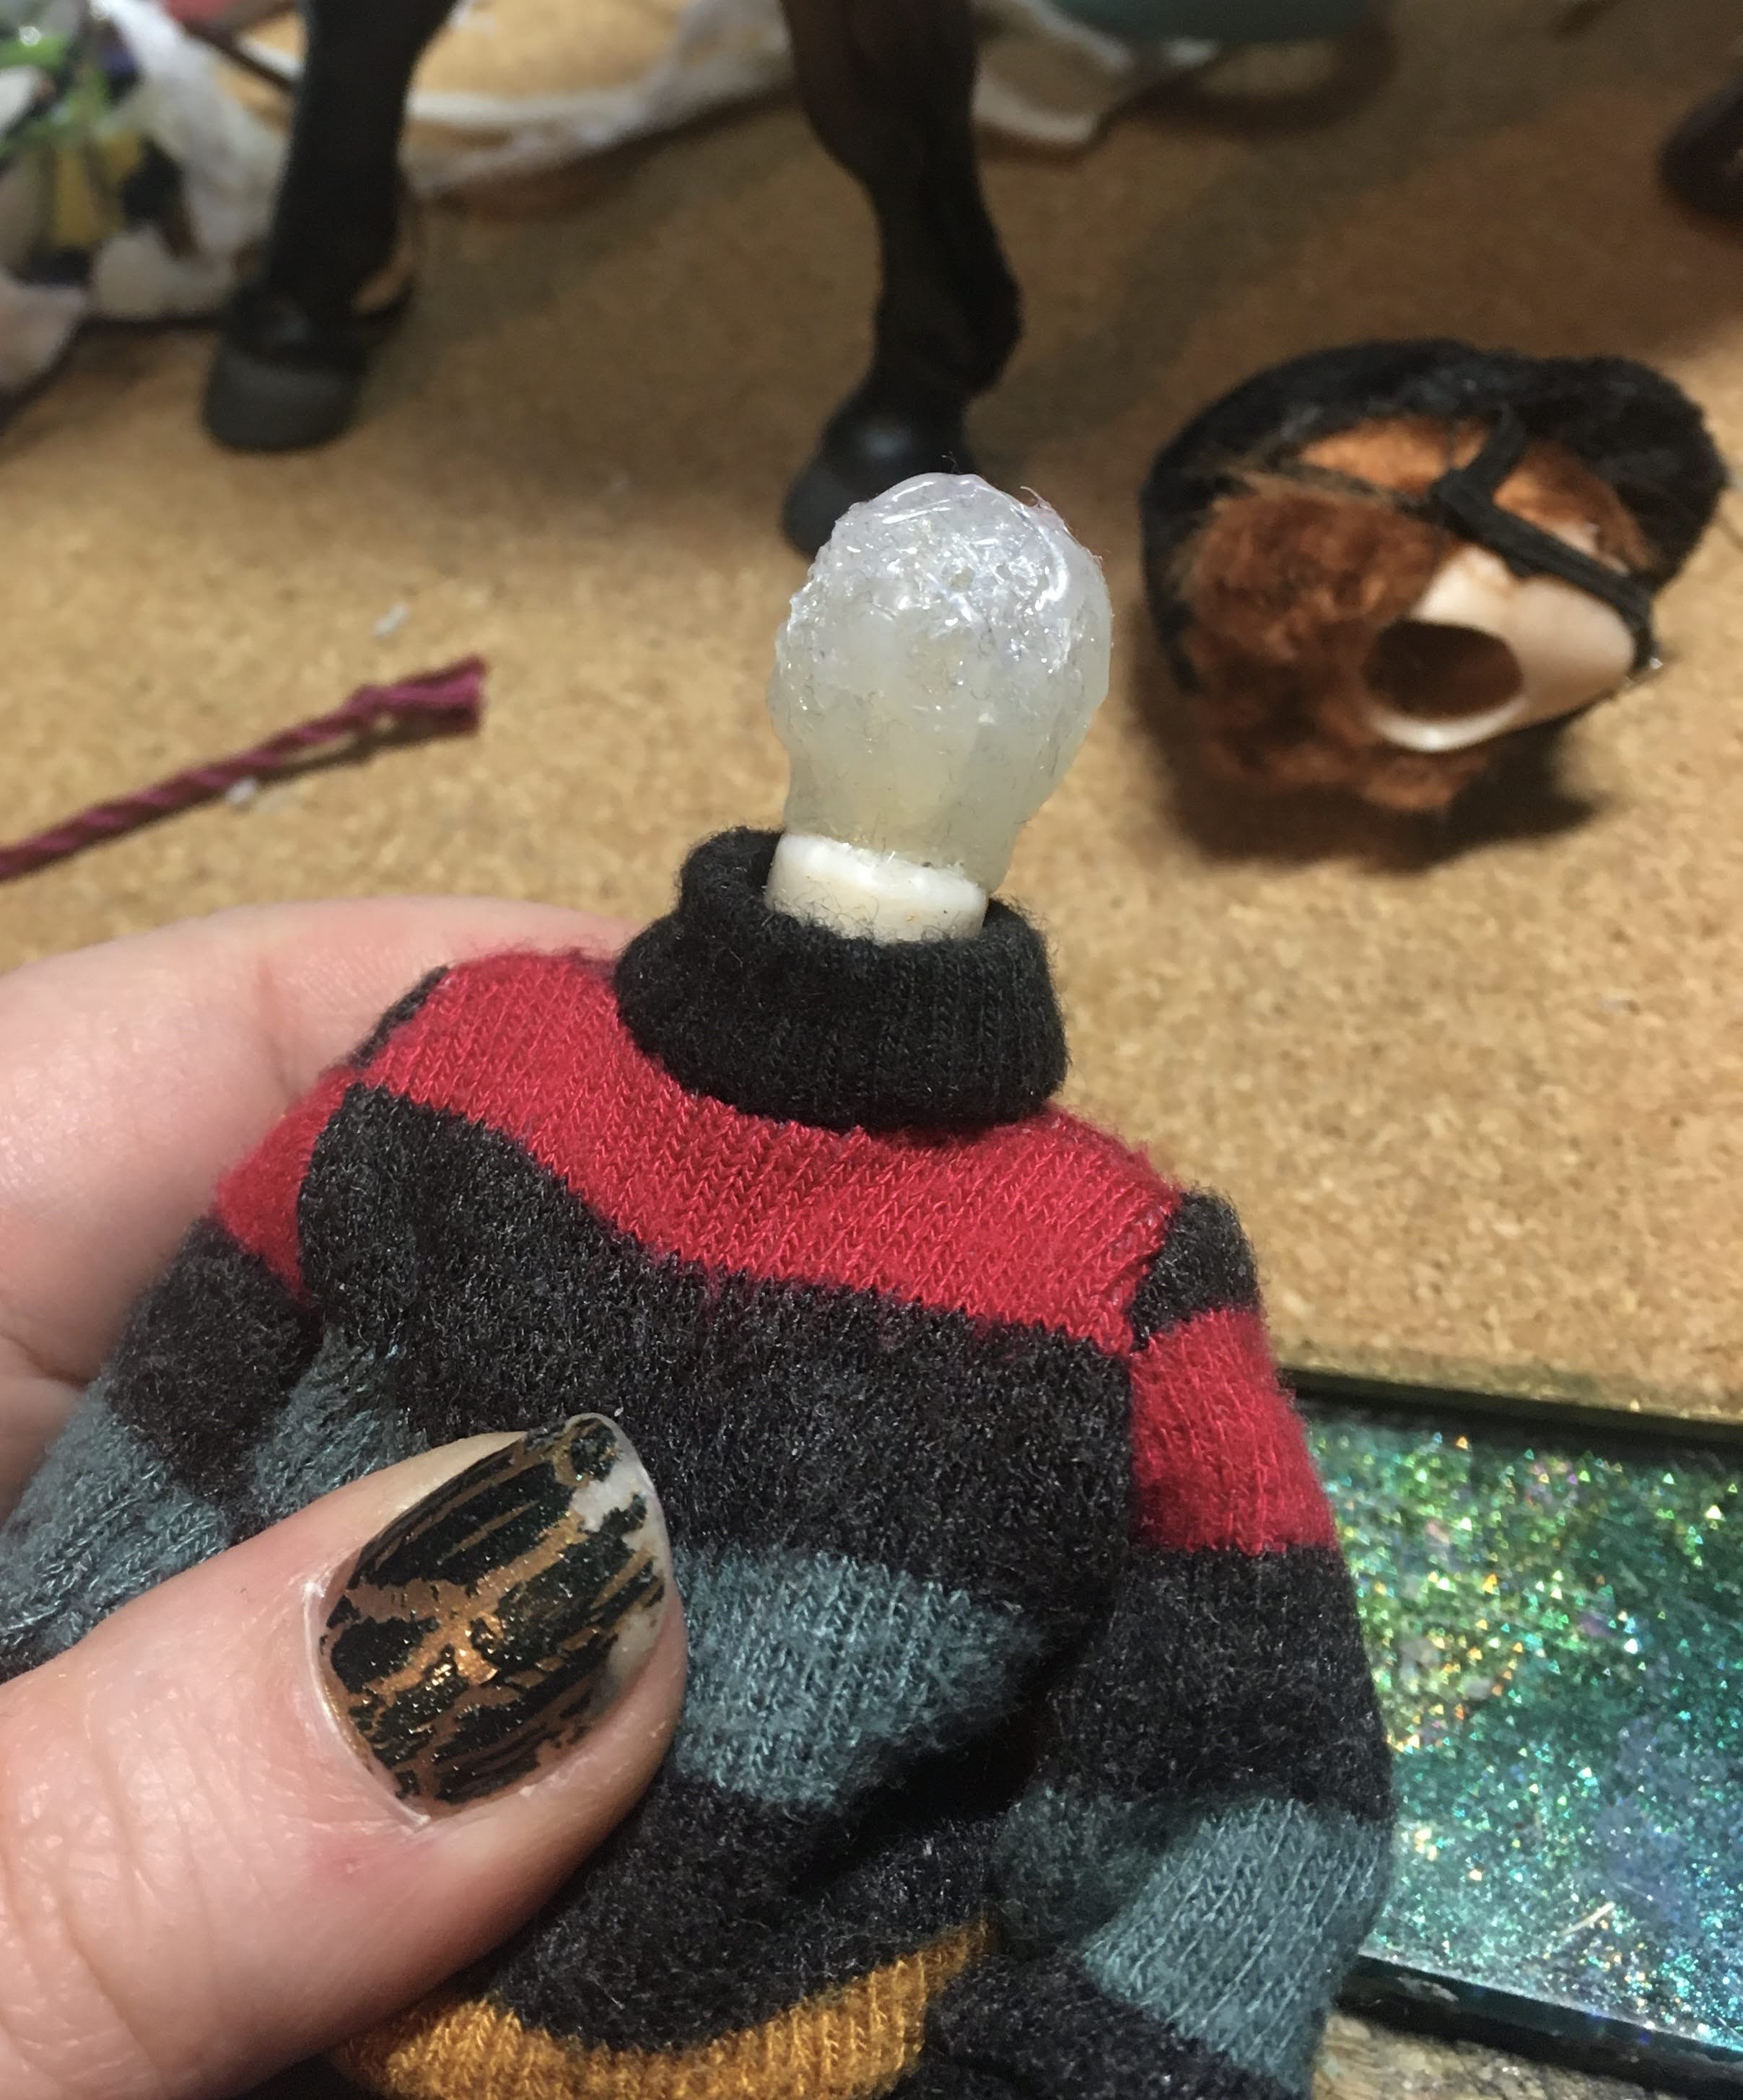
I did away with her original static neck peg and made a new elasticated contraption based on BJD mechanics, which worked great, until I accidentally broke it later on. I couldn't be bothered starting over, so I hot glued a kebab skewer inside the body cavity and built up a rough ball on the top for the head to fit over. The flexibility isn't as good as it was, but her head doesn't fall off now so that's something.


Her jumper was made from an odd sock using this tried and tested method by the inimitable My Froggy Stuff, and her denim jodhpurs were a bit of a bodge job. I didn't have any stretchy fabric in more traditional colours for breeches, and after making the jumper I'd already decided she'd be a casual rider so she didn't need to look show-ready. I did try making a pair of white breeches but they ended up too loose and wonky looking, so I more or less made up the pattern as I went. The knee patches are just faux suede I glued into place, then stitched around for extra security.


I decided she looked like a Katie!

The boots took ages to get right. I've made plenty before, but none this size, so I had to create new patterns from scratch and seemingly everything went wrong before I finally gave up. I originally intended to make her short jodhpur boots but it just wasn't happening, so she ended up with long boots instead. They ended up a little too tight around her calves but I can't be bothered to make them again so we'll just say she's had a growth spurt and really needs to get the next size up. πŸ˜‰

The helmet also went though several iterations - but eventually I wrapped her in several layers of cling film to protect her, then glued on a few torn strips of fabric over her head to make a base. My thinking here was that it would allow for a little flexibility but I'm not really sure it made much of a difference. I then covered that in a thin layer of Apoxie Sculpt which was carved and sanded to shape afterwards. It did crack in one area, so I had to go back in afterwards to shore it up. In an ideal world I'd have liked to make a mould and cast it in resin but it was a lot of faff for one doll so this made more sense.
Once fully cured I carefully removed it from her head and the clingfilm, then popped it on her head so I could mark out any areas that needed extra work and sand accordingly.


Rather than sculpt the brim onto the helmet like most modern styles, I went for the slightly vintage look of the removable velvet cover I remember from my youth. I traced the front of the helmet onto cereal box card so it would fit snugly, then drew and cut out the brim. This was then glued onto stretchy synthetic velvet on one side, then folded over and glued to the other side. The helmet part got the same treatment, though I glued it in stages so I could pull the fabric taut and avoid any wrinkling.


I folded the excess fabric underneath and glued it in place, making sure to trim off as much as I could so the doll's head could still fit inside easily. The harness part is just thin black elastic with a decorative Rio Rondo buckle. Oh and I added a little button at the top which was just a little circle of card with the velvet glued around it. I accidentally smeared some glue on the velvet in a few places so it isn't as polished as I'd have liked, but as she's kitted out for hacking rather than showing, I think we can just pretend it's damage from cantering under low hanging branches or something!


Now all she needed was a pony!


Oh! That was lucky, here's one!

This is Thistle, my limited edition Exmoor by Copperfox, from their original Kickstarter. I absolutely adore the mould, for all its flaws, as it looks like the typical generic riding school pony everyone grew up around. Despite my affection for her, she'd never managed to acquire anything tack-wise other than a headcollar, and now with a pony mad girl in need of a pony, now seemed like the perfect time to give her some!


I generally don't like making tack, which seems a bit hypocritical given that I've made tack for nearly half of my 73 Julip Originals at this point. (although the quality of said tack varies tremendously!) Weirdly, I quite enjoy the construction of saddles, but absolutely loathe strapwork, so bridles frustrate me. Every time I make a saddle, I always end up making a new pattern from scratch, which takes ages, so this time around I decided to try and make a decent pattern that I could use again and, if I could make it good enough, potentially sell or make available for a one off donation. (I'm perpetually unemployed, so anything hobby related I could do to earn a little money I'm going to try!πŸ˜…)

Anyway, I was really pleased with the tack I'd made for my NaMoPony, so I used that as a basis, and after a lot of faffing around, finally made this!


The patterned suede on the seat came from an old purse I recycled, as did the majority of the leather. The softer stretchier kind on the knee roll and the panels came from a leather glove. Recycling ftw!


The bridle took longer to make than the saddle I think - I kept accidentally slicing through the leather lace and had to start from scratch, and I made four different browbands before I was finally satisfied! I really wanted one of those traditional woven ribbon ones, but no matter how hard I tried I just couldn't wrap my head around how to make them, so I gave up and used a simple strip of fancy ribbon instead. πŸ˜‚ The reins were supposed to be plain leather but by this point I never wanted to look at leather ever again, so I just plaited some embroidery thread for that comfy cotton look. They hang quite nicely too so that's a bonus.

I also made her a super comfy quilted numnah, using thin fleece and some fabric I'd found in a remnants box at my local fabric shop a while ago. I do actually have a sewing machine, and use it often, but for some reason I decided to sew the entire thing by hand which took ages. It's lovely and squishy though, and I added in some ribbon...things, to keep the girth in place. It's perhaps a little too thick for this particular saddle however, as it sits on the pony much better without it, but meh, it's COMFY!


So, here we are, Katie has her own pony and tack set now, so hopefully at some point I'll be able to take them somewhere nice for a photoshoot!

I've been working on finalising the saddle pattern, and resizing it for different scales, so if that's something you'd be interested in using (and potentially buying!) please let me know! 

I was thinking of just linking to my Ko-Fi (which you can find up on the top left hand side of my blog πŸ˜‰) so if anyone wanted to pop in a wee donation as a thank you they can. The last thing I want to do is put tutorials and the like behind a paywall, as I wholeheartedly believe that hobby knowledge should be free to access but at the same time, I kinda need to make some money somehow and I've worked really hard on this, so it feels like an acceptable compromise! πŸ˜… I'm planning on resizing it for Classics, Julips, Collecta and Schleich as there's already a very good pattern and tutorial for Stablemates available from Anna Helt of Dreamflite Design.


I still need to do a bit more testing so I can be sure it's easy to follow though. On that note...
We're *finally* getting fibre broadband installed next week (after months and months and months of me pestering my decidedly non techy parents who were totally fine with abominably slow upload speeds until Mum tried to upload 28GB at once and it pretty much killed our wifi, and a week later it's still going >.<) so hopefully that means that I can finally look into doing some video tutorials! I shot and edited most of my NaMoPaiMo project from 2019 but then the file got corrupted so I'd need to start over, but once I've done that I have several projects I'd really like to film and stick on youtube, including a guide to assembling the saddle!

So yeah, I went off on a bit of a tangent there, but here's my finished pair, ready for a hack!

This was a really fun challenge, and definitely pushed me to try something a little out of my comfort zone.