

This project has been a long time coming, and just to warn you, this is one of my biggest blog posts to date, so I'd advise getting yourself a cup of tea and a snack if you're intending on reading the whole thing in one go! (seriously, it's like 10k of tutorial and angst)
Out of all the hundreds of model horse
brands and types available, my favourite will always be my beloved Julip
Originals. They aren’t to everyone’s taste, and they’re far from realistic, but
I love their character and how each one is so completely unique, handmade as
they are.

For a while I was something of an unofficial ambassador for Julip,
making photostories and dioramas and taking ponies with me on holiday just so I
could get nice photos of them by the beach, and I’ve lost count of the number
of people who’ve told me that it was those same photostories that got them into
Julips. It’s honestly one of my proudest achievements in the hobby, and gives
me so much joy when people cite me as the reason they started collecting them,
especially when it’s folk out with the UK as they’re barely known in the
international model horse hobby.

Not
having my own horse, and no longer having riding lessons by the time I started
collecting, like many people, having the models was a good substitute, and
being 1:12, my preferred miniature scale at the time, it allowed me to have a
lot of fun producing dioramas and scenes which of course lent themselves well to
stories.

Over the years my Julips have taken a bit of a back seat and the 1/6th scale dolls have become my biggest obsession, but I still utterly adore my little rubber ponies, and at the back of my mind I always planned on making them some new digs, but as is the norm for me, I just never quite got around to it.
The Bridle Tree Barn Raising Challenge was the inspiration I needed, being, simply, a community challenge to customise or create a stable, barn or accessory during the month of December, and after
having great fun customising a single stall stable last year, I knew that this
year would be the time to pull out all the stops and make the stables I always
wanted.
But
first, some history.
For
a number of years I had two wooden stables (made by Brushwood Toys/Wolseley Toy
Company Ltd ) which formed the backbone of my ‘EA Equestrian’ riding stables.
They were huge, took up the entirety of my desk and while they could be
disassembled, they were very heavy, being made of solid MDF, and after a while
I had to pack them up because they took up far too much space.


That was…seven
years ago now, and my poor Julips haven’t had a stable since!
I always had a very clear picture in my head of the yard they lived in,
and while I always intended on customising the wooden ones to fit the mental
image I had of them, I never got round to it.
(For those of you who are familiar with the game Far Cry 4,
I once used the map maker in the PS4 version to recreate the whole yard as best I
could given the resources available, including the cross country course, and
I’m still annoyed by the fact I can’t find the video I recorded of it – first
person XC isn’t quite as exciting without the horse, but it was kind of wild to
be able to walk through my little yard, even if the buildings and scenery
looked nothing like what I had in my head. (also hilariously the first time I
tried it out I didn’t realise you could disable weapons, so I had a video of my
character running and jumping whilst waving a handgun which I will never not
find funny)
When I joined the HARPG (Horse Art RPG) community on
deviantArt a few years later, it was the ideal way to make that yard a reality.
I already had the layout committed to memory, but drawing it made it real in a
way that I knew I’d never be able to manage in miniature, unless by some
miracle I can one day achieve my dream of a full garden of perfectly scaled
miniature landscapes!

As I wrote and drew their stories, the characters of the horses and
riders were of course at the forefront of it all, but the yard itself, ‘EA
Equestrian’ was just as important, and is very much a real place to me, with a
history and an impact on the land around it. The stables are red brick with a
stucco effect on the top half and there’s a fancy clock tower at the front with
a weathervane.

They’re well maintained but grubby – it’s a working yard after
all, and horses are messy. It sits on a hill by the edge of a moor in an
undefined and unfortunately fictional part of the Scottish Highlands, with the
ruins of a castle nestled above it in one of the fields; a cross country course
winding its way through deciduous woodland around it, and through the riding school
horses’ pastures.

Three carved stones stand like sentinels on an outcropping in
the middle of the moor, their origin a mixture of myth and historical fact. There
is a small village a couple of miles away – Hollowcroft; an old stately home of
the same name nearby, and a few miles beyond that lies the sea. The yard originally
began as a stud for the local Earl’s hunting horses back in the 18th
century, but burned down in a terrible fire, leaving the site derelict for many
years until the previous owner’s mother rebuilt it in the early 1950s and redeveloped
it as a riding school. Her daughter Abigail has since added to it with a modern
‘American Barn’ style indoor stable block and indoor arena combo. I did make backdrops
of those in miniature, but I cringe to look at them now as I don’t think
there’s a straight line in any of it and it’s all really squint. Still, it did
the job at the time and perhaps I’ll revisit them as part of the challenge next
year, now that I’m a much better modelmaker.
I have so many stories about this place I’d like to tell,
and maybe I will one day, in text or art form most likely rather than photo,
but never say never.
Ok,
history lesson over, let’s get this thing started!
I
wanted to keep it visually like the stable I had before, with two looseboxes
and a window to the right of the doors. Most real stables of this type have the
windows on the left it seems, but I wanted to have the top doors open all the
time and didn’t want the windows to be blocked.
Behold! My most detailed and accurate plan!

Julips
fit in well with 1/12th scale, though on average they’re smaller than true
1/12th, just as most Breyer Classics are a little over scale, so rather than
taking measurements from real stables and scaling them down, I did what I do
best and bodged it, drawing up a few concepts and holding horses up next to
them to see if it fitted.


Using
squared paper was incredibly helpful as I didn’t need to worry if my lines were
accurate, I could just plot heights and widths and follow the lines on the
paper.
With
a little consultation from friends to get an outsider’s perspective, I finally
ended up with this. The bottom door is 85mm x 85mm (yes, Tom, it’s square, you
were right, most stable doors are square which blew my mind) and the top is
85mm x 80mm.

This
was a good fit for most Julips - big enough for the average horse but not too
tall for the ponies. Even the biggest Julip mould of all, the Heavy Horse, could just squeeze in his big ol' noggin. (sadly, after adding in the floor he can't now, sad times)

To
make things easy for myself I managed to design it so the front and back were
A4 sized in landscape format, and the sides the same but in portrait. This was
ideal for me because I’m not the best at cutting straight lines accurately and
having the majority of the walls already perfectly level was a dream come true.
On
that note, materials.
I
toyed with using foamboard as its relatively cheap and very easy to work with,
but it warps and is very fragile, so that idea didn’t last long.
In
an ideal world I’d have used MDF, but I didn’t have the tools to cut out the doors
and windows cleanly, nor the budget to get someone else to do it for me, so
that one was out as well.
Balsa
wood is cheap and easy to work with, and I have a great little feed shed my dad
made out of it years ago, but it can be fragile and easily damaged, so that too
was a bust.
I
then remembered a material I used at college - foamed PVC plastic sheeting -
it’s often used in the sign-making industry. I used it to make a pavement for
an architectural model during my first year at college and I really enjoyed
working with it. It’s lightweight yet sturdy, doesn’t warp (unless you apply
heat, which I later learned to my chagrin), takes paint well and can be cut and
carved with a scalpel. The only downside is that you can only glue it to
itself with superglue or PVC cement, but as I was intending to hold the
structure together with pegs so it could be dismantled easily, this wasn’t too
much of a problem. This
particular kind was sold as ‘Palight’ sheet from a modelmaking supplier I've used before but
it’s also sold as ‘Foamex’.
To
my delight I discovered it could be purchased in 3mm thick A4 sheets and so I
bought myself a batch of ten - two for the fronts, two for the backs and four
for the sides with a spare two for either the base or for if I messed something
up with the others. In the end I did need more but luckily 4D Modelshop had
very fast and efficient shipping!
Construction
Unusually
for me, I actually made the plans well in advance of the challenge’s official start,
plotting out the dimensions on paper long before I had the Foamex in front of
me and I’m so glad I did because I just wanted to MAKE on the first of
December, not think about pesky measurements and things!
I even made an extra set that I could colour in to get a better idea of how I wanted the final building to look.


I
lined up my plan with the PVC sheet and made guide marks where the door and
windows were, then, using a metal rule and a set square, drew them in
accurately.

When it came to deciding the pitch of the roof, I will admit that I pretty much just made it up on the spot, without references! XD

Once
I was satisfied with the placement of everything it was time to cut them out.
3mm Foamex is easy to cut with a scalpel, so using my metal rule, I made
several precise scores along the lines until it sliced through cleanly.
Remember,
a sharp blade is a safe blade!
I replaced it after every couple of sections as
the PVC blunted it pretty quickly and when that happens it’s all too easy to
hurt yourself or make mistakes.
Once
everything was cut out I used masking tape to hold it all together so I could
see how it looked.


It
turned out exactly as I imagined!
I hadn’t expected to make this much progress
so quickly – planning ahead really does help, who’d have thought it?!
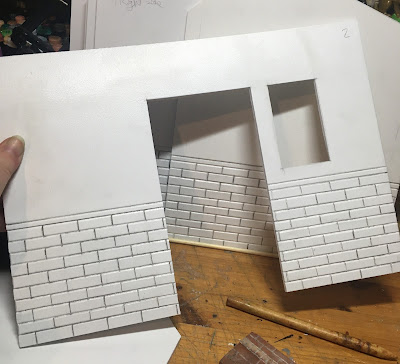
When
it came to the overall design for the stables, I wanted the lower half of the
building to be brick, with the top part in off white plaster/stucco as another
throwback to my old stables, but actually working out the size of bricks
I’d need was another matter.
In the end I looked at some reference pictures of
real stables to see how many bricks there were to the top of the door, then I divided
that by the height of the door. In the end this translated to ten and a bit, as
I found a piece of wooden trim almost the perfect size in my stash, so I used
this as a template rather than spend ages measuring things out. Accuracy is
obviously important, but in my experience, ease of working often trumps that,
and if you can find a way to make things easier for yourself you should
absolutely do it.
If
I’d been sensible I’d have worked out what size of brick I wanted then printed
off a few sheets of appropriately scaled brickwork from my laptop and used it
as a template to trace onto the walls. As it happened, that idea didn’t come to
me until long after I’d spent several hours faffing about with rulers and getting
graphite all over myself.


The most important part for me was making
sure that the bricks all lined up at the edges, so when the two blocks were
pushed together, aside from the unavoidable line between them, the bricks would
look seamless, so I made sure that I placed whatever wall was adjacent next to
the other as I plotted things out.

At
some point I realised I could use my ruler to mark out the next row of bricks a
little off centre which saved a lot of maths. I’d have preferred the stagger to
be more symmetrical but I thought I’d just have to learn to love it. Luckily I
found another piece of moulding exactly the right width so I was able to rub
out the wonky lines and start again which looks so much better.
By
the end of the first day I already had the shell of the buildings which was
frankly astonishing. I couldn’t wait for the next day however, as that meant it was time for…
ACTUAL 3D BRICKS!
Since Foamex is easy to carve, I intended to score the grout lines in with a round ended tool of
some kind like a dotting tool. I had a good selection of these; some came with nail art supplies (sold
as ‘dotting tools’) and others from general craft shops. This
worked great in tests on scraps.

In the end, after a
bit of trial and error with different tools and random paintbrush handles, I
ended up using a screwdriver instead as the grooves it created were wider and
more like real grout lines. Once I was satisfied I’d got the templates as
accurate as possible, I lined up my metal ruler and scored along the guides
with the screwdriver. At first I only did it twice per line but afterwards
added a third as it looked better, then I went over them all again with
a larger ball ended tool to bevel the edges of each brick.
This
took...some time.

I did a simple finishwork test on a scrap piece of Foamex to
try out paint techniques which I was really happy with. Most of the texture
came from the gesso and the way I applied the paint, but I knew I wanted my
bricks to be a bit rougher, so I did some more experimenting.


Here's a 15 minute video of me waffling to camera about how I achieved this -
At
first I grabbed a couple of suitably rough and heavy looking rocks from one of
my drawers (doesn’t everyone have a designated Useful Rock Drawer in their
room? No? Just me?) and basically just bashed the Foamex with them at random. I
pressed into the plastic fairly heavily in places and lightly tapped it in
others, trying not to focus in on any particular area. I hoped it would give it
a nice natural and random texture, but it wasn’t enough to show through a
couple of layers of paint.
Eventually I just went back to the dotting tool. The texturing
itself wasn’t difficult, it really just involves drawing lots of squiggly lines whilst
applying pressure, but it’s the applying pressure part that’s really tiring. I
really needed to loosen up and move my whole arm rather than just my hand,
which is something I struggle with when doing digital art, but it’s not an easy
habit to break!


After a while it really began to take a toll on my hand and elbow so to speed up the process, I taped three dotting tools together and just went ham on the Foamex, furiously scribbling at it like a toddler with a crayon. The texture wasn’t quite as random as it was when I did it brick by brick, but it was a hell of a lot faster, and I was able to go in afterwards with a single tool and touch up any areas that looked too obvious and to add a little more detail towards the front. For the most part, the stable will only really be viewed from the front or the sides, so adding the same level of detail to the back was fairly unnecessary, but I knew that I’d feel unaccomplished if I didn’t give every single aspect of it the same level of attention to detail.
At least that’s what I kept telling
myself when my arm kept aching.

Day 3
came to a close with my arm feeling like it wouldn’t last the night, but I was
really pleased with my progress. Weirdly, I expected to have a lot more done by
then, but the texturing took so long it really threw me off. Obviously I know
that for most people this is a huge amount of work to have achieved in a
relatively short space of time, but I have no job or social life and
most likely undiagnosed ADHD so once I’m in project mode I’ll keep going until
I need to eat or sleep (And sometimes not even for that!) and the passage of
time doesn’t really exist for me!
Day 4.
I
decided to prime the exterior walls (not my best idea it turned out, as I
wasted lots of time waiting for them to dry when I needed to glue things to
them) and also cut, sanded, primed and painted the wooden supports I needed to put
the whole thing together.
As most of you will know, the majority of my builds aren’t planned phenomenally
well. I usually have a vague idea of how I want to make things, perhaps with a
few specific plans for certain areas, but for the most part I tend to bodge stuff
- try out lots of ideas until something works, with actual details of the
construction being mostly hand waved away, like I’d somehow know what I was
doing when I reached that stage.
My
inspiration for much of the construction of this stable came from the Magpie
Models one I customised last year. It was made from MDF sheets held together
with plastic pegs, which were sunk into wooden posts affixed to the inside of
two of the sides. This made it very sturdy but equally allowed for it to be
dismantled very easily - something I needed for my own stables as lack of space
is a real issue for me.
I
had some square balsa wood dowels that would be perfect, even though balsa wood
isn’t the sturdiest. When painting it you normally need to use a sanding sealer
first, so the paint doesn’t soak into the wood but in this instance, I wanted
to be able to see the grain so I just primed it with a little thinned down
gesso. I didn’t have any actual wood stain, so I just used watered down
acrylics. After they’d dried, I applied a few coats of Mod Podge that I thinned
down with water as I didn’t want it to be glossy. Once fully dry I
attached them to the front and back walls with superglue, ready for the next
stage!
Importantly, I made sure I left a 3mm gap to account for the side walls,
so they’d sit flush. If I hadn’t, the side walls would have stuck out like a
sore thumb and the whole plan would have been a failure.

I intended to drill
holes in the sides and through the wooden supports to allow for removable
pegs…
...which I didn’t currently have.
A+ on the planning front there!


I also
learned that while 3mm Foamex is great, I really should have opted for the 4mm
as the sides were bowing a little in the middle. It wasn’t too noticeable, but
it did mean that instead of the two pegs on each post I’d originally planned
on, I now needed one in the middle to keep it from warping outwards. I think
much of this was due to me using the heatgun on them to dry the primer quickly,
and later on, when I came to paint the walls, I did the same thing which warped
them further, so uh, yeah, don’t be impatient like me and just wait for things
to dry!
Day 5 was all about assembly.
I drilled six holes in each of the side pieces and a
matching set on the wooden supports glued to the front and back walls. Finding
pegs to fit was harder than I’d thought (yay for zero forward planning!) but in
the end I settled on some bamboo BBQ skewers. My initial plan was to emulate
the Magpie ones, where the pegs have a flat top like nails, are separate from
the walls themselves and are only inserted when needed. I tried a few different
things – some actual nails, some different diameters of dowelling, but none of
them stayed in place. Regrettably, I ended up supergluing them into the back/front
wall supports which seemed like a good idea at the time but now I have major
regrets. Unfortunately, because they’re glued into fragile balsa, I knew that
virtually any attempt to remove them would just damage the supports so I
resigned myself to my mistake.
The side
walls just slot into them, and it does work, but due to the aforementioned
warping of said walls, they have a habit of popping loose if you aren’t
careful. This was mitigated somewhat by adding a strip of micropore tape (the
medical stuff that’s like thin masking tape – I use it a lot for crafting!) to
the loose ones, then going over it with superglue to give it a little more surface
area and friction so they'd stay in place. I had to carve out some of the holes on the side walls where
I’d drilled them a couple of milimetres off, so that probably didn’t help
either.

If I were to make this stable again I would definitely use a
slightly thicker grade of Foamex, perhaps 4mm rather than 3, as while it’s
pretty sturdy stuff, it would be significantly sturdier with another mm and
definitely wouldn’t warp so much. It stands well enough but if knocked it
wouldn’t stay up long. Due to the cut outs for the window and door, the front
sides were a little more flexible, so I glued in a couple of square dowels to
the top and bottom to add strength. I kinda wish I’d done the same with the
side walls now too but never mind.While I added them for purely practical reasons, it actually looks really realistic in the finished stable so that was a nice little bit of serendipity!

I
intended on making the doors out of wood, but it turned out my supply of balsa
wood was much lower than I remembered (although of course I've since discovered a
stash of it long after the fact – typical!) so I had to improvise. I kept all
the offcuts from when I cut out the doors and windows, and as they were
literally the right size, they were ideal. Of course, as they were, they didn’t
look much like wood, so I used the same technique as for the bricks and carved
in planks and woodgrain. I actually really overdid it on one of them, and very
nearly went through to the other side, so I’d definitely advise not putting so
much pressure into it as the texture came out a lot more noticeable than I
would have liked.


Day 6.
I was out most of this day on a walk, so I didn’t get as
much done as I’d have liked. What I did do was paint the doors.(but neglected to take any photos of them, whoops)
I primed them the night before with gesso, so the paint had
something to stick to, and then gave them a coat of black acrylic, followed by
a dry brushed layer of browns and ochres to help make the texture pop. Finally,
I went in with some watered-down paint and a long-bristled nail art brush to
add in more detail. The shading ended up a little off in colour and almost
cartoonish, and part of me wishes I’d just left it black but I’d be weathering
them anyway so they wouldn’t look like that forever. Both sides of each were
given a layer of Mod Podge to seal it all in and left to dry.
After masking off the balsa corner supports, the interior walls of the stable were painted with a mix of
white and Naples Yellow acrylic. It ended up skewing a little yellower than I
intended but it added to the cosy look I think. I brushed on the paint at
first, then stippled it with a broad brush to add texture and to get rid of any
brushstrokes. Stippling is my favourite way of applying paint for this very
reason! Afterwards they were all sealed with Mod Podge.

(Side note. I used to be very snooty about Mod Podge because
from everything I knew about it, it was just glorified PVA glue with a brand
name and a price tag to match, and I stubbornly refused to buy any for years for that
reason. I finally ended up trying some of my mum’s a couple of years ago, and I
take everything back, it’s amazing and I love it and I used SO MUCH of it on
this project.)
Day 7 was the one I’d most been looking forward to – I could
finally paint the bricks and outside walls!
I painted the upper parts first using the same mix of White
and Naples Yellow as I did the previous day on the inside, though I added a lot
more white this time so it wasn’t quite as magnolia coloured and more of a
creamy white. Once again, I brushed it on, then stippled out the brushstrokes
which was very satisfying.

By the time I’d finished the last wall, the first
one had almost completely dried, so I gave it a quick blast with the heatgun to
finish it off (argh, hindsight says this was a mistake as it definitely
contributed to the warping!) then applied a generous layer of Mod Podge the
same way, lots of stippling. I gave each wall two coats of Mod Podge, and when
it was finally and completely dry, I masked off the bottom edge of the ‘stucco’
parts and started painting the bricks at last.
I began with a uniform burnt orange/terracotta colour, then once that
was dry, I repeated the colour, this time stippling on some browns and ochres
while the orange paint was still wet to create a slight variation. While I tried to keep it random, I did concentrate the darker areas around the bottom of the walls, to account for the accumulation of dirt that would logically occur in a busy stableyard.


There’s
nothing worse than seeing a brick wall that’s all one colour – even when bricks
are produced in the same factory there’s always some minor variation in colour;
if not from the bricks themselves, from the environment and weather conditions
afterwards.
Once that was all dry
I repeated the process on the line of shorter bricks at the top, but in a
creamy sandstoney colour for a little bit of contrasting detail. Everything was
then given several coats of Mod Podge and left to dry. This step was vital for
the next one, as I needed the paint on the bricks to be fully protected for
when I added in the grout. I intended on doing that the following day, but I
couldn’t resist and did it that night instead!
The grout was made from a mixture of Mod Podge and Plaster
of Paris, and once applied generously, the excess was wiped off with a damp
cloth and left to dry. It highlights all the texture that took so long to do,
and I couldn’t be happier with it. You can of course buy pre made grout and
such from doll’s house suppliers, but I knew I’d hardly use it outside of this
project, and I had these materials to hand so I decided I’d rather make my own.
If you mix some paint into this combination it can be used to great effect for making
stone texture.


The grout dried pretty quickly due to the high plaster content, so I was able to see the finished effect before I went to bed and to say I was pleased would have been something of an understatement. I probably should have added a little white paint to the mixture as the ground ended up a little transparent, but as I was going to weather the hell out of it anyway, it didn't really matter.


Day 8.
This was the day I’d been most looking forward to since
starting this project; the weathering stage!
I began by applying a couple of homemade washes (made from
gloss medium, water and brown/black acrylics –I’d have much rather had matte
medium but I’d run out) which I almost immediately lifted off the surface by dabbing
at it with a towel so it would lie only in the recessed areas. I tried to
concentrate the grime at the bottom of the wall where dirt would naturally accumulate,
paying attention to references of real brick buildings. After that had dried, I
repeated the process with a more yellowish wash to add back some warmth to the
colours.


Later, I went in with some dark green paint along the base
of the walls to emulate moss and lichen growth. (I think it was actually Raw
Umber by Pebeo, but it might have been Opaque Sap Green, I can’t remember which
– not a vibrant green, but something much more muted and yellow/brown hued)

I tried to apply it where moisture would gather in real life
– at the base of the walls and following the edges of bricks where water would flow
along when it rained. I may have overdone it a little in places, but I love me
some moss, and I’d be adding in more three dimensional vegetation at a later
date so this wasn’t the end by far.
After all that I sealed it in with a layer of yes, you’ve
guessed it, Mod Podge, and removed the masking tape that was protecting the
upper walls from the brickwork. That part looked far too clean by comparison,
so I scrubbed some pastels into it fairly roughly to bring out the subtle
texture that was created when I originally stippled on the gesso primer. It also
brought out a few rough patches here and there but I quite liked that. Rather
than use spray sealer, I sponged on yet more Mod Podge. (Seriously, it’s my
favourite thing) There was absolutely nothing wrong with the brickwork as I
found it that morning, but I really wanted these stables to look established
and well used, not something out of a catalogue, and adding in the pastels
really helped with that.


The next thing I worked on was the windows. In all honesty I
hadn’t thought much about how to make them. With the Magpie one last year, all
I did was glue in a bit of wire mesh, add a wooden frame and call it done,
but this time around I definitely wanted the windows to be properly glazed, but
I still really liked the mesh look. I knew that many stables used a kind of
safety glass, where the wire mesh is embedded into the glass, so it doesn’t
shatter if it gets broken, and I really wanted to try my hand at emulating that
effect.
The technique I came up with is super simple but very
effective!
I made a little Reel of it on Instagram which has become one
of, if not my most popular post ever judging by the views!
All you need is clear plastic from packaging, (I have a hoard
of the stuff from doll boxes) a sewing needle, a ruler, cutting implement of
your choice, (I use a scalpel) paper and some black or silver acrylic paint.
Start by drawing out a template for your window. I used the
piece of Foamex I’d cut out for the window originally, and drew around it on a
piece of squared paper, marking the corners. I knew it would fit nicely into
the grid because that’s what I drew the original plan on, and thinking about it
now, I could have just used that instead, couldn’t I? Hindsight’s a wonderful
thing!
If you don’t have gridded/squared paper, you could just draw
it out manually. Tape the plastic on top of the template, and using a ruler,
gently scrape along the lines with the needle. I did about four scores per line
– you don’t want to cut through the plastic, but you want a deep enough channel
for the paint to sit in. I went beyond the lines I’d marked so that there was
no chance of coming up short.
Once done, brush on some acrylic paint in the colour of your
choice and wipe off the excess. The paint should sit in the engraved areas and
lift off the rest, leaving you with a pretty convincing sheet of safety glass.
You can use this same technique for engraved text or decorative details too,
and with a bit of effort I’m sure you could make glass that looked cracked and
broken as well!

Wiping off the acrylic can be a little hit or miss, and I
did have to go in again with a fine brush to fix a few areas that didn’t take
the paint well. Even with the best will in the world, the finish wasn’t
perfect, but that actually paid off well as it gave the glass that kind of dirt
and dust covered look all stable windows have. Later on in the build, I sponged on a thin layer of Mod Podge which gave it a really nice cloudy effect, like it was caked with dust from years of mucking out.

To finish it off I made a little windowsill out of scrap
wood (stained with diluted acrylic/Mod Podge) and glued it into place. I
purposefully made it with an inset part so it would sit snugly inside the
window, and left space on the outside for the frame to sit upon. The frame itself was made from stained balsa wood I superglued together, then glued directly onto the windowpane with Bostik
glue.


This stuff gets everywhere so it ended up a little messy in places
unfortunately. I added in a little divider ¾ of the way up for a bit of detail,
then trimmed the clear plastic to size before gluing it directly onto the wall.
Out of all the things I made for this stable, the windows are probably my very
favourite part.


Day 10. Floor time!
My initial plan for the day was to go to Hobbycraft for supplies, but that unfortunately fell through which
really threw me off. I had intended to buy some specific
materials for making the roof but with that not being an option, instead
I concentrated on the flooring. I used up my last two sheets of Foamex for
this, cutting them to fit snugly inside each stable, with notches cut out of
the corners to accommodate the support beams. This part was surprisingly
fraught, as getting the Foamex to behave was harder than I anticipated. I
imagined that cutting the floors would be easy, as all I’d need to do was measure
3mm in on all sides (the width of the walls) and mark where the balsa wood
corner supports were, however, with all the faffing around with the heatgun
during the painting process, the walls were all warped so it wasn’t quite so
easy to measure. I cut out some foamboard templates first to check it fitted
correctly, then did the same on the Foamex once I was sure they were the right
size.


I wanted the floors of the stables to look really weathered
and stained, like they’d been used for decades. I knew I wanted rubber matting
and some proper bedding on top, but I also wanted the actual base to look good
even without the comfy layers.
I made another wee tutorial video on how I painted the
concrete –
Basically, I mixed black acrylic into gesso with a wee touch
of brown, roughly smeared it onto the surface, then dabbed at it with a sponge
to give it a little texture. Once dry, I gave it the ‘ol Mod Podge treatment and
when that dried I went in with chalk pastels around the edges and at random for
some imbedded grime.


Concrete can be tricky to get right but add enough grime
and it’ll look great! Don’t bother using your good brushes for this, you’ll
need to really smoosh in the pigments, so it’s best to use brushes that are
well past their best. Once done, I added yet another layer of Mod Podge with a
sponge. For some random stains, I used a wash of diluted acrylic paint and just
dripped and sponged it on and allowed it to dry. For the ‘haloed’ stains, I let the edges dry
by blasting the puddles with a heat gun then soaked the excess liquid up with a
sponge. (Yes, I used the heat gun again, I didn’t learn my lesson, and yes, the
floors warped too! I tried to fix it by heating them afterwards and then
leaving heavy objects on them overnight but they’re still a bit squint. Le
sigh.)
Day 11.
Today was the day for making door furniture. (and yes, that’s a real term!)
I knew I wanted fancy
cast iron hinges for my stable doors, and there are many available in 1/12th
scale, but they also come with something of a price tag and well, you know me,
I’m cheap! 😂 Why spend money when I could just make my
own? So, instead I bought a set of small brass hinges off eBay, then made some
extensions from black styrene which I stuck them onto with epoxy glue.


Once
fully cured, nails/rivets were made using a scrapbooking glue/effect gel called ‘3D Pearl Effects’ by Dovecraft. I’m not entirely sure what it is
exactly, but it’s great for adding raised details like this. It would be ideal
for adding leading to faux stained glass windows for instance. I then prepped
them for painting with spray primer, painted them with black acrylic and
finished them off with some brushed on graphite dust for a subtle metallic
sheen before sealing with good old Mod Podge. The hinges are fully functional
and just needed to be glued to the doors and doorframes.
(Just FYI, when installing these I accidentally glued one on
squint so every time I opened the door one hinge kept getting loose and
breaking off – take your time when attaching them and be mindful of how the
doors open so you aren’t putting the hinges under extra strain)
Day 12.
I made a couple of kick bolts for the bottom of the doors
out of more styrene. Each piece was cut out and sanded to shape, then joined
together with Plastic Weld. They were also given rivets, paint and the graphite
treatment afterwards. Sewing pins were cut to size to provide the mechanism and
would be glued into the door when it was time to install them.


Here’s another little tutorial showing exactly what I just
described here
I also weathered the interior walls of the stable - it got a
little wild in places so I‘ll just say there’s been a bad case of damp that
hasn’t been dealt with in a few years. 😂
Most of this was achieved by the liberal
application of pastel dust and washes being dripped from the top of the wall,
then the excess was sponged off, so you were left with a subtle stain rather
than a really obvious paint drip. At some point I realised that spraying the
drips with water helped to randomise the effect, so I went a little overboard
on that.


It looked subtle to begin with, but then
one wall ended up more grimy than the others making the rest look a bit off, so
I added more grime and then it just looked terrible. I actually had to wipe off
most of the paint on a couple of them and start again several times until I was
finally happy with it. Of course, true to form the best walls are the inside of
the front, which you don’t normally see!
I also added in some wall panels –
I’ve seen some real life stables with unpainted wood or chipboard panelling, others with rubber
matting, and I quite liked the look of the latter. Unfortunately, I was out of
black craft foam, so I had to paint some green and purple sheets instead. The
stuff I had was very cheap and very thin, so I had to touch it up in a few
places when I knocked the walls and put dents in them. (We’ll just say one of
the horses had a hissy fit over not being fed right that instant!)
Once painted they were given a coat of
Mod Podge (because let’s face it, what ISN’T covered in Mod Podge at this
stage?!) and then glued into place on the walls. After all the weathering I
sealed it with yet more Mod Podge, then threw on a little of the bedding
material* as in my experience that stuff gets everywhere. Rather than just
sprinkling it on, I made a point of kind of throwing it upwards, to emulate the
action of tossing shavings up against the wall to form the banks of a deep bed.
I even added some to the corners of the window and along the edges of the mats
and the corner supports where it would naturally accumulate. (*a free sample of real horse bedding I sent off for
years ago, I can’t remember the name, but it came in pellet form which you
soaked and then let dry. It’s wood based I think and smells really nice!)

I worried that it looked a little stark
with the light shavings against the black mats, so once it had all dried
nicely, I went back in with my trusty homemade washes to tone it down and add
in a few obligatory poo stains here and there with some dry-brushed acrylic.
The bottom of the corner beams also got in on that, which pulled everything
together really well.
With the doors in place , the stables nearly looked finished, and I had great fun setting them up temporarily to see how they'd look. The corner alignment wasn't my original plan, as I'd need to make a completely different roof structure, but I really liked how they looked in this format, and for photos it would be easy enough to shoot from low enough or crop it so that the roof couldn't be seen anyway.
One of the reasons I made two individual stables like this was so I could do things like this, and with a little creative photoshopping and accessorising, could make it look like a full row of stables!


The doors got metal anti-chew
strips added on at some point as well. They’re just made from very thin silver card (I actually sanded and carefully peeled most of the backing off so they'd mould to the shape of the doors easier) and were glued
into place with a little bit of paint for weathering. I accidentally glued them
on a little squint which wasn’t ideal so we’ll just have to imagine that their
local carpenter is just as bad at measuring things as I am!


Day 13.
This was a weird one. Outside of the challenge my luck was terrible.
This was a weird one. Outside of the challenge my luck was terrible.

Then on my way back I tripped
over nothing and decked it right in the middle of the road!

I got a huge
graze on my left knee and a limp for my trouble - clearly I shouldn’t leave my
house, the outside world is too dangerous! 😂
Challenge-wise I fared much better as I made a pair of working bolts/latches for the doors! They're mostly made from styrene with a bent piece of paper clip for the bolt, but the tunnel like sections it slides into are made from cereal box card that were strengthened and stiffened with superglue. The actual bolt part was meant to be black to match the rest, but I couldn’t find an easy way to change the colour of the wire without it rubbing off and I had no plastic-coated paperclips in black, so it looks a little odd. I'll replace them eventually if I come across some the right colour.
I also added some green flock to the walls for some nice 3D
moss, and while I know everyone loved how wild I went with it last year, I
tried to be a little more subtle this time around. The colour of the flock
helped too - I had to buy more as I’d used up all my green last time, and the new
stuff was a much more muted and natural colour than the extremely vibrant shade
of before. I found it on eBay, sold for use in ‘velvet manicures’ which frankly
look terrible and incredibly impractical, but it’s a cheap source for modelmaking
supplies so I can’t really complain!
To ‘grow’ the moss, I applied Mod Podge in all the areas I
felt it would be likely to accumulate– in the recesses of the grout lines and at the
bottom of the walls in particular – then sprinkled on the flock. By itself it
looks ok, but close up you can see the fibres which don’t look all that
natural, so next I smooshed more Mod Podge into it with a paintbrush, so it
formed clumps instead of just being loose fibres. This also has the advantage
that it gives you rather a lot of control over it, so you can pick up clumps
and move them around to your liking.


The end of this build was very much in sight, I just needed
to make the roof and add a few accessories and it would be ready for a
photoshoot! I’d naively hoped I’d have been finished by the 14-day mark, but
alas, it wasn’t meant to be.
Day 14.
Not my finest hour.
I spent most of the day measuring and cutting foamboard for
the roof but no matter what I did nothing seemed to fit properly. I initially
wanted to use foamboard because it was easy, but concluded it was too light and
fragile, so then I thought I’d just use it for templates and make the actual
roof out of more Foamex or balsa wood. That was all well and good, but I was
now lacking in both of those things.
The real stickler was less about the structure and more the
aesthetics.
Years ago, I went to Hobbycraft and found some amazing,
corrugated craft foam which I thought would be perfect for the top layer of the
roof. It’s thicker and glossier than your average craft foam
and I assumed I’d be able to find it online somewhere but apparently, it’s a
Hobbycraft exclusive, and they were out of the black variety on their website. I
had a few scraps left from what I’d bought back then, but nothing like what I’d
need for the stables. I did have some corrugated card in my stash, but I had my
heart set on the foam by this point and that stuff just wasn’t going to cut it.
My nearest Hobbycraft is around fourteen miles away and I planned on going in to
get some, but as I can’t drive and I’m trying to avoid public transport as much
as I can these days thanks to the current situation, I was entirely reliant on
my dad providing transportation. His health hasn’t been the best recently, with
a lot of referred pain in his side so some days he really doesn’t want to drive
which is completely understandable. Still, it was frustrating when we’d
arranged a specific day to go and I’d got myself all hyped up for it, only to
be told that morning that we’d have to postpone.
I was at a real loss as to
what to do with myself – I had no supplies for the roof so I couldn’t start on
that, and while I did make a couple of tiny accessories (tie up rings and
bridle hooks) it didn’t scratch the itch to create and put me in a really bad
mood all afternoon.

First world problems I know, and I also know it sounds
ridiculous and petty to be so put out by one bad day when for the last thirteen I’d
made huge progress, but whenever I hit a problem like this, one I can’t solve
without external help or resources, I always get incredibly demotivated. I
could feel my enthusiasm for the project beginning to slip, something I knew
was unfortunately inevitable because that’s just how my brain works.
Once I get started on a project like this I go into hyper
focus; I can literally sit making things for twelve hours and it feels like
two. Sometimes I’ll be so engrossed in the details I’ll suddenly realise it’s
4am and I haven’t left my desk since 7pm.
It’s not always healthy, but gods, when I’m in the zone I
get shit done.
It’s one of the things that’s made me pursue an ADHD
diagnosis in the last few months – it’s great when it works in my favour, but
the rest of the time it’s a curse.
This project has been a rarity for me in that I’ve actually
had a pretty decent plan of how everything was supposed to go, and until this
point, it had all gone smoothly. The roof was meant to be something pretty
simple I could easily put together in one day, but it soon became the absolute
bane of my existence and started making me resent the entire project.
Day 15.
I *finally* made it to Hobbycraft, so I was able to get all
the black textured foam I could ever need for my stable roof! (I think I spent a tenner
on that alone! lol) I also picked up another ‘waffle’ textured type which
unfortunately didn’t come in black, but I thought had potential for rubber
floor matting once painted. (I can’t remember when I did it, but I cut them
down to size then painted them with a mixture of black paint and Mod Podge which turned out great!)
Day 16.
I was in a really weird mood all day.
At first, I was
excited to continue with the stable as I’d finally managed to buy the
corrugated foam I needed. I continued with the foamboard roof structure I
started a few days before, but it just wasn’t working, and I knew it wasn’t
going to no matter what I did. It was the wrong material for a start, I needed
something much sturdier, and I just couldn’t get it to sit evenly. My good mood
evaporated instantly, and my motivation hit rock bottom. I spent the day tiding
my room instead, and ordered up some more Foamex, as well as some styrene
strips and tubing I could use for guttering. 4D Modelshop is very speedy when
it comes to deliveries, so I knew I wouldn’t have to wait more than a couple of
days, and yet, not being able to start on things was aggravating.
The annoying thing is that I knew this would happen. This is
just how my brain works; I throw myself headfirst into projects, no breaks, no
coming back to things after a few weeks off, it’s either hyperfocus or complete
disinterest, and that’s exactly what was happening. I hate it.
I was SO close to finishing, yet I sat at my desk that
evening just…not doing anything, and it was beyond frustrating. I knew the
challenge wasn’t a competition and there was no issue or penalty if I didn’t
finish it within the month, but I *wanted* to, mostly for my own sanity, and
the fact I had other projects I wanted to do that month. Of course, I could have
just put the stable stuff to one side for a few days and got back to it later,
that would be logical, but again, that’s not how my brain works. If I’d done that,
I could pretty much guarantee I’d be immediately distracted by 1/6th stuff
again and wouldn’t be able to go back to the stable. Ugh.
The next few days seemed to stretch on forever. I continued
my catchup binge of Grey’s Anatomy, something which cheered me up. (That was until I got
to S16 Ep16, and genuinely felt angry about it for the rest of the evening.
Talk about doing a character dirty! >:( I was actually raging.)
I got my Covid
booster shortly afterwards and aside from a bit of a sore arm, had no side
effects at all so that was something positive to come out of it all.
One of the days I realised I really wasn’t doing great mentally,
and wasn’t allowing myself to take a break, even when I couldn’t physically
make anything for the stable. It was like I was subconsciously punishing myself
for not achieving something, and I came to the horrible realisation that I do
this all the time. Not having a job means that for the most part I have no
structure in my life, and as I’m in the comfortable position of living at home
with my parents, I can afford to dedicate most of my time to my hobbies, but as
a result I often feel like I need to be doing something productive to make the
best use of my time or I’m just being lazy. That’s all right in principle, but,
it’s actually really harmful for me mentally, and while it’s not a comfortable
thing to have to confront, I’m really glad that this project has made me do it.
I often put off watching films or TV shows I want to watch because I feel I could
be doing something more important, and honestly its exhausting. So, that day I
just got myself comfy in bed and watched Disney films all day long and it was
GREAT. I really need to allocate myself a day each week where I can just do
that without feeling guilty for y’know, having some fun.
(I say that like I don’t enjoy making things, which of
course I do, but I put so much pressure on myself after a while projects become
more about getting them finished than enjoying the process)
ANYWAY,
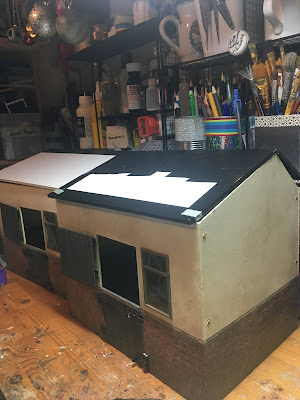
I fiddled with the roof design a bit more until the Foamex arrived
and decided that the front walls looked too tall when viewed from actual 1/12th
scale person height. To counter that I
glued a couple of strips of thin wood at the top which broke up the uniformity
and gave it a more interesting profile.
Rather than making one big roof piece which would be harder
to store, I intended on making two – one large part for the front with an overhang, and a smaller, narrower
piece for the shorter and more steeply angled back and maybe some kind of decorative
strip to join the two together at the top. I toyed with the idea of adding a
proper hinge in the middle but frankly that was a step too far!
Once I'd double and triple measured everything, I cut the Foamex to size and then clad the
interior with wooden beams and planks - one 3mm in from each side and a thicker
one at the front so it would slot in snugly against the side walls and butt up
against the front wall, holding it in place, with the opposite for the back
part. This explanation isn't all that coherent, but I hope you can see what I mean with the photos of the finished roof. I was in such a foul mood throughout this whole process that I didn't take any photos of it in progress!
The top part in this shot is of the front of the stable, with the black part being the underside of the overhang. The horizontal piece below it is what presses up against the front wall.

Here it is at an angle so you can see what I mean.

Clearly, I’m a glutton for punishment because I also decided to add some windows in at this point!
They had been in my mental initial design, but I
hadn’t really settled on whether to actually add them or not, assuming that by this
point I’d have rigged up some kind of LED lighting system like I did last year.
Mentally I was absolutely not in the mood for that level of faff, so windows it
was! I chose to put them in the back of the roof, so they’d let light in and also because I
preferred the look of the stables from the front with a solid structure.
Once the Foamex arrived, I measured and cut two windows out
of each of the back sections, then glued in the wooden beams I fashioned from coffee
stirrers. I don’t drink coffee, but any time I’m in a café I always snaffle a
handful of the stirring sticks because I figure that I’ll at least get some practical
use out of them rather than have them chucked in the bin after one short bath
in a coffee cup! I used up most of my stash during this project so I’m going to
need to eat out more often apparently.

I repeated the
process to make sure everything fitted. During that time one of the side walls
decided to fall down a few times so I had to revisit the pegs to make sure they
fitted more securely so everything lined up. Once it all fitted nicely, or as
close to nicely as I could manage, anyway, I painted the interior with a thick coat of gesso, then more of
the creamy magnolia colour to match the walls, then finally, the beams with diluted
acrylic to stain them. I neglected to weather this part which I regret, as now
we have really manky walls and a nice shiny clean ceiling, but frankly, by this
point I never wanted to see another roof in my life, so I was simply happy to
get it done!


I painted the inside edges of the window to match the wood
surrounds – I did intend on cladding them with more coffee stirrers but,
y’know, effort, so paint had to suffice. The windows themselves were
significantly simpler than the ones at the front of the stable, just a
rectangle of transparent plastic a cm or so wider than the cut out. I glued it
directly to the back of the roof with Bostik and moved on to the final layer - the fancy foam I'd been freaking out over.
It was at this moment I realised I fucked up.
I still needed to cut holes in the corrugated foam to
account for the windows and had intended on using the Foamex part like a
stencil, so all I needed to do was line them up and draw inside the window frame
for accuracy. With them now blocked off with ‘glass’ I couldn’t do that, so
instead I grumbled to myself for half an hour as I did some measuring. It was
lucky that I’d bought extra foam sheets as I managed to cut one
catastrophically wrong! Finally, I had matching roof parts so I glued them onto
the Foamex, sandwiching the windowpane between them. By some fluke I managed to
do so just as my last tube of glue ran out!
I was so tempted to call it done at this point, but there
was one final thing I needed and that was guttering. When I started designing
the stables, I purposefully made two individual ones that combined to make a
double stable block. As everything
was made at the same time to the same measurements, they should have sat flush
with no gaps, but alas, my overreliance on the heat gun led to warping, and no
matter how many nights I left the walls weighed flat with heavy bottles and
books, they refused to stay as vertical as they once were, so there was now a
small but noticeable gap in-between the buildings.
A gutter was one of the things I’d planned to add anyway, as
even if the gap hadn’t been huge, there would still have been an obvious line there,
so I wanted something there to disguise it. Like many aspects of this project,
what should have been quite simple turned out to be incredibly frustrating, but
thankfully it all worked out in the end.
I really wanted some round guttering, but I didn’t have any
way to cut a styrene tube in half cleanly, and I couldn’t find any moulding or
half pipe in the right thickness, so I ended up getting some 6.4 x 4.8 ‘deep channel’ styrene rod from 4D.
I should probably have got the next size up, but it worked well enough. I
chopped up some 7.9mm styrene tube and reattached it at different angles using
Plastic Weld for the downpipe.
I’ve never been particularly good at working out
angles and mitre joints are horrible, so I did a lot of googling which only
made things worse as almost every guide to cutting mitres I could find involved
lots of geometry and actual mathematical equations. In the end I just said, ‘fuck that’ and
just did it by eye. It’s wonky and no plumber would dare endorse it, but there
we are, it does the job.

The downpipe ended up a little too short, so rather than
take it apart or try to extend it, I simply made a little raised drainage grate
from some of the leftover Foamex and a scrap of plastic mesh. I painted it to
look like concrete and had great fun adding lots of moss and even some static
grass to give the impression that it sees a lot of use. I added some clear
gloss nail polish to both it and the bottom of the pipe for that ‘just rained’
look. It isn’t attached to anything, just a loose prop, so I’ll need to be
careful it doesn’t get lost.
Real drainpipes have clips
holding them in place, but I couldn’t do that here as I’d need both stable
fronts to be attached as the clips go on either side, and that was my whole
reason for putting in a drainpipe! Instead, I decided to make the hopper/running
outlet (guess who’s been googling guttering terminology?) at the top of the
downpipe, cut notches in the sides and then, once the gutters were attached to
the roof parts, they would slot into the hopper and gravity/physics/the sheer
weight of my expectation would hold the downpipe in position without glue. I used
a piece of plastic armature joint I had knocking around for said hopper, and
while it doesn’t look much like the real ones, it’s good enough for me.


I added a strip of wood on the overhang of the roof to attach the guttering to, then sanded it and painted both it, the gutter, and the downpipe with a mixture of acrylic paint, talcum powder and a wee bit of the old faithful Mod Podge. Adding talcum powder gives the acrylics some body, so it’s great for filling in any uneven surfaces, and it also gives a nice subtle matte texture as well. (a handy hint for if you have any overly glossy paint!) I went over it all with a bit of graphite powder too, then more Mod Podge. In hindsight I shouldn’t have done any of that as most guttering these days is matte plastic with no metallic sheen but who cares, in my tiny world all gutters look like this, ok?!
Considering I was pretty much making this up as I went along
whilst running on empty as far as my creative juices were concerned, I was
surprised by just how well it turned out.
Well, until I went to fit everything together and suddenly
realised to my horror that the front roof pieces no longer matched, and therefore
the guttering didn’t either.

I honestly wanted to chuck the entire thing out of the
window, I was just so done.
I’d measured and double checked everything, why wasn’t it
fitting when it did perfectly five minutes ago?! Was it the wooden supports on
the inside? Was one of them squint? Perhaps I should rip them out and put new
ones in, maybe the foam was misaligned, maybe…
Oh.
Maybe, I’d simply picked up the left hand roof piece and put it
on the right hand stable - the wrong stable.
FML. It’s always the simplest mistakes that hurt the most.
All along I’d been incredibly careful about this because, as
I said earlier, while they were both made to the same measurements, there was
still some irregularity thanks to the warping and individual material
thicknesses etc. For that reason, every wall and floor and roof part has a
little bit of coloured sharpie drawn along one edge – blue for the left stable,
red for the right. I had marked the roof parts accordingly but evidently not
well enough!
With that crisis now over, I added a few final details here
and there; touched up the paintwork in places, and then, suddenly,
incredibly…it was done.
Day 23 - FINISHED!
The stables were finally complete!


I’m so, so pleased with them, even if I was kind of sick of the sight of them by the end, lol.
I photographed and filmed most of the process with the
intention of both this blog post and hopefully a future youtube video, though I
skipped the roof for the most part as it was being problematic and I didn’t
want to waste time faffing about with camera angles when I could spend it
actually making it work!
I’ll put all the shiny photos in the following blog post as
this one has gone on long enough and it’s much easier to just look at the
pictures of happy ponies in comfy stables than scroll past all this nonsense.
I stressed myself out so much this month and I don’t think
I’ll be trying something quite this ambitious next year for the sake of my
sanity! I’m my own worst enemy with projects like these – once I’ve committed to
starting something, I need to keep going or I’ll completely lose motivation,
which is why setbacks like the roof hit so hard, they interrupted my flow and
once that’s gone it’s incredibly difficult to bring back. I’m just so glad it
happened towards the end rather than the beginning as it would have been a lot
harder to keep going in that case. Hobbies are fantastic for your mental
health, but sometimes there comes a point where you need to prioritise, and I learned
a lot about myself throughout this whole process which has been really
enlightening.
I daren’t think about just how many hours I’ve spent on it
in total - I know for a fact there were days when I didn’t leave my desk for
five to eight hours at a time - but despite all the stress I think it was 100%
worth it, they truly are the stables I’ve been wanting to play with for years,
and while right now I’m pretty burnt out and need a break from them, I know I’m
going to have a lot of fun in the future setting up scenes and taking photos.
Because they can be disassembled so easily it means I can finally take stables
with me to shows too, so I might actually have a chance at winning the scene
classes!
If you’ve been following the progress of this on Instagram
or somehow managed to get through this absolutely gargantuan blog post (which,
as I type has gone well over ten thousand words, yikes) thank you for coming
along for the ride! As I said, I hope to edit together a proper video tutorial
thing for YouTube at some point, but don’t hold your breath, I’m still procrastinating
on doing one for my NaMoPaiMo pony from 2018!
Tl;dr - In which I stressed myself out to a huge degree but somehow made a stable block out of it.
No comments:
Post a Comment