
Saturday, 29 September 2012
Bird's Eye View
My room was a total mess so I spent most of my time in bed playing Skyrim and hunting around for the tissues! I'm feeling better but I'm still pretty contagious so keep your distance!
In the meantime, I had an odd craving to make some new yard animals. So, armed with my trusty iPhone for photo reference and a pile of sculpey, I got to work...

The first batch were really simplistic and lacked beaks...


...but the rest turned out pretty well!
As they were so small I just used the heat-gun on them rather than stick them in the oven, hence the rather fetching burn patterns they're modelling here.
Before I painted them I realised I'd need somewhere for them to go, somewhere I could photograph them that would tie into my little yard and then it hit me - a bird table!


That one is from my grandpa's garden and yes, a pair of pheasants is next on the agenda!
 I really liked the rustic style of it and having hooks on the side really opened up the possibilities of adding more feeders to it, thus making it far more interesting.
 In fact, a feeder was the first thing I actually made but I'll get to that one later...
I had some very thin wood veneer in one of my drawers (from cheese packaging of all things, lol) which would be perfect for the roof and an assortment of coffee stirrers and dowelling.
I found this piece in the same drawer and while I still have no idea where it came from, it proved to be the perfect size for the main table part.
I made holes in the sides with a thumb-tack and the hooks out of some fine wire I found on the floor at college the other day. (recycling ftw!)

The roof was a bit problematic to begin with as by this point I realised that I'd left all my measuring things at college so I was going to have to guesstimate everything. In the end this resulted in a seriously wonky looking structure which I easily worked around in EAE canon by saying that David built it. :P
The main part is two triangles of thin wood doublesided onto some card with a wooden rod in the middle. The 'shingles' were roughly cut out and glued on afterwards.
Pretty much everything was guesstimated and I had no idea if it would all fit together in the end!


Luckily for me, it did!
This photo is really rather flattering as it hides the exceptionally squint roof section and the fact that one of the legs doesn't actually touch the ground properly...
I went over it with a couple of washes to bring out the grain and make it look less like I'd made it out of scraps which worked an absolute treat! A couple of layers of matte varnish later it looked like this!


Now, back to the birds...
 I didn't have anything in particular in mind when I made some of them but there were a couple I modelled specifically on particular birds. Out of the lot, this little guy is my favourite.
The Blue Tit (Cyanistes caeruleus or Parus caeruleus)
He was a right pain to paint as he's so small but I think he was worth the effort.
I also made a male Chaffinch (Fringilla coelebs)

A Dunnock, (Prunella modularis)

...a Yellowhammer (Emberiza citrinella)
(called Thor, lol)

...a House Sparrow (Passer domesticus)
The suet feeder was made from some fine mesh filled with painted sponge.

...a rather svelte Wood Pigeon (Columba palumbus)

and a Greenfinch (Carduelis chloris) who turned out too small!

You can see my favourite feeder in that photo too. It was actually the first thing I made - even before the birds!
I'll do a tutorial for it if anyone's interested but it's pretty self evident what it's made from - a clear plastic drinking straw, wire, very fine grit and cork for the seeds and some card for the lid.
Here it is with a penny for scale.

I also made some half coconuts out of sculpey which were painted and then decorated with some of the spare seedmix from the feeder.

I thought it would be nice if it were set up beside the yard's feedroom/shed along with all the other wild animals that visit the yard on a regular basis. I made everything other than the rabbits (although I did paint them) and the shed, which my dad made. (actually for my mum but she doesn't like modern miniatures so I stole it. XD)

The flying bird at the bottom is a Starling but he doesn't photograph well, alas. I made Noel the Fieldfare and Mrs B the Blackbird years ago, as well as Corwin the Raven up on the roof.The rest of the birds haven't been named yet so post your ideas in the comments if you like. :D
Hopefully these won't be the last additions to the EAE menagerie - I've got plenty of ideas but suggestions are always welcomed!
EG out!
Friday, 21 September 2012
Fossils of the Future - FINISHED!
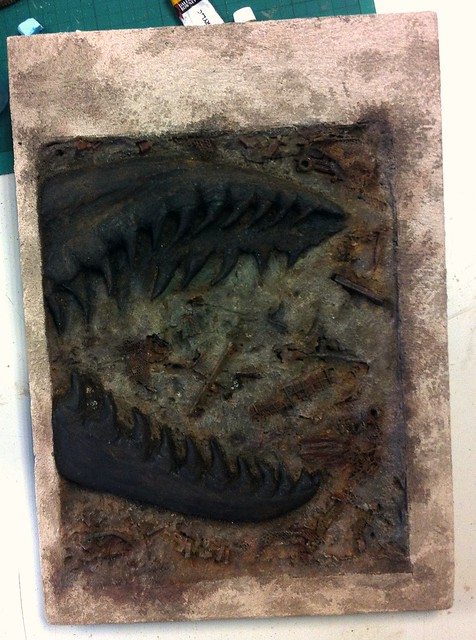
The last time you lot saw my fossil it looked like this:

We only had this week to finish everything which was plenty of time I thought as I was well ahead and just needed to do a little more detailing on everything and then do the text at the top.
The best laid plans and all that, however, were suddenly ruined by the onset of the most horrific headcold which took root at the beginning of the week and was so bad on Tuesday that I had to miss college, thus, leaving me with a lot more work to catch up with than I'd originally anticipated!
First things first, I painted the actual fossilised parts a very dark brown-black so that it'd blend in with everyone else's work. I intended to go over it at the end with a light coat of PVA to give it a very slight shine but I ended up not having enough time.
The main surface wasn't right so I went over it a few times with a series of different paints so it'd lose the rust colour which worked well on the buried artefacts but not on the actual dirt stuff! I added in some plaster dust and fine sand as well to vary the texture even more. I may have gone a little OTT with the dirty washes on the surrounding stone as everyone else's stuff was pretty plain but meh, I like it. :P

I missed all of Tuesday so the following day was insanely important as we now only had the afternoon to finish the lot! This was made even more of a rush as we spent the morning listening to a talk about the only course in the UK to offer a degree in this field of study. -link- It was very interesting and definitely something to think about for the future. (even though it's insanely expensive and is way down south so I'd have to leave home and that's something I'm absolutely terrified of doing!)
Anyway, so yes, that rather stymied the idea of using the morning to catch up and as I was still horrendously choked up with the cold, I found myself using it as an excuse constantly.
'Could someone pass me that paint over please?'
'Can't you reach it yourself?'
'aksdgjsaiudhgiudfghafduihg I've got a COLD!'
Yes, well ANYWAY, the next thing to accomplish was the text at the top of the panel. We'd all decided on a phrase/statementy thing and had each been allocated words. The original idea was to each come up with a subtitle that related to your word/s and have it at the bottom so each panel could work as a standalone piece as well as part of a bigger installation but they'd obviously run out of time as only a couple of people had done so by Wednesday.
My words were 'First On' (not the easiest thing to come up with a subtitle for anyway) and I had yet to settle on a font! After much muddling, I finally came up with this.
Once designed, it was traced (onto tracing paper funnily enough) and then transferred onto the piece by gently scoring into the foam with a scalpel. I overdid it a couple of times - partly because I'd never done it before and well, I was in a rush, I'll admit it.
After a tense moment when I unstuck the paper expecting loads of sections I'd missed out I was relived to see this instead:

 However, if I thought the worst was over I was very sadly mistaken. We were to carve out the letters like they were stone, with the cuts done at a 45° angle like this.
<--------
Alas, blue foam is a lot easier to cut than real stone and as a result my first few letters are pretty rubbish looking.

Everyone else's was really neat but then, they'd had Tuesday. :P
We laid them all out (mine still needing the letters painted) and it wasn't until then that we noticed the monumental communications breakdown.

It should have read -
While everyone else started to get the backing panel sorted out, I rushed off to fill in my text - literally finishing it just as everything was being stuck down - talk about 11th hour! XD


So yes, it's finished! If I could do it again there are a few things I'd do differently in terms of finishwork and whatnot but I can't really complain - we got a LOT done in six days. :D
EG out!

We only had this week to finish everything which was plenty of time I thought as I was well ahead and just needed to do a little more detailing on everything and then do the text at the top.
The best laid plans and all that, however, were suddenly ruined by the onset of the most horrific headcold which took root at the beginning of the week and was so bad on Tuesday that I had to miss college, thus, leaving me with a lot more work to catch up with than I'd originally anticipated!
First things first, I painted the actual fossilised parts a very dark brown-black so that it'd blend in with everyone else's work. I intended to go over it at the end with a light coat of PVA to give it a very slight shine but I ended up not having enough time.
The main surface wasn't right so I went over it a few times with a series of different paints so it'd lose the rust colour which worked well on the buried artefacts but not on the actual dirt stuff! I added in some plaster dust and fine sand as well to vary the texture even more. I may have gone a little OTT with the dirty washes on the surrounding stone as everyone else's stuff was pretty plain but meh, I like it. :P
I missed all of Tuesday so the following day was insanely important as we now only had the afternoon to finish the lot! This was made even more of a rush as we spent the morning listening to a talk about the only course in the UK to offer a degree in this field of study. -link- It was very interesting and definitely something to think about for the future. (even though it's insanely expensive and is way down south so I'd have to leave home and that's something I'm absolutely terrified of doing!)
Anyway, so yes, that rather stymied the idea of using the morning to catch up and as I was still horrendously choked up with the cold, I found myself using it as an excuse constantly.
| tumblr gifs are ALWAYS appropriate. :P |
'Could someone pass me that paint over please?'
'Can't you reach it yourself?'
'aksdgjsaiudhgiudfghafduihg I've got a COLD!'
Yes, well ANYWAY, the next thing to accomplish was the text at the top of the panel. We'd all decided on a phrase/statementy thing and had each been allocated words. The original idea was to each come up with a subtitle that related to your word/s and have it at the bottom so each panel could work as a standalone piece as well as part of a bigger installation but they'd obviously run out of time as only a couple of people had done so by Wednesday.
My words were 'First On' (not the easiest thing to come up with a subtitle for anyway) and I had yet to settle on a font! After much muddling, I finally came up with this.
 |
| I really love that 'R'. |
Once designed, it was traced (onto tracing paper funnily enough) and then transferred onto the piece by gently scoring into the foam with a scalpel. I overdid it a couple of times - partly because I'd never done it before and well, I was in a rush, I'll admit it.
 |
| Probably the most accurate photo in terms of colour correctness. |
<--------
Alas, blue foam is a lot easier to cut than real stone and as a result my first few letters are pretty rubbish looking.
Everyone else's was really neat but then, they'd had Tuesday. :P
We laid them all out (mine still needing the letters painted) and it wasn't until then that we noticed the monumental communications breakdown.
It should have read -
DRAWN BY WASTE, CREATURES DESCENDED. FEEDING FIRST ON
LANDFILL AND THEN ON HUMAN LIFE, HERE LIE FOSSILISED
LANDFILL AND THEN ON HUMAN LIFE, HERE LIE FOSSILISED
REMAINS OF THE LOST CIVILIZATION FROM THE 21ST CENTURY
However, it had somehow been changed at some point and no one had noticed. XD
While everyone else started to get the backing panel sorted out, I rushed off to fill in my text - literally finishing it just as everything was being stuck down - talk about 11th hour! XD
 |
| I love this photo solely because it looks like John has an eyepatch. XD |
So yes, it's finished! If I could do it again there are a few things I'd do differently in terms of finishwork and whatnot but I can't really complain - we got a LOT done in six days. :D
EG out!
Saturday, 15 September 2012
When is a rock not a rock?

When it isn't actually a rock!
As my next base will be for a gull, I needed some rocks for it to stand on and seeing as real rocks are far too heavy for the purpose, I had to make my own!
Laurence had some latex moulds he'd made of a selection of really nicely textured stones and after a quick 'how to mix plaster' guide (which resulted in one batch rather hilariously going off in a matter of moments after a monumental cockup in water to plaster ratios) I was well on my way to full scale geological production.


Well, after a week or two anyway. Plaster takes ages to go off if it's mixed properly. :P
The following Friday they were decanted from their moulds (one with major difficulty as it had a particularly awkward undercut and we actually had to cut the latex to remove it) and left to dry out for a bit just in case there was any residual moisture still on the surface.


There wasn't, so, last week I set about turning the plain chalky pebbles into something a bird would be proud to stand upon.
 |
| My beloved Hadrian resin still doesn't have a name. :( |
I never make 'recipes' for paint colours so don't expect a list of the types I used. All I remember was that 'Neutral Grey' was my basecoat for two of them and an 'Olive' of some kind made EXCELLENT mossy algae.

 |
| First coat - 'Neutral Grey' |
This was them after their first coat - I faffed about a lot with the two at the back and just went where the paints took me.

I staggered the painting process so that by the time I'd finished a coat on the fourth one, the first one would be ready for the next layer. In this picture above, the one on the left has just had its second coat - a wash of dark grey/brown paint which was patted off with a bit of paper towel so that the colour remained only in the cracks and crevices. I did a few layers of that and built up the patina subtly as there's nothing worse than seeing a fake rock that looks like it's fake!

The purpley one on the top right got a roughly stippled on coat of neutral grey, followed by several washes, while the orange one got a similar treatment with more browns and ochres than grey.
This was one of my favourites purely because of the incredible detail the mould had created.

After a couple of hours they were starting to look much more like rocks and not plaster casts. I could have left them as they were but they still didn't look finished to me. (forgive the oddly coloured photos - my phone likes to mess things up from time to time)

I used the good old fashioned toothbrush technique to add random speckling to each of them which made a remarkable difference in how they looked, texture-wise. This one had perhaps a bit too much but then again, it was the first one I did it to so you had to start somewhere. XD
My favourite rock here had some lighter and darker grey stippled on to break up the monotony as well as the aforementioned toothbrush flicking.

They looked good but something was still lacking - life!
Cue the algae...


As soon as the greeny brown paint went on I knew I'd made the right call. They looked far more used and weathered than before and I was very nearly ready to use the 'finished' word. However, I still reckoned they could do with a bit more planty material.
I really wanted to do some lichen like this...


...but I wasn't entirely sure how. Laurence recommended using painted sawdust so I set about mixing up a big gunky bowl of the stuff with a liberal quantity of PVA to bond it all together.
The results were...ok....ish.

Up close it's still really obviously sawdust but from a distance it isn't too bad.
You'll notice there that I added some seaweed around the base of the rocks. This was the one part of the project that I really wasn't sure about. I haven't actually started to make the base itself but I knew I'd want it to be set on a shoreline/beach kind of thing so seaweed was a must. The only downside was that I didn't have any to hand so it was up to me to cobble something together.
Salvation came in the form of more sawdust and paint, this time mixed with LOADS of PVA and some of the crushed leaves and moss I'd used earlier on the hedgehog base. This gave some really convincing weedy shapes but when I blobbed it onto the rocks themselves I had a horrible, horrible feeling that I'd just ruined a whole day's work.
It didn't look convincing at all. It just looked awful!

That was last week.
This Friday I brought out the olive paint again and phew, it worked a treat!


Finally, finished!

I'm REALLY pleased with how well they've turned out - far better than I ever thought they would, and I cannot wait til next week when I'll hopefully be able to start work on the base itself.
When I actually have some money (I'm painfully skint at the moment) I'm going to invest in some latex so I can make my own moulds. I'd love to make some more rocks for model horse bases and things as well as some speciality props... ;)
To conclude, here's a photo of Barbara blow-drying the Glaucous Gull she and Laurence have been working on for the past few weeks. They'd just given the skin a bath and needed to dry it as quickly and thoroughly as possible to prevent it slipping. (to clarify, this isn't what'd going on my rocks btw - she's just a skin, not to be mounted, I just thought it was suitably bizarre to finish the post with. XD)

EG out!
Subscribe to:
Posts (Atom)