
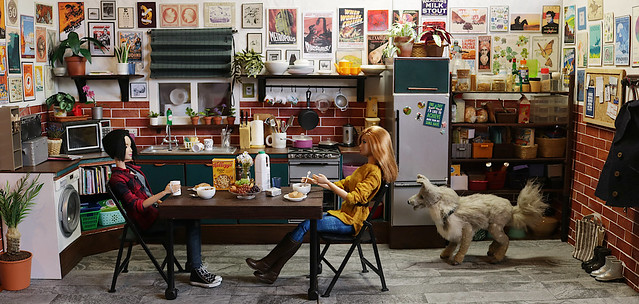
A kitchen for Max and Juno has been top of my list for years, but making such a diorama was going to be tricky thanks to all the appliances and accessories. Luckily you know how much I love a challenge, so I took it on with gusto...
This is going to be a loooooong post with lots of photos so consider yourself warned!
While many of my projects develop over time and kind of on a whim, I really wanted this one to be properly planned out...well, as much as I ever plan anything I suppose. XD
To that end, I drew the most basic of sketches of what I wanted.
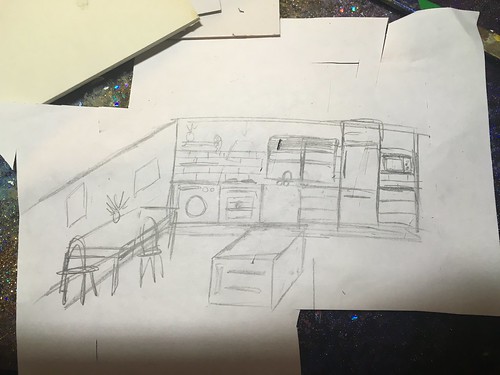
I also made a Pinterest inspiration board which was super useful to tie down colour schemes and styles that I liked.
The priorities were obviously a cooker/oven, fridge and sink, along with a microwave and possibly a washing machine or something along with plenty of shelving. While I could technically make all of these things myself, I really wanted everything to look sleek and professional and I don't exactly have the best track record on that front!
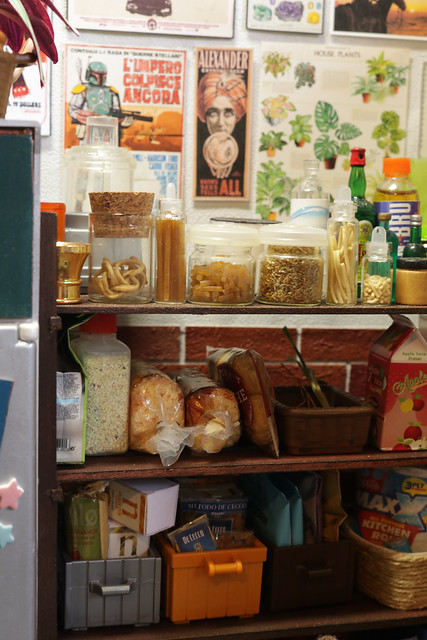
Luckily for me, vintage Sindy kitchen units are both well made and realistic, as well as being plentiful and cheap on ebay, so I bought a handful myself, and was also given some by a very generous friend. (thanks Manda!)
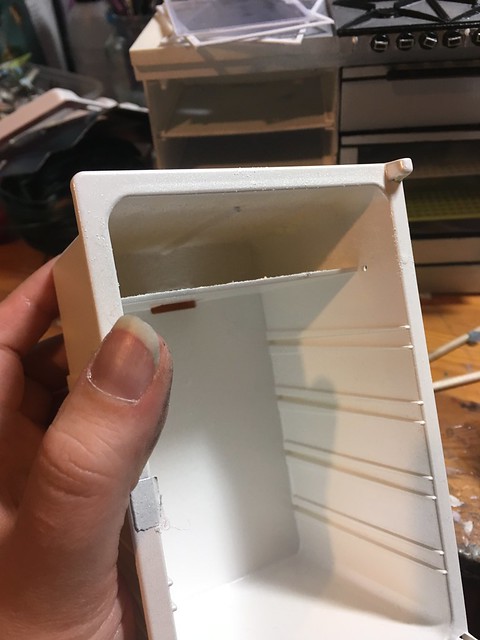
Fridge
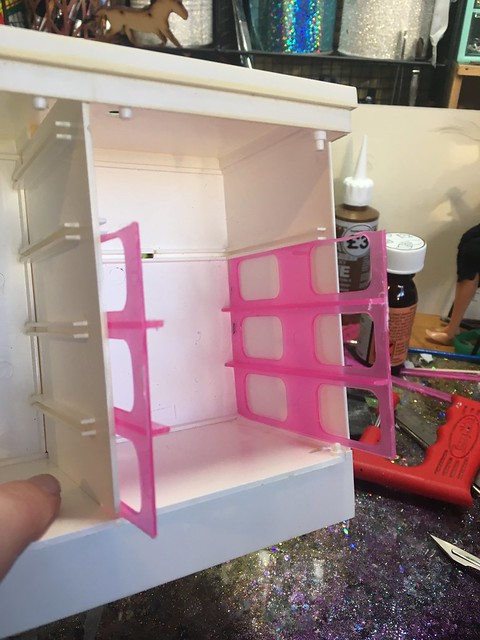
I'd been looking for a fridge for ages, and hadn't had any luck so I decided to just throw in the towel and make my own. I cobbled it together out of foamboard and managed to stuff a cheap set of LED christmas lights in at the back.
It did look like a fridge, especially from the front, once I'd made a door and everything but it just looked...crafty, and not in a good way! Luckily I managed to score a rather sad looking Sindy fridge on ebay, and the homemade one got deconstructed and the foamboard put back in my stash.
The poor thing had definitely seen better days; the door was broken at the hinge, it was covered in old residue where it had presumably been held together with tape for the last forty plus years and once I opened it up, the interior was full of horrible old glue and decidedly shifty looking electrics.

I didn't like the little flip-down bit at the top of the interior part so that came out and after giving everything a thorough clean I got started on the rest. The shelves obviously hadn't survived so I made some new ones from clear plastic and thin styrene strips. The fridge rather unhelpfully narrowed towards the back, so I had to make several templates before cutting out the final pieces.

I gave the whole thing a few coats of primer, then some white spray paint with a final very light coat of pearlescent paint to give it a little sparkle. It's very subtle and doesn't show much in photographs but it looks great in person.
The freezer drawer also got repainted, and I added a few layers of very fine white and clear glitter to simulate ice, which turned out way more effective than I imagined it would. I added some to the top part of the fridge as well which is probably pretty unrealistic as you don't really want your fridge to be literally frozen but never mind, it looks good XD

It looks especially good with a light on!

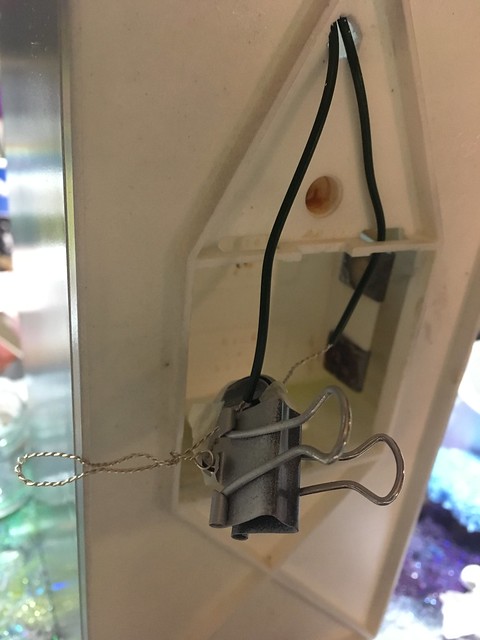
The fact the original had a working light that activated when you opened the door was VERY impressive, especially for the time, and companies today really ought to take notes. Sindy was so ahead of her time when it came to realism! Sadly the passage of time had rendered the lights inoperable, and rather than try to fix it with my complete lack of knowledge, I decided to strip everything out and replace it with a really simple LED.

I'm no great expert at LED circuitry and honestly, I just tend to bodge it every time I use them in a project. I bought a batch of tiny LED lights off ebay a while ago - they run off two tiny batteries and the switch is just a tiny piece of paper that slots between them - I think they were sold as novelty balloon lights or something, because apparently that's a thing.
Anyway, I took the LED bulb out and wrapped thin wire around the 'legs' of it, to extend the contacts, then hitched it up to a larger coin battery instead of the two tiny ones it came with. I wanted the light inside the fridge to be a little more diffused so I made a kind of covering with hot glue for it to sit behind.

Only one 'leg' is taped to the battery and the other has to be clipped onto it to complete the circuit. It's super simple, and while it does mean that I need to pull the fridge out to switch the light on, it's much easier than messing around with soldering and whatnot and it's easy to fix and/or replace if need be.
One of the first things I altered was the doors. The wood panelled look might have been super trendy back in the day, but I really didn't like them. Rather than take them off, I just sanded them as much as I could, lopped the knobs off and used styrene and 'Plastic Weld' to cover up the offending panels.

Pegs and clips come in really handy for this kind of thing!


I made new handles from bamboo skewers and wire and fixed them in place after spray painting the doors silver and repairing the broken hinge with a section of wooden dowel.
I couldn't resist adding a few fridge magnets courtesy of some 3d stickers I had in my sticker stash, and a picture I found online that cracked me up because my dolls have achieved far more than I have, let alone any Sims!

Cooker
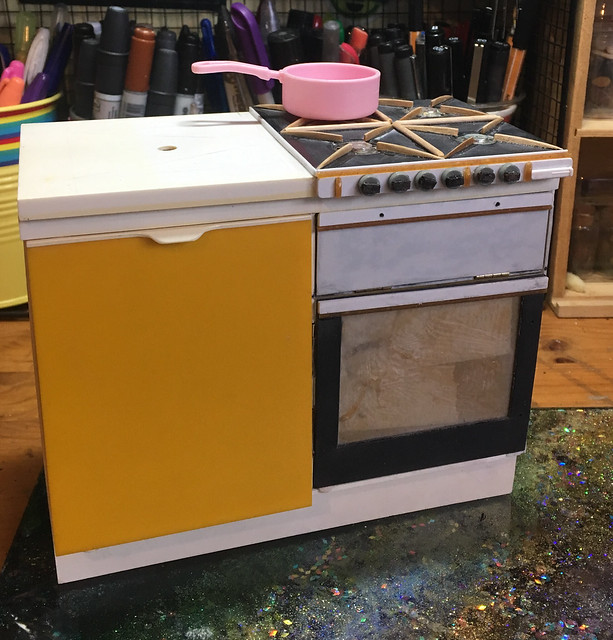
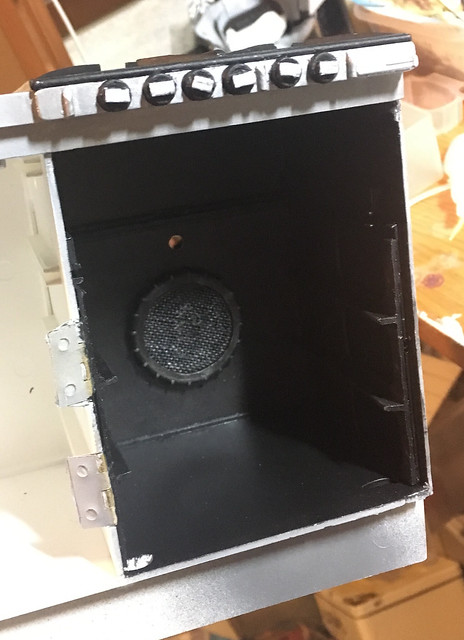
Next up was the cooker. The original Sindy unit had an electric hob on top and cupboards underneath. I'm used to a gas cooker in my own kitchen, so I wanted the same for M&J for familiarity's sake. I also wanted an oven underneath, so some serious work was needed.
First things first, the door was removed, and I used one of the existing shelf supports to make the base for the grill section.

The fan at the back of the oven was fun to make; the end of a spool of thread and a milk bottle lid with the centre cut out and backed with some fine mesh.


I carefully cut notches into the middle section of the unit to attach tiny hinges to so they would sit flush.


I remade the oven door several times as I managed to mangle the measurements and then accidentally gouged a big scrape through the front on another one. It finally came together in the end though, using two layers of black styrene with some clear plastic sandwiched in-between. (I covered it with liquid latex to protect it when I painted the rest)


The handles were plastic cotton buds/qtips with wire.

The oven needed shelves to cook food on, and I found some pieces of plastic in my stash (originally part of one of those cheap daily pill boxes - the ones where all the little boxes are joined together) that would be ideal.

Obviously they were a little big for the space but once cut down and painted they looked great.


The gas hob was also a lot of fun to put together. The original top was easy enough to remove, then I cut a replacement panel out of styrene. I then did some measuring and split the square into four, centring a circle in each. The actual gas burner parts were a good find - metal press studs/snap fasteners. I've got absolutely heaps of them from both grandma's old sewing kits and plenty I've picked up in charity shop sewing bundles, so it was easy to find matching ones in two different sizes.
The pan supports were just flat wooden toothpicks I sanded one side of so they lay flush.


Cut down cocktail sticks provided extra divisions in the middle.

I added new shelves to the non oven side of the unit, just mountboard with of all things, dry spaghetti glued to the front to give it a nice clean finish. I picked that tip up on a modelmaking job a few years ago - it's fragile, but consistent in diameter and can just be snapped to size!

The control knobs were just tiny buttons with equally tiny strips of leather on the top for detailing. In hindsight I should have used something else as they don't look quite as clean as everything else but oh well.

The outside got a few coats of silver spray paint...
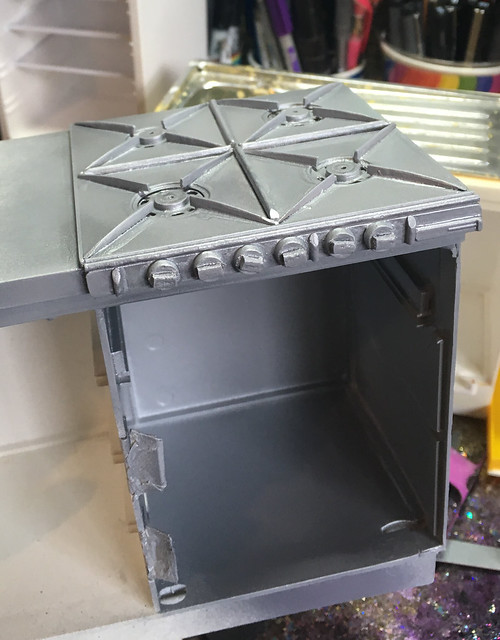
...then I handpainted the interior a matte black with a few metallic highlights here and there.
I didn't do quite enough sanding on the hob, (but let's face it, nobody has a perfectly clean and shiny cooker after prolonged use, so I'm just going to use that as my excuse. XD) but the paintwork helped make it look a bit more finished.

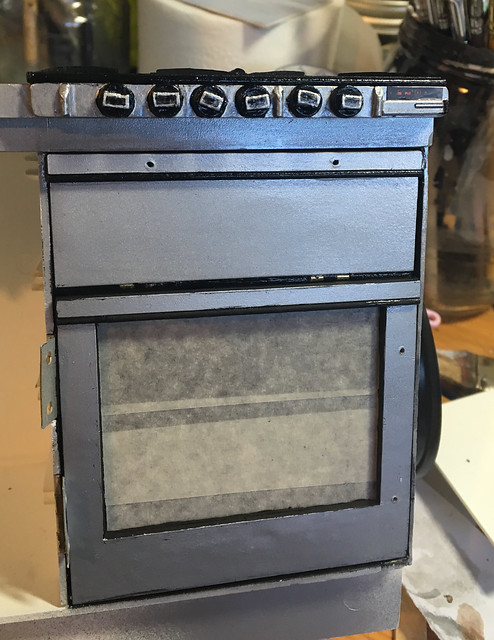
The liquid latex and masking tape I painted on the 'glass' front peeled off easily after I'd finished painting everything.
I stupidly didn't photograph this part, but I cut out a counter top from mountboard and covered it with sticky-back plastic/self adhesive vinyl in a woodgrain pattern, then glued it on. The rest of the unit was primed and painted with a custom mix of acrylics.

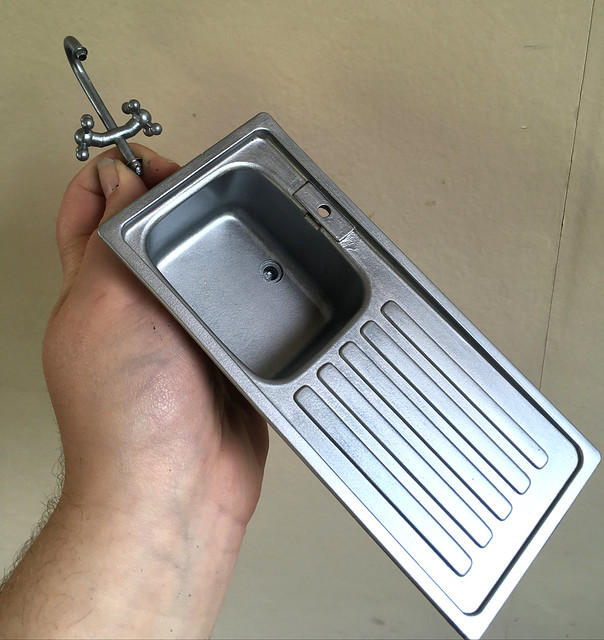
Sink
There wasn't really anything wrong with the standard Sindy sink unit as it was, other than the draining board being, to me at least, on the wrong side, but I didn't like how tiny the spout was. Luckily, I'd already found a replacement, courtesy of a novelty paperclip holder I'd bought from 'Flying Tiger Copenhagen' a few months ago with this very thing in mind.

It was just a pink plastic container with yellow duck shaped paperclips, but it came with some perfectly 1/6th scale taps and faucet!
I was able to pull them off easily, then did some tweaks. I didn't like how the spout ended so I sawed it off and replaced it with a mini brad, as well as cutting the taps down and constructing a new support for them and the faucet out of a styrene rod. I got the angles a little wrong so it's not quite symmetrical but it isn't too noticeable.


Once I'd removed the sink from the unit and sanded it to within an inch of its life, I spray primed everything then went over it all again with silver spray paint. Unfortunately I didn't have any chrome paint, so all the metalwork turned out looking a lot more matte than I planned but I actually really like it. I loved how shiny the original looked, but alas, it wasn't meant to be.
I painted the unit to match the cooker, along with the wooden effect counter top.
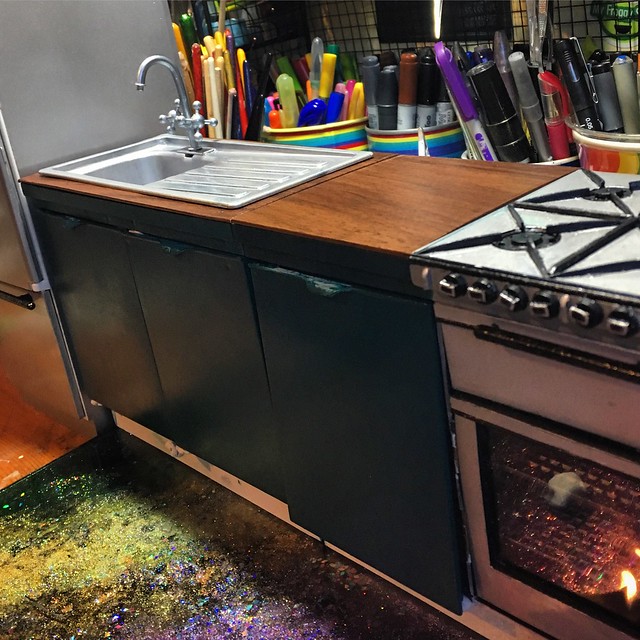

Making sure the counter top fitted snugly around the sink was...fun, but I'm glad I spent the extra time on it as it looks really nice.

I'd settled on the dark teal colour for the units with a copper highlights, so once they were added in, the units were pretty much done...until I remembered they were too short.

Sindy dolls are smaller in height than Barbies, but even then, the furniture always seemed a little diminutive for the scale. With that in mind, I raised up the units with strips of foamboard, hot glued to the underside. I covered a longer strip with the wooden vinyl to act as a front panel which tidied up the now messy base and really pulled the whole thing together.

Washing Machine
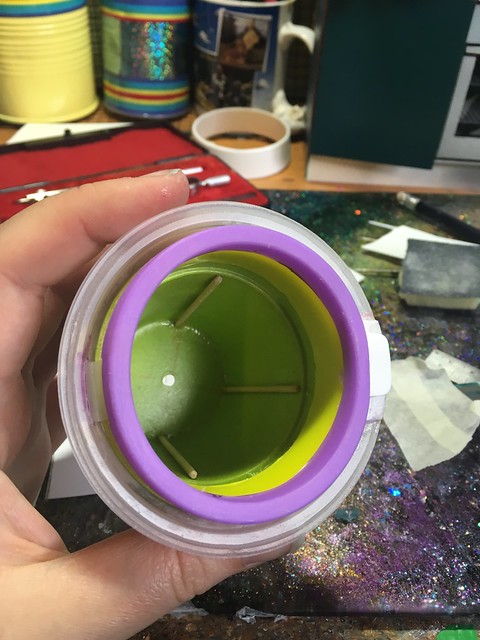
Despite absolutely loathing housework in real life, I still wanted to inflict it upon Max and Juno, so a washing machine was another must have. Rather than try to find another Sindy unit to mangle, I decided to make this one entirely from scratch. I took measurements of the existing units for comparison, then constructed a simple box from styrene.


The tricky part would be making a drum. I could have just put a faux door on and be done with it, but where's the fun in that? 😉
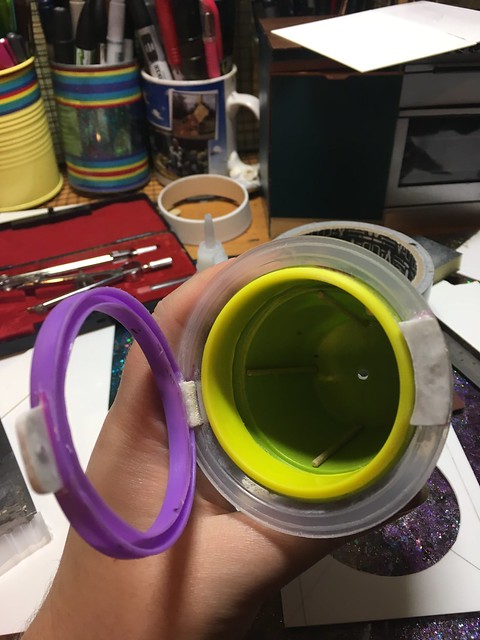
I raided my stash of 'cylindrical and circular things' and found a few items that fitted together perfectly. The clear plastic pot originally held a chocolate trifle, the green one is a plant pot and the yellow and purple parts were from a mini Play-Doh container. The purple part was the lid to the Play-Doh, so it already fitted over the yellow part snugly which really helped as I wanted the door to be able to close neatly. I cut out the centre part of the lid, added some cut down cocktail sticks for detail inside the drum and glued only the yellow and green parts together. The purple part would become the door, so I wanted that loose, and ideally I wanted the drum to sit inside but not attached to the trifle pot so that it could spin freely, or at least have the potential to do so.
I made a basic hinge out of ribbon rather than a pre-made metal one as I wanted it to be a little more flexible.


While the door did close, it was awkward to open again, so I decided to experiment with some tiny neodymium magnets I'd bought on ebay. These ones are absolutely minute but pretty powerful, so they'd be perfect for a door lock.
I cut out the 'latch' parts from styrene and sunk the magnets into them, covering them up with another very thin layer of smooshed up styrene and plastic weld so they wouldn't be tempted to jump out and escape.

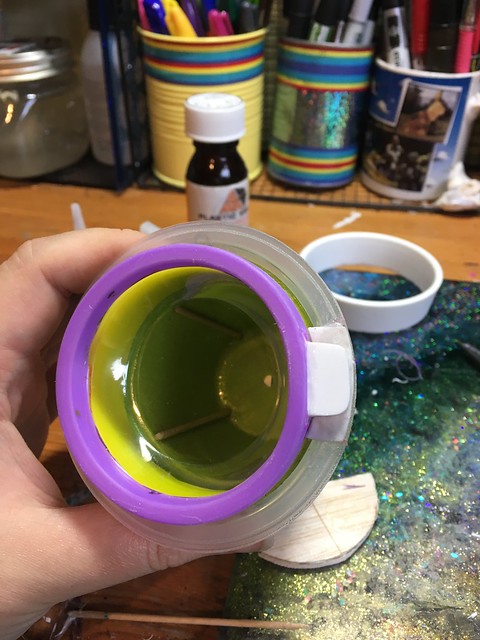
The trifle pot had quite a wide rim which, thanks to some careful measuring at the start, sat snugly outside the hole, giving it a really nice finished edge.

Even though it was the bane of my existence at college, vacuum-forming is an incredibly useful technique, and one I really ought to experiment with more. Alas, I don't have one of my own, (though at some point I'd like to make a basic one using our handheld Dyson to provide the vacuum) but I did have the tools to make something similar. Using the washing machine door as a template, I cut circles in two sheets of balsa wood, sandwiched a sheet of clear plastic between them and clamped the sides with binder clips. Using my heatgun, I blasted the plastic until it was malleable, then quickly and evenly pressed it down on top of an empty masking tape roll. Without a vacuum, the plastic didn't cling to the form, but that was exactly what I wanted, as I intended to make the inverse glass part that's such a distinctive part of washing machine doors.

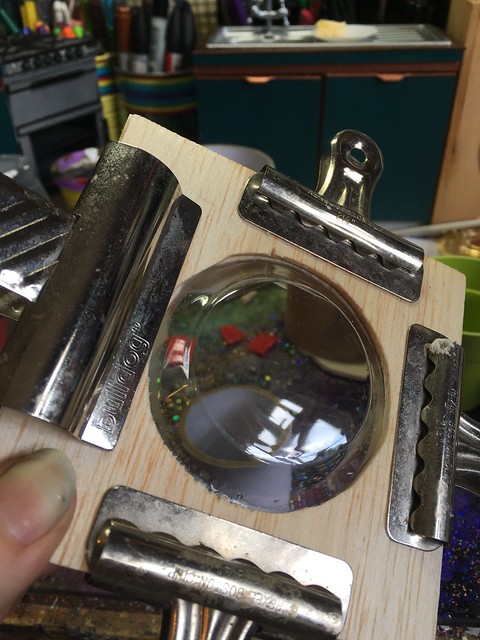
This required a few attempts, but it turned out really nicely in the end!
I painted the drum and door parts silver, and added the glass in afterwards as I didn't trust myself not to somehow undo all my hard work!

To finish, everything else was prepped, primed and painted - I went for a nice clean white finish on this one rather than silver, leaving that for the details alone.

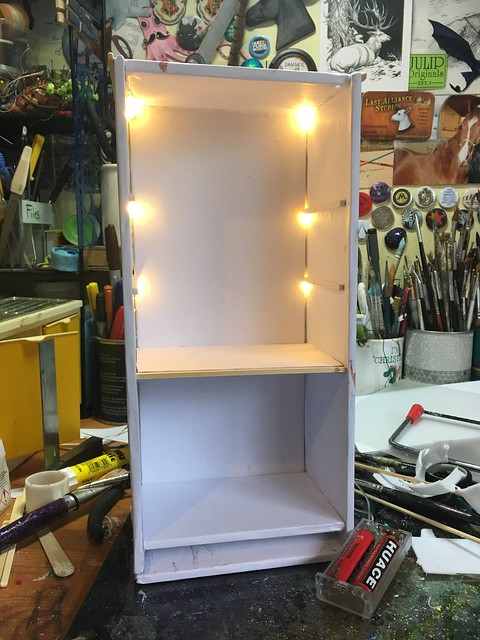
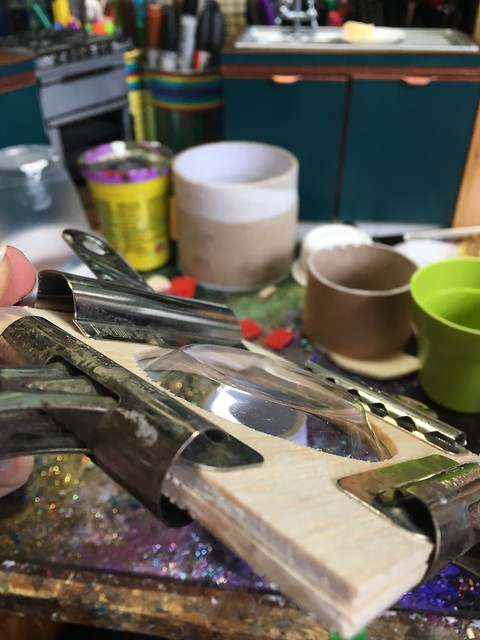
Microwave
Next up on my list of things was a microwave.
I made a 'working' one in 1/12th scale a number of years ago, so making this one wasn't as hard as it could have been. I took some basic measurements of my own full size microwave, used an online scale converter to get the sizes down to 1/6th, then made a basic box out of styrene.

Like the cooker, it got hinges so the door could open and close.

I wanted to install another LED, so I left space in the enclosed part on the right to house a coin battery and bulb, feeding the wires through a hole in the back where I could just touch the wires together to switch it on. This did work quite well but I think since I made it, something's come loose inside as it no longer works, so I might need to take the top part off and investigate at some point.
Originally I thought I could incorporate the original LED tealight switch into the design so I just needed to push the switch at the front to turn it on but I overestimated my ability to make it work, hence the wires out the back. 😂
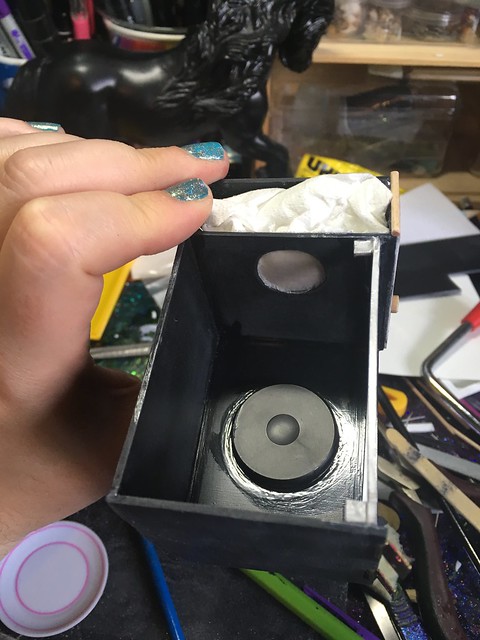
I used one of the original electric hob plates for the bottom of the microwave and found some really nice textured foam in my stash to eventually cover the inside walls with.
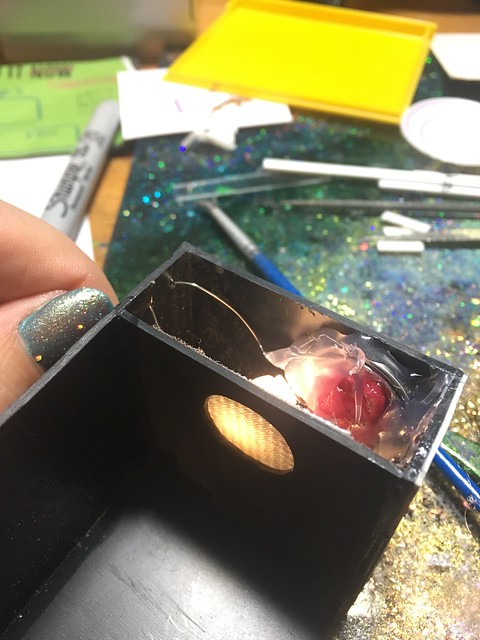

Thin styrene strips were added to the front panel to add some details, as well as a cut down wooden dowel for one of the twisty dial thingys.

As ever this was sanded, primed and given a few coats of silver spray paint.

Afterwards I painted the door and front panel in black acrylic, adding some 'screens' cut out from magazines and laminated with sellotape. Unfortunately I couldn't find anything for the numbers other than a shot of a mobile phone, hence the letters underneath! 😅 I could have just printed one out but the PC and I were not on the best of terms at the time so I chose not to.
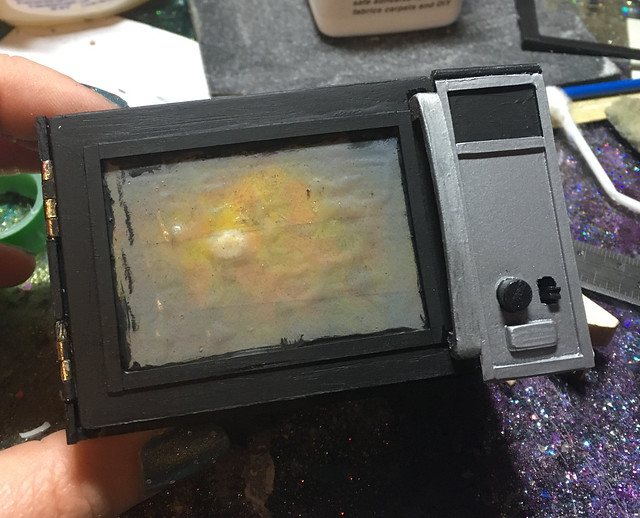

The door handle was made from a thick strip of styrene and took several attempts to get right.

Corner Unit
I dropped the ball on documenting the corner unit, but frankly, it was probably for the best as I made a total mess of it and the only reason it looks OK now is because I've covered it in accessories!

In essence, I made the sides the same as the other units, and worked out how big a front I wanted it to have and worked from there. I originally wanted to make it a set of drawers, but by the time I reached that stage I was already pretty fed up with it and just wanted it done. My first mistake was making it out of mountboard and foamboard rather than styrene, so the shelves have warped a bit and it's wonky in all the wrong places. Still, it does the job, and I can always remake it in the future if it comes down to it.
Walls
I make all my dioramas in much the same way using sheets of foamboard, or in a couple of cases, thick mountboard, and recently I've started using velcro strips to join them together so I don't have to lean them against heavy objects to stay upright. I wanted the kitchen to be a large room, so used several big sheets of foamboard. The back wall in its entirety (made up of two sheets) measures 945mm or just over 3 feet, which is pretty huge, considering that my entire workspace is only about 4 feet! 😂
I knew I wanted the walls to be red brick, so I made my own by painting textured wallpaper a warm terracotta in acrylics, then cut out hundreds of tiny bricks. First I cut them into long strips, then used a template to chop them regularly.

I used a glue stick to apply them directly onto the foamboard. This worked out well as the glue is low tack and the bricks simply peel off if you need to reposition them elsewhere, which I did, several times.
After a few layers above the units, I hit a quandary. I really liked the look of a fully brick wall, but wasn't sure if it would look too overwhelming.

Some bad photoshopping didn't exactly help me make up my mind, as I really liked how warm and inviting the brick looked, while the white walls were a little cold.

Eventually I decided to stick with the half brick design, and used some more wallpaper in an off white colour to give the upper part a little texture. Unfortunately when applying it I ended up with a couple of air pockets but I was able to hide them with art later on. By this point I'd discarded the balsa wood shelves I'd made and replaced them with new ones, made from wooden strips and coffee stirrers, stained with acrylics and a matte varnish. I also added a window, as I really liked the idea of having one over the sink, so you could gaze outside whilst enduring the monotony of doing the washing up.
I didn't even need to actually make a window as I had in my stash, a perfectly sized one made from thick card that had been part of a christmas card a few years before. It actually had some nice little bevelled edges, and after a new coat of paint and some clear plastic installed behind it, it turned out really nice.

You'll see I also made another set of shelves next to the fridge, this time out of a random cardboard box I added shelves to. It looks miles better than the corner unit and definitely didn't take nearly as long to put together! Practice makes perfect and all that! 😆
At this point I just wanted to play with it, so I started setting everything up and adding all my accessories and things...and then realised that I really didn't know what to do with all that space on the right. I knew I wanted to build some shelves to store dry goods like pasta and the like, so that became my next project. (and yes, I did build it whilst everything else was set up XD)

I've never been very good at doing open shelves and these literally took me an entire day as the glue didn't set properly at points and at the wrong angle, and in general things just wanted to go a bit wrong, but eventually I managed to get them put together nicely. I used square wooden dowels with notches sanded out at regular intervals so I could slot in smaller square dowels for the flat wooden shelves to sit on. The shelves themselves were strips of wood used for doll's house mouldings and things, but I flipped them upside down so the flat side was on top.

After a coat of paint they actually look pretty nice! I realised too late that I'd made them too short though, so I needed to give them some extra height.
I had some cheap sharpies that had run dry, so I dismantled them, sanded the main part of the pen and painted them black, then slotted the legs of the shelves inside them like thigh high boots!😆

You don't really notice them much because it's quite a dark corner.
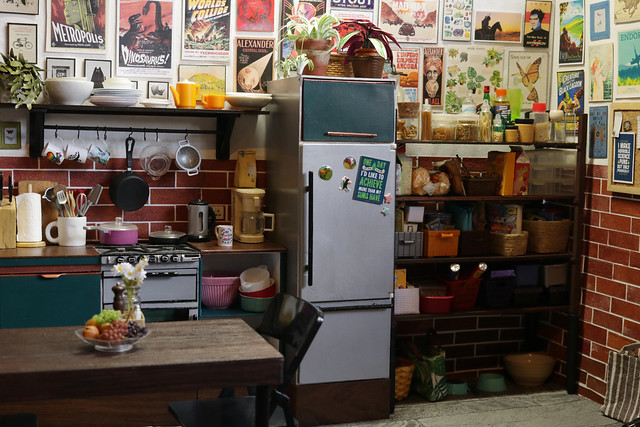
I ended up shortening the back wall by quite a bit, as it was just looking too empty up that side, and I'm really pleased I did that, as it looks far more realistic that way. The side wall is fairly empty of stuff, with only a noticeboard (piece of cork and wooden coffee stirrers) and a coat rack. I imagine that the back door is directly in front of the shelves, so you can come in, dump your bags, shoes and coats and get a cuppa on the go.
Kettle
Speaking of which, another thing I really wanted to make was a kettle. I don't drink tea or coffee myself, but the ability to quickly boil water is an absolutely vital part of a kitchen so I just had to have one. (it really weirds me out that kettles aren't really a thing in the US, and that most people use a microwave to boil water or do it on the hob which takes ages - what's wrong with you people?!😂)
I intended to use a suitably sized pen lid or something, but for once my stash of useful bits and pieces failed me, so I opted for plan B; to make one from a thick section of wooden dowel instead.

It took a lot of sanding and carving because it was a really tough chunk of pine, but I eventually got it to a state I was happy with and gave it a coat of paint...which highlighted all the rough patches and uneven surface which I absolutely wasn't happy with. I tried to fix it but just made things worse so I called it a day and decided to start again. It was disappointing but sometimes with models that's just what happens, and you need to waste a few days of work in order to make something better.
This time I settled on part of a plastic thread spool, some scraps of styrene, a button and fake gemstone.
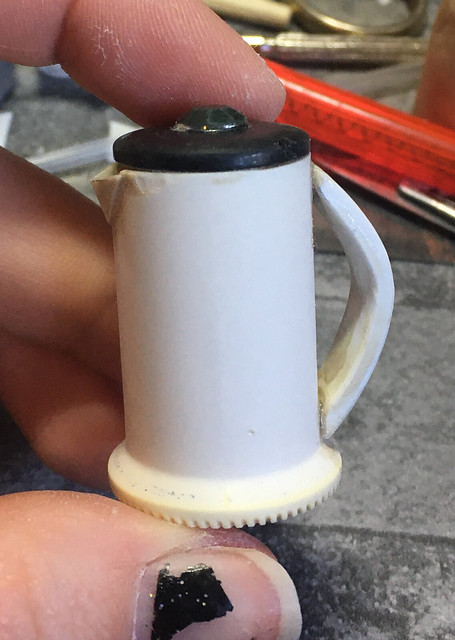

I very carefully used my Dremel to drill out a strip down one side, which I slid a scrap of clear plastic into for the water gauge.

I masked off the clear part and painted everything, and ta-da, one finished kettle!

Sadly, after having it up for over a week, I really needed my desk back, so everything had to be dismantled and put away until next time! I don't have any space for permanent set-ups or dioramas so everything I make has to be collapsible for storage reasons, and as I don't have much of that either, it's always a bit of a challenge! Just for fun I set up my phone to record a time lapse of me taking everything down if anyone's interested!
As ever, if anyone has any questions about how I made anything, don't hesitate to ask and I'll see what I can do to explain things! :)
WOW! What an Unforgettable journey from beginning to end and I have LEARNED so many things from this one post Christine!
ReplyDeleteI particularly like how you made your range gas burners, and the convection fan inside the oven, and the washing machine door and drum.
Your ingenuity and creativity are so advanced that you should Instruct an online Miniature MASTER CLASS because Every Facet of this build has something to offer eager miniaturists regardless their prefered working scale:
MOST Impressive! :D
Hahaha, thank you! :D Now that I have a decent laptop I'm hoping I can do some video tutorials this year, once I've found editing software I get on with that is! :D
DeleteYou really need your own YouTube channel. You are so talented!
ReplyDeleteAww, thank you! I fully intend to at some point but right now I have an absolutely abysmal internet connection so uploading videos isn’t an option right now. :(
ReplyDeleteJust saw this link on Fcebook and I must say I was pleasantly surprised by your creativity and hard work in making this wonderful kitchen; love that you put so much art on the walls too:) subcribed to your instagram page. roomboxgirl
ReplyDelete