
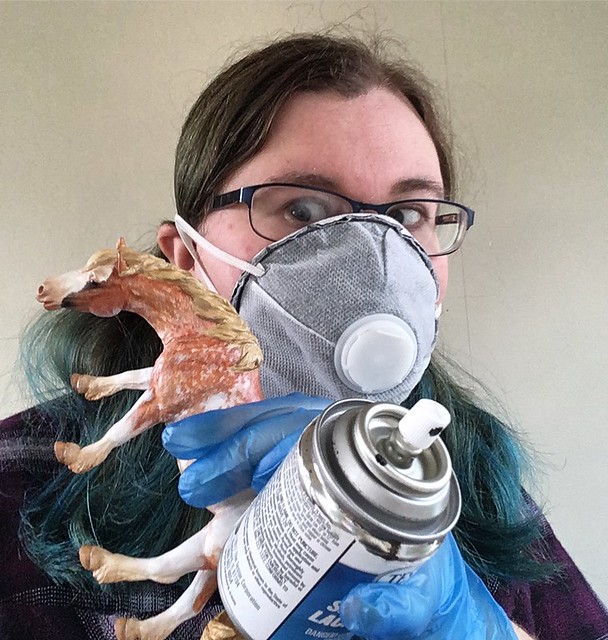
I've been procrastinating more than usual recently, and as a result my documentation of this year's event has been delayed by far too long!
I filmed as I painted, so there’ll eventually be a full video tutorial on YouTube at some point once I’ve got round to editing it all!
---
For a project like NaMoPaiMo, success can be measured in many different ways.
For some, success can be as simple as adding paint to a model after years of no motivation, or trying out a new colour or technique. For others, it can be more specific, like finally finishing that AR you’ve been putting off painting because you lacked the confidence to even start it, or nailing the perfect dappling technique.
Everybody’s experience is entirely their own, and therefore, in the words of the inimitable Bob Ross:
’we don’t make mistakes, we make happy accidents’
That said, I made my fair share of mistakes this year, but I think the successes drowned them out overall.
That said, I made my fair share of mistakes this year, but I think the successes drowned them out overall.
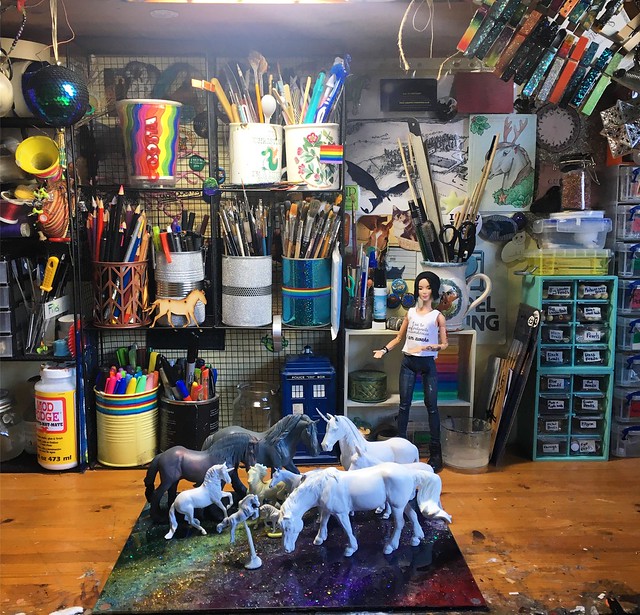
As most of you will know, while my 1/6th scale dolls have my attention at the moment, in the model horse area, I tend to focus on small scale customs, mostly because I lack the space for bigger models and because I find it far easier to work on smaller ones.
So, with my last two NaMo horses being small, it made sense to continue along that vein, right?
Play to my strengths?
Wrong!
I’d been incredibly lucky to have been gifted this absolutely gorgeous Gigi resin last year as a NaMo prize, and really wanted to do her justice by choosing her as my victim this year.
Wrong!
I’d been incredibly lucky to have been gifted this absolutely gorgeous Gigi resin last year as a NaMo prize, and really wanted to do her justice by choosing her as my victim this year.

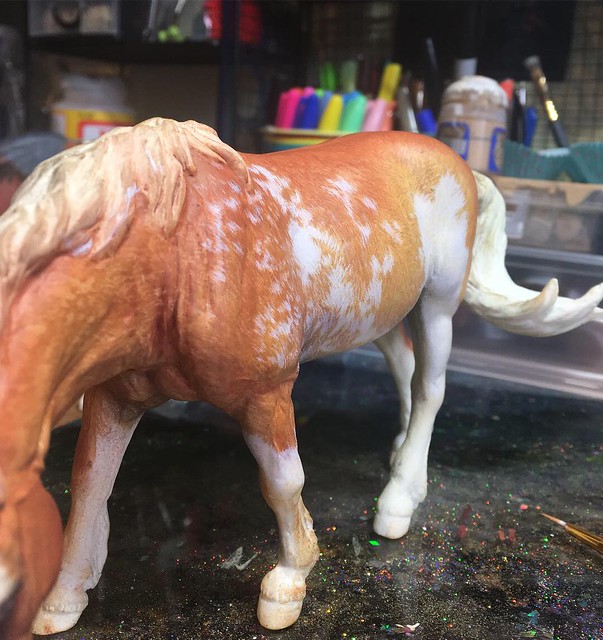
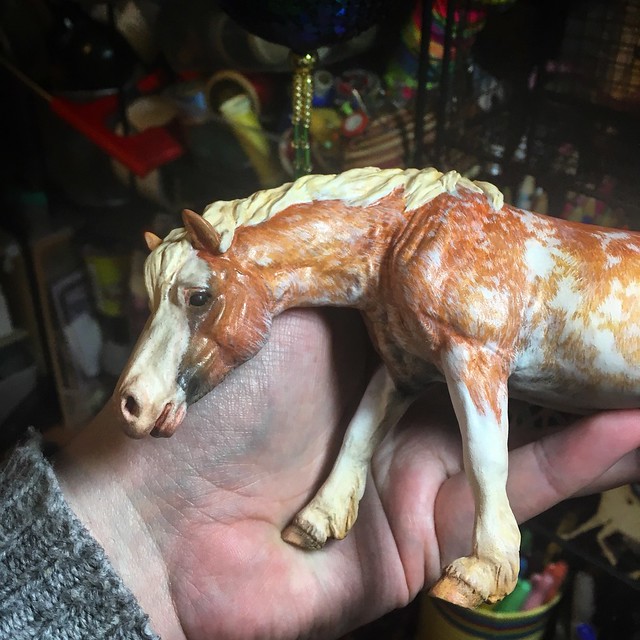
I chose an especially awkward colour to paint her as well; flaxen chestnut sabino, as it’s one of my favourites and I thought she’d really suit it. I don’t paint as often as I’d like to these days as my mind is inevitably on other things, but I find NaMoPaiMo is fantastic for getting my brain back on track and forcing me to do some painting when I’d otherwise just procrastinate. The community spirit of it all is so inspiring and you really do feel connected to everyone else, even when you’re miles away from other hobbyists.
Anyway, let’s begin, shall we?
Anyway, let’s begin, shall we?
I set out a rather optimistic selection of other models I hoped to paint during the month but only Gigi and Max's jumping mini ended up with clothes on.
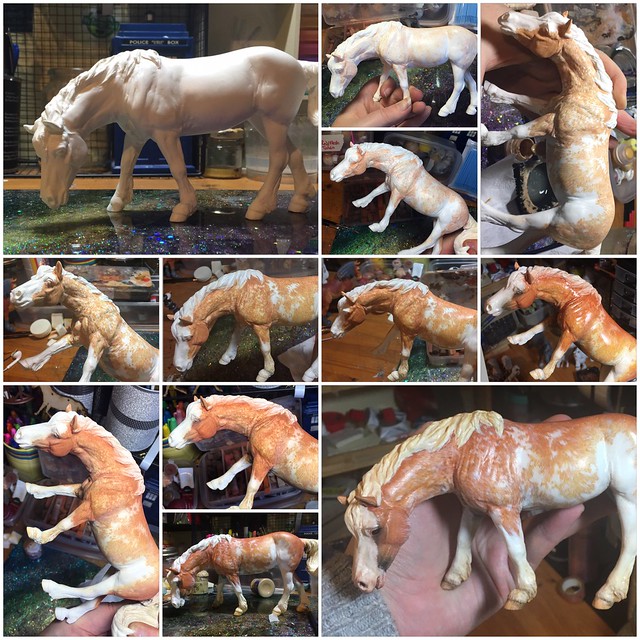
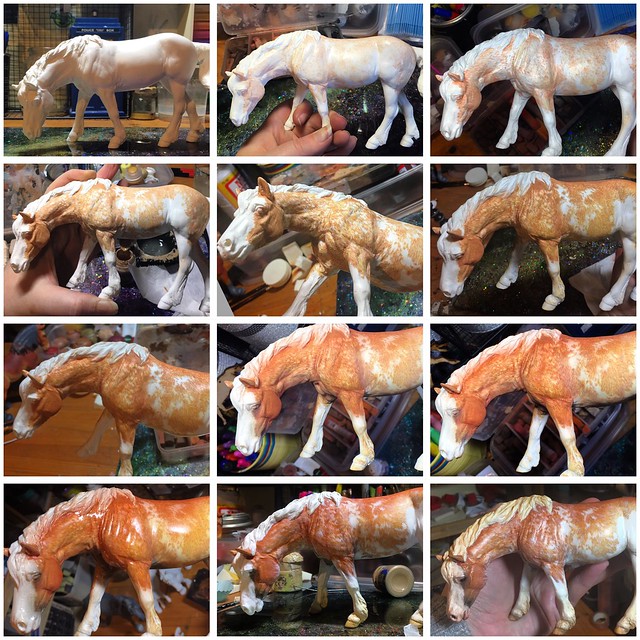
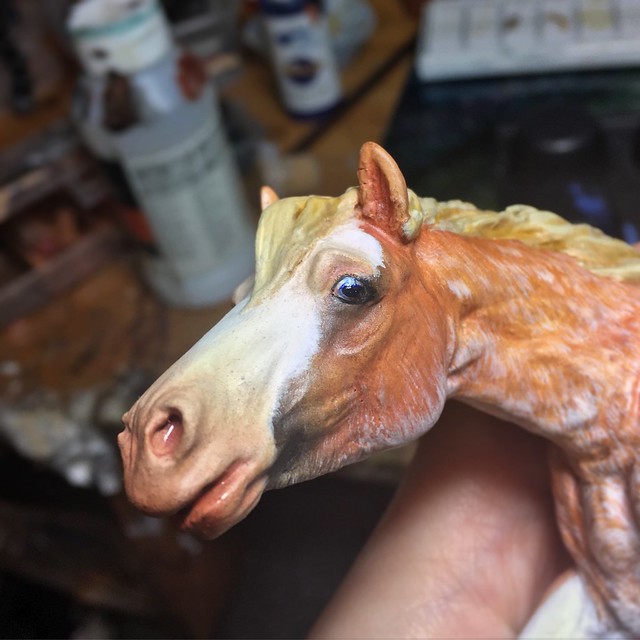
I didn’t think there’d be much prepping required to begin with as she was a really nice clean cast, but then I did a little sanding and...
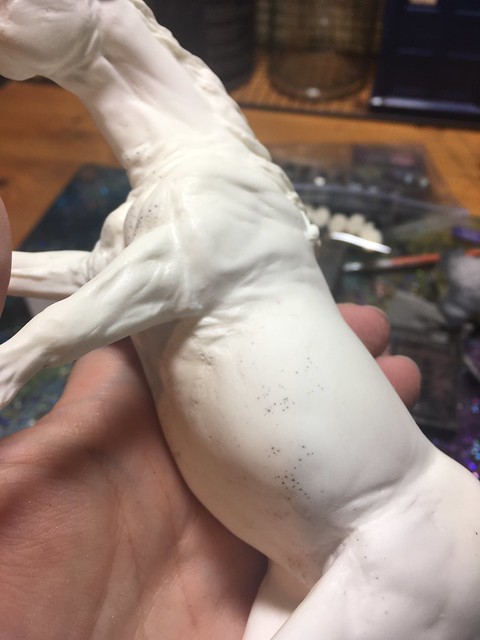
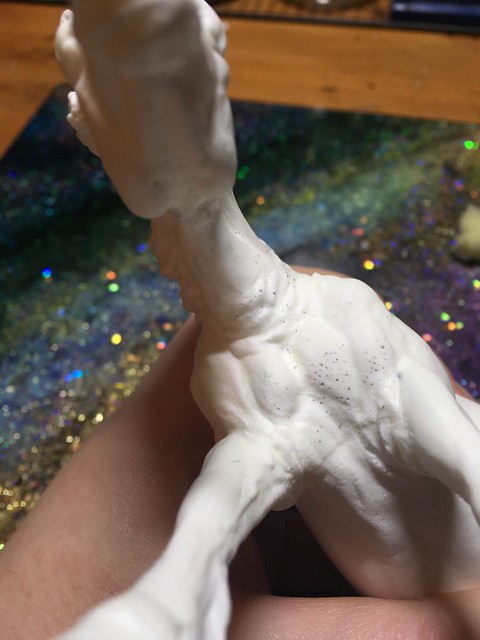
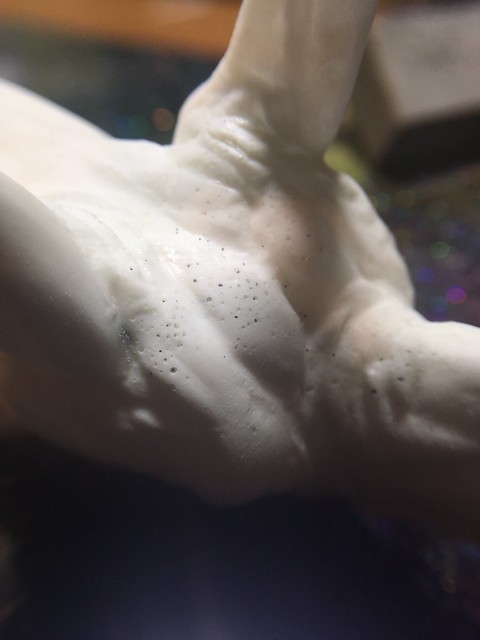
...PINHOLES! 😭
I rubbed a little pastel dust over the raw resin so I could see the divots better and eurghh, there were a LOT more of them than I thought! I managed to fill them with a combo of £1 shop epoxy glue for the deep ones and gesso and superglue for the shallower ones. It wasn’t a perfect solution but it beat faffing around with epoxy clay which I loathe working with. In hindsight I really wouldn't recommend the epoxy glue for this as it's a pain to work with too, but at the time I just wanted to start painting!
She was then sanded to within an inch of her life and finally sprayed with the last of my white primer.
Using a dizzying array of references, I blocked in the rough sabino pattern with pastels, using a silicone sculpting tool to apply the pigment. This is a technique I picked up from another hobbyist and I’d really recommend it as it allows you much greater control than a soft brush does. Initially I was only going to outline the markings so I could shade around them, but eventually it seemed to make more sense to rough out all the hair texture first, leaving the markings untouched.
Using a dizzying array of references, I blocked in the rough sabino pattern with pastels, using a silicone sculpting tool to apply the pigment. This is a technique I picked up from another hobbyist and I’d really recommend it as it allows you much greater control than a soft brush does. Initially I was only going to outline the markings so I could shade around them, but eventually it seemed to make more sense to rough out all the hair texture first, leaving the markings untouched.
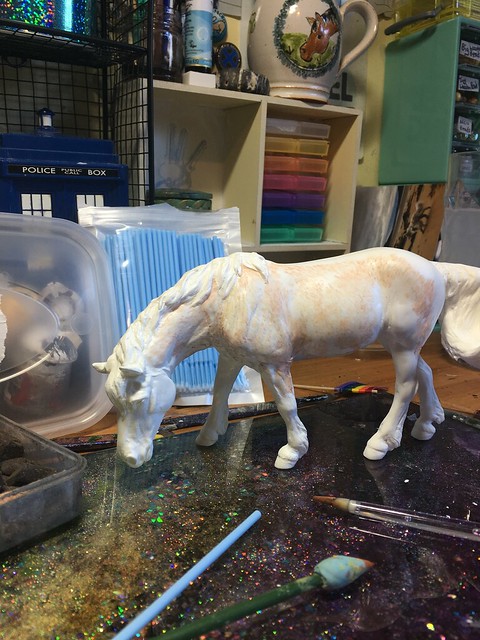


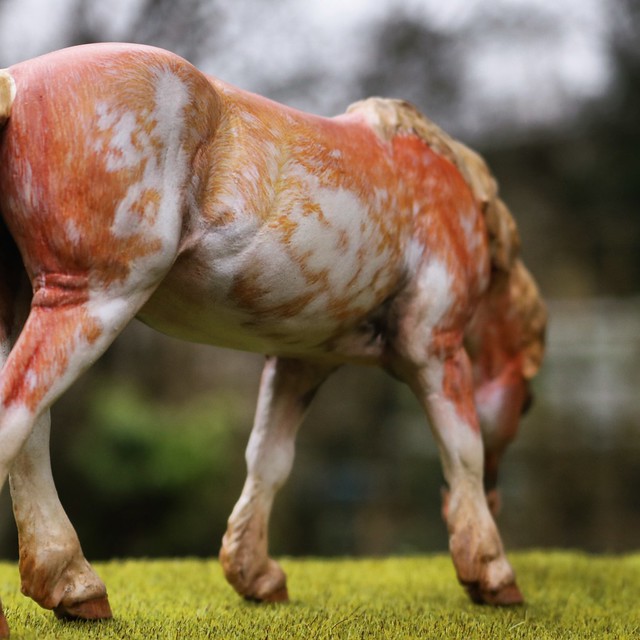
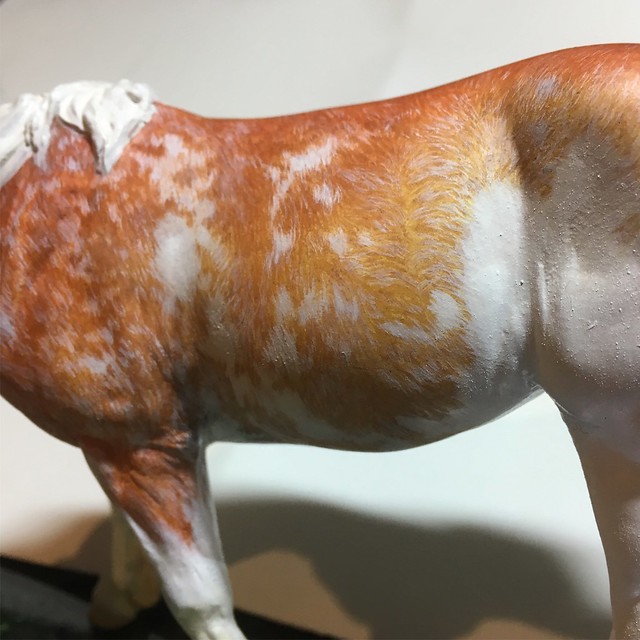
Although I'd intended on painting her in acrylics first and adding hair detail afterwards in lighter acrylics or pastel pencils, I ended up doing it all backwards instead! Once I'd blocked out the body colour with the pastels, I locked it in with spray sealer, then went over my previous work carefully with acrylics, paying close attention to the hair growth patterns by constantly referring to photos to keep it accurate. I used a variety of sabino references and improvised in a few areas so it isn't based on one particular horse. There's a couple of areas in hindsight I wish I'd done differently as they don't look quite as realistic as I'd intended, but overall I'm pleased with the white markings.
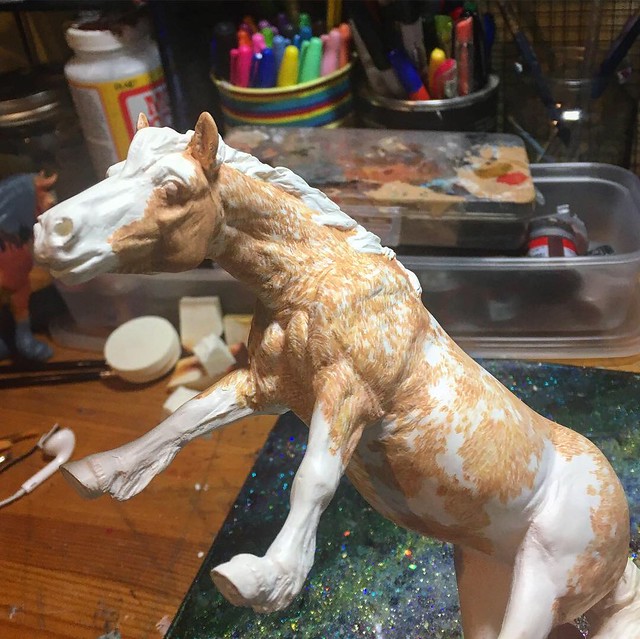
By day 2, I was over the moon with her progress. I scrubbed in a layer of pastel over the acrylic to soften it, adding darker shading over the topline and in areas of shadow like the grooves in the musculature, and lighter tones on the flanks and belly.
(and yes, I said Day 2 - I'm unemployed right now so I have way too much time on my hands!😆)
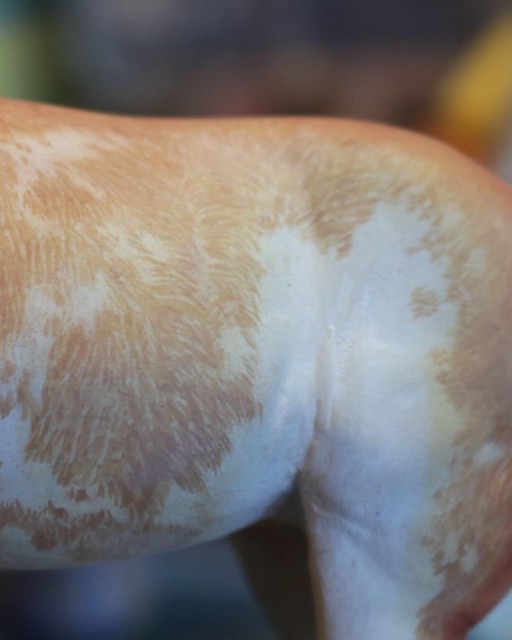
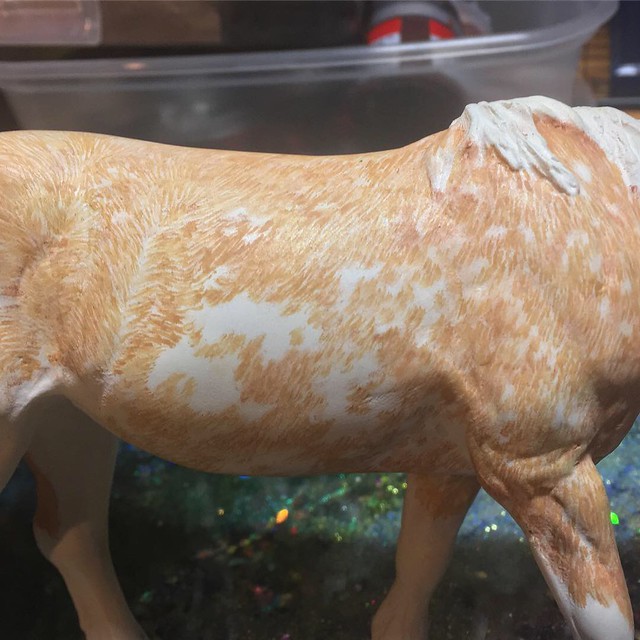
She was looking a little too orange after a few layers so another layer of sealer later, I went over the whole body with a buff colour (white pastel, a bit of grey and some ochre - basically what had accumulated at the bottom of one of my pastel boxes!) to tone down the values so it wasn't quite as in your face. I see a lot of people struggle with their chestnuts ending up radioactive, so don't be afraid to experiment with different colours that you normally wouldn't think of using, like greys and cooler tones.
This guide is actually for painting human skin tones, but I often refer to it for horses too as the same kind of thing applies, especially when it comes to using 'unnatural' pastel shades for highlights and things. I used to have real problems with my digital portraits looking really samey and lifeless until I started incorporating greens and purples into the mix and it makes a really big difference.
(also holy crap, I haven't posted anything on dA in yeeeears 😅)
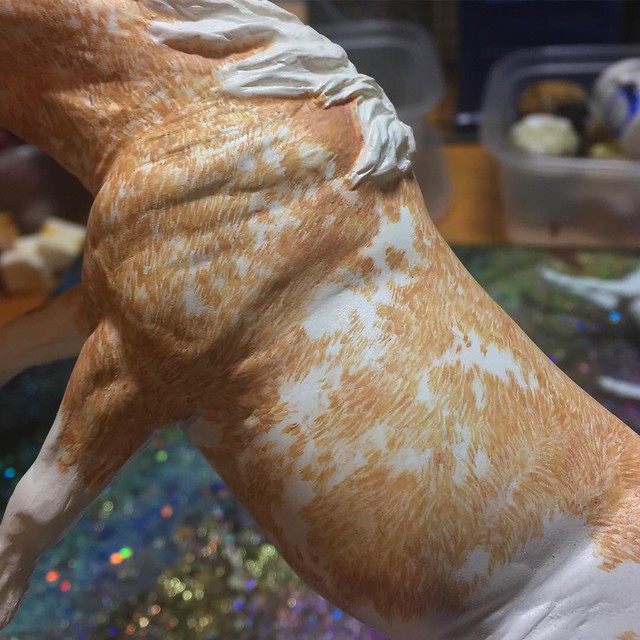
I repeated this process, adding in more shading as I went along until it reached the shade of chestnut I'd been aiming for from the start. I also added in areas of dark skin on the face and around the genitalia. At one point I put waaaaay too much in the creases of the hind legs and had to go back with white paint to fix it.
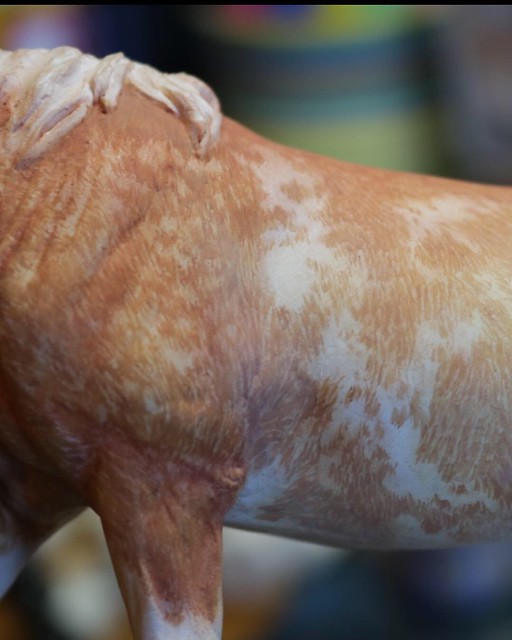
Finally it was time for the fun part - adding white markings...hair...by individual hair. When I eventually get the video up, there'll be a part about how to do white markings and getting the paint the right consistency which is something I know a lot of people struggle with, including myself!
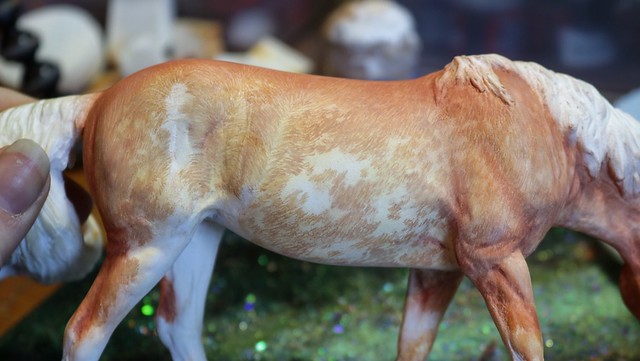
Adding in all the white hairs took forever, but the results were worth it.
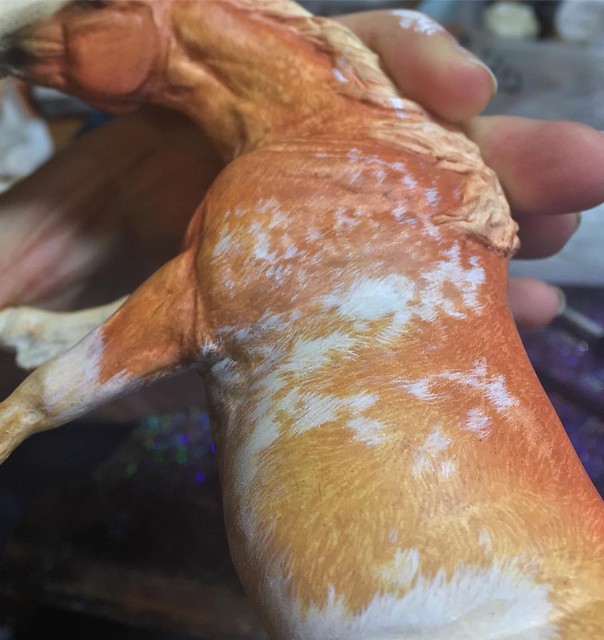
Some of my paint obviously wasn't as well mixed as I'd have liked, and the larger areas of white were really obviously uneven and full of dried lumps of paint. Once it was fully dry I buffed at it with some fabric and eventually went in with some very fine sandpaper to remove the worst bits. Some parts remained a little lumpy but they weren't too bothersome so I left them as they were.

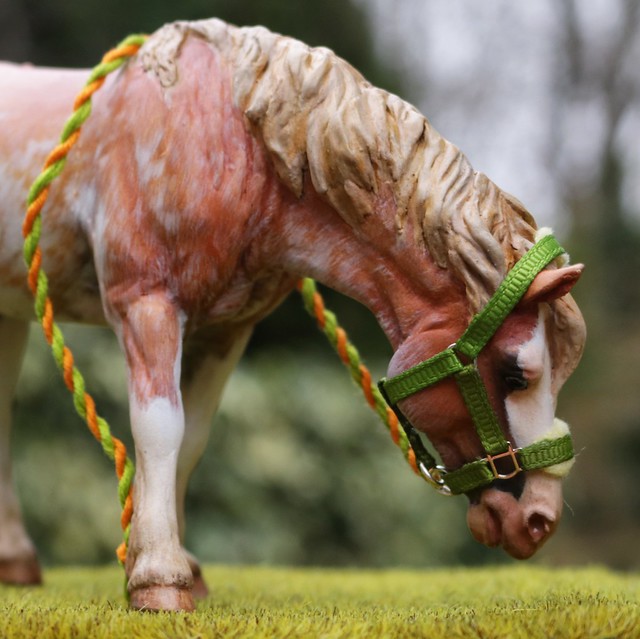
I shaded the muzzle both in pastels and afterwards with acrylics, as I just couldn't get them to blend properly. Usually I'm fine with one method or the other, but this time I needed both! I managed the other areas of pinking with pastels alone, but for some reason the muzzle wasn't being very helpful.
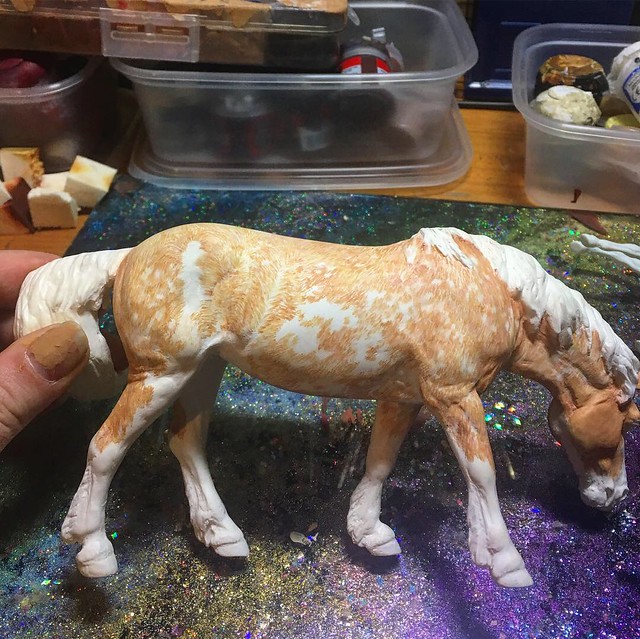
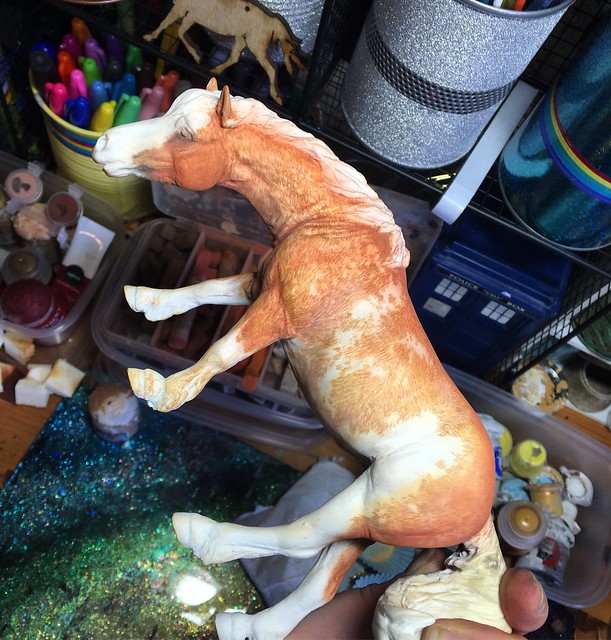
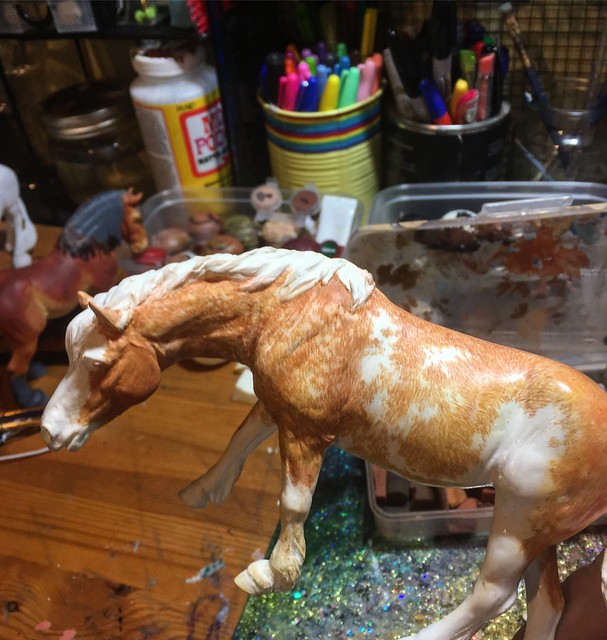
Normally I'm really good at doing mane and tail shading but this time I just couldn't get them to match, and it honestly took longer to get right than all the hair detailing I'd done before!
At first I went in with an off white acrylic, then while the paint was still wet, blended in some yellowish ochre so the transition between the two would be smooth, adding highlights and shadows as I went. It looked great to begin with, then one layer too many ruined it, so I started again...and again...and again as it just wasn't right. I added a layer or two of a darker wash (Citadel's 'Seraphim Sepia) in an effort to bring out all the sculptural details, but that only made the tail look great and the mane look crap! I was finally happy with the tail, but the mane was bugging the hell out of me so I repainted it again...and again and eventually just gave up and told myself I'd just have to live with it.
(only for me to repaint it one final time after I'd finished the rest of the horse!😅)
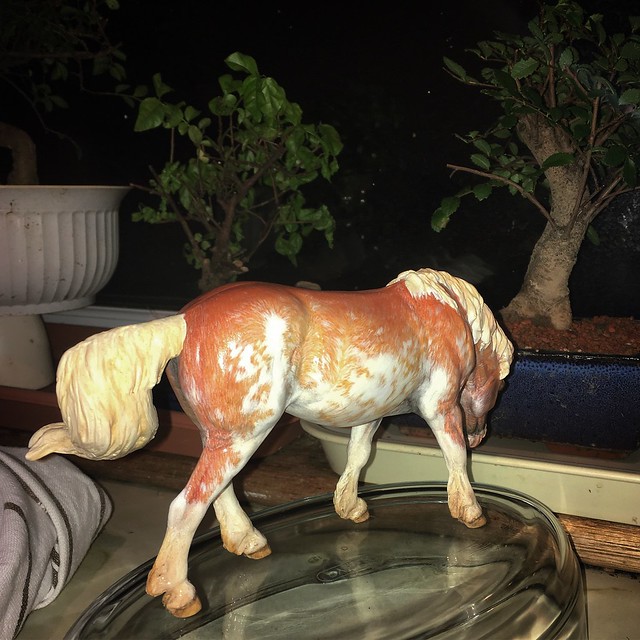
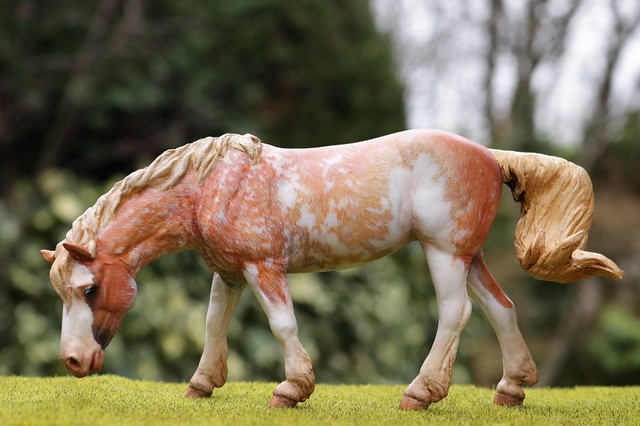
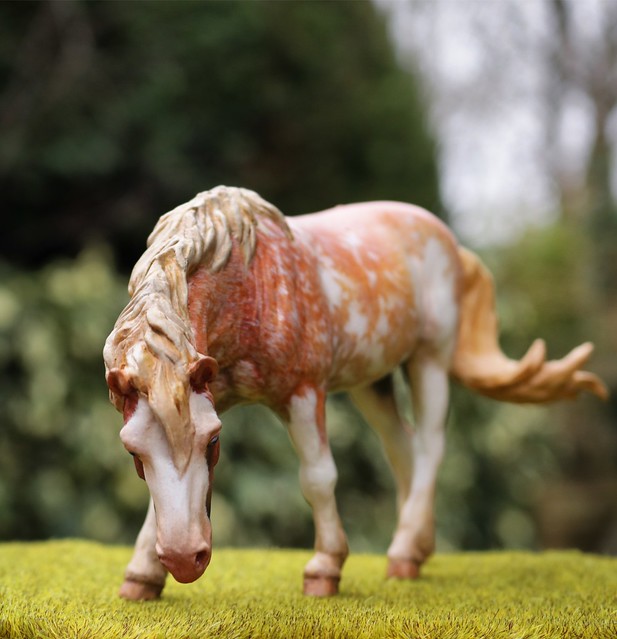
Luckily the legs ended up being far more cooperative, only needing a couple of layers to get them into their finished and nicely grubby state. I wanted this pony to be in 'field' condition, as if she was an old riding school mount who wasn't expected to be in show condition at any time. The hooves were done similarly, in acrylics along with pastel and watercolour pencils, and some of the same Citadel wash to bring out the sculptural details.
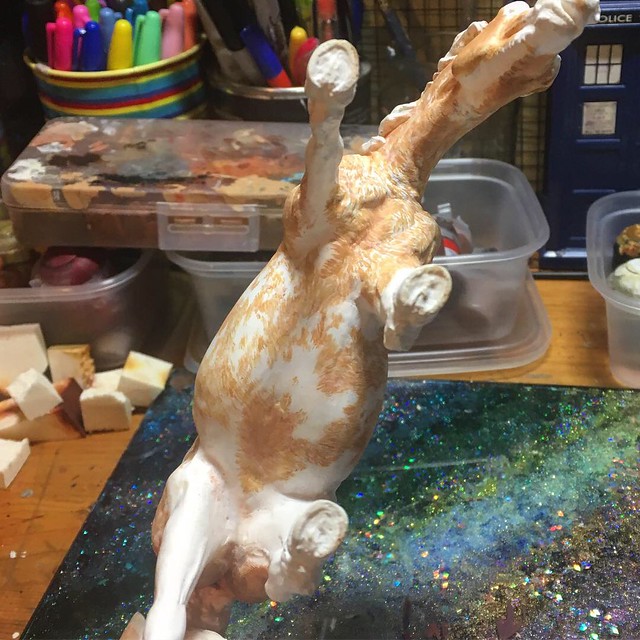
Start to nearly finished in collage form!
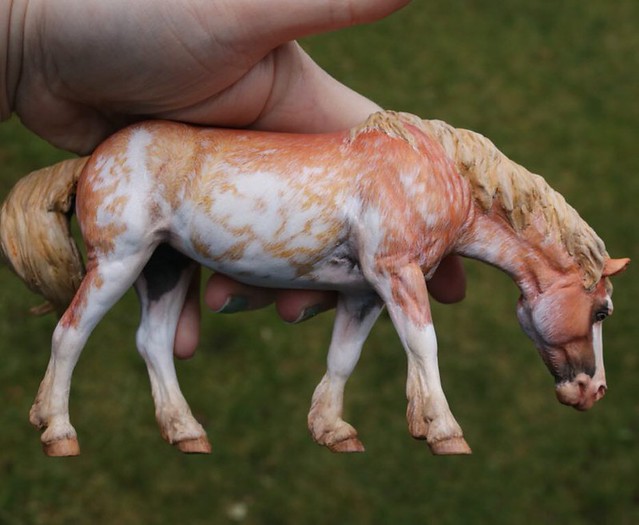
The mane and tail were waaaaay too dark and samey here but it shows off her shading nicely.
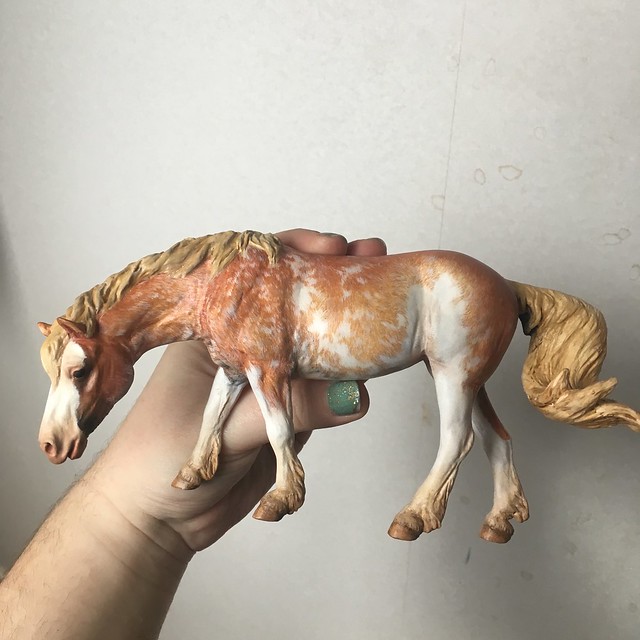
I'd sealed her a couple times with gloss to try to cut down on the dreaded pastel grain, and she was now a lot shinier than I wanted by the end, so I took her out for a final spray of Testors Dullcote.
She just needed eyes now (acrylics and metallic poster paints) and a final layer of gloss over them and in the nostrils to add that bit of lifelike shine.
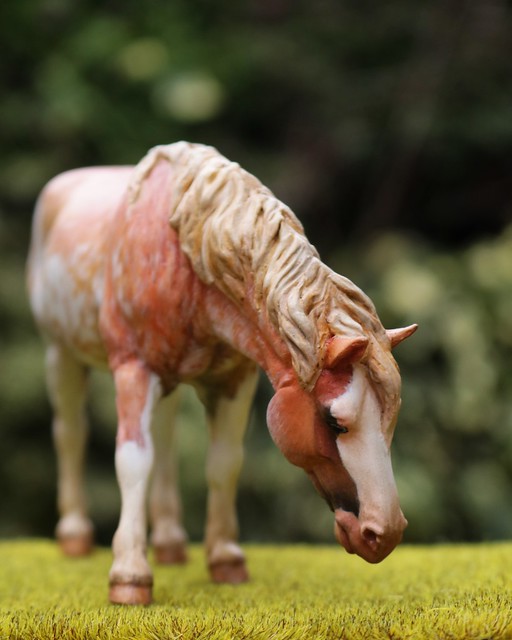
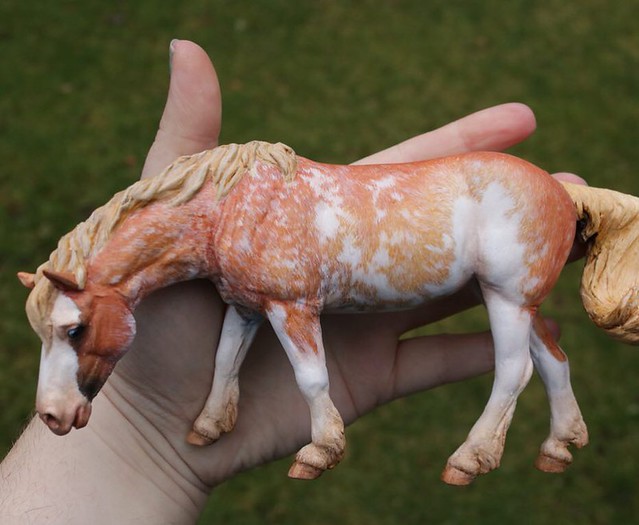
Finally, I could call her complete, so...I present to you all, Primrose, the retired riding school mare,
who’s been there, done that and seen it all before! Her hobbies include
grazing, ignoring the shenanigans of small children and then mobbing
them for mints. 😆
(thanks for ruining my lovely photo, raindrops. 😒)
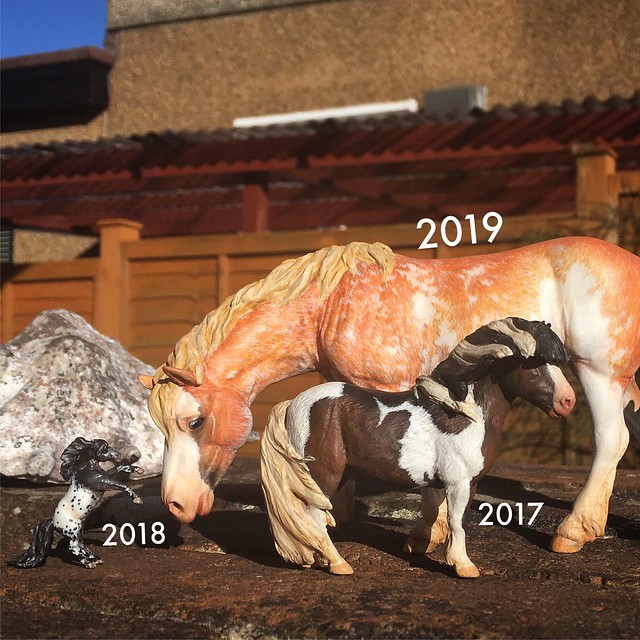
Here she is with my other two NaMo ponies!
Overall I'm incredibly pleased with her, especially her eyes and legs, and while there are areas I wish I'd done differently, the struggle was all part of the experience and I'm still glad I had issues there as I ended up learning from it.I still hate her mane and tail though. 😄
Will I go big next year and attempt a Traditional? Probably not, lol, but you never know!
As I said, I'm currently editing the video, which at this rate will end up being about half an hour long!
FABULOUS- thank you for sharing her journey!
ReplyDeleteUnbelievable!!! Your Primrose is AMAZING! I love her coat and the way you've combined the layers of pastels with the layers of acrylics and water colours with an Incredible Effect. It's as if you can actually "feel" the warmth of her hair under the palm of your hand and that she's gently breathing in and out as she looks back at you with those liquid eyes - a Really FANTASTIC and PROFESSIONALLY PAINTED PONY, Christine.
ReplyDeleteCongratulations! :D
I forgot to comment on this when you first posted it but WOW. It was so neat to watch your progress on this horse. I love the soft look you got with all those layers. And I'm glad you did the dirty feathers and such... it really completes the look. Beautiful!
ReplyDeleteThanks for giving such a great photos of horse models.
ReplyDeleteI'm very crazy about horses
keep doing well
horse equine tack