
Anyway, moving on...
I've been meaning to get involved with some voluntary work for a while now but until recently hadn't really felt up to doing anything. A chance comment about helping one of my dad's work colleagues snowballed and I'm now coming to work with him every other Friday to help out Laurence with some things.
 |
| Myself and 'Matisse' the Mallard. |
Hey, wait...are those wires coming out of his legs?
Oh, didn't I mention? My dad works for Glasgow Museums and Laurence is the taxidermist. ;)
 |
| (Sorry, I couldn't resist! XD) |
 I won't be doing any actual taxidermy though sadly, I'm assuming the role of 'Groundwork Preparator' (in layman's terms, I make nice scenic bases for the mounted specimens)
But bear in mind that there will be a lot of photos in this post - some of which include 'in progress' shots of the taxidermy so if it really isn't your thing, my apologies. I'll link to anything that could be considered graphic so you don't need to see anything gory though. :)
I've always loved taxidermy (blame my dad for that - we usually had at least one dead mouse in the freezer ready to be taken into work when I was growing up) and one of my earliest memories of Kelvingrove Museum was the big woodland diorama case with all manner of native species mingling in amongst the undergrowth. It was one of those displays that you could examine for hours and still find something new each time! Sadly, the current trend is for everything to be displayed 'cleanly' with ugly perspex bases and everything on open display (which really isn't good for the specimens...but more on that later) so good dioramas are in fairly short supply and my beloved woodland dio was taken apart and dismantled when the museum was renovated a number of years ago. I won't be making anything particularly large, or indeed, to go on display in the museum; however those I do make will be loaned out to the Open Museum and the like so they'll still be seen by a large number of people!
The workshop is definitely my kind of room - all organised chaos with bits and pieces scattered all over the place...


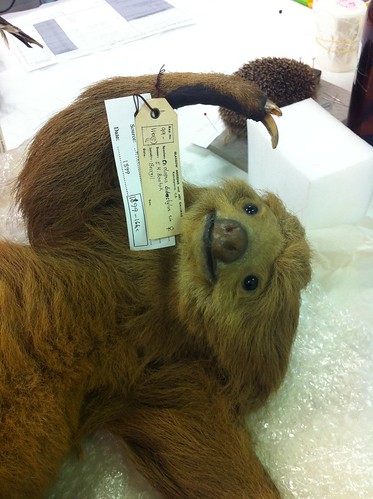 What's that in the corner? Oh nothing, just the 133 year old Sloth who needs some of her toenails stuck back on. ;D Isn't she lovely? (and don't Sloths have the weirdest hands?!)
 The first day I went, I met up with my fellow volunteer Barbara who, unlike myself, won't be making bases, but instead will be dissecting some of the unmounted and relatively fresh specimens and examining them for parasites. You know, as you do. :P (she's doing it at uni I think) Laurence has been showing her how to make a bird skin which works out well because not only does she get to dissect something and learn from the gory bits, but the museum also gains another valuable addition to the collection. (Unlike the traditional mounted specimens you're used to seeing on display, skins are mainly kept for for research and have all the internals bar the skull, leg and wing bones removed - a lot trickier than you'd think!)
To start off with, they would be skinning out a juvenile Starling...
(-This is what was removed from the body cavity - the white stuff is preservative - and we realised afterwards that the newspaper article was strangely appropriate!-)
 |
| This was it more or less finished I believe. |
...while I would be making a base for this incredibly miffed looking rabbit.

Now, I will be the first to admit that not all taxidermy is good. Some specimens have dodgy eyes, freakish anatomy etc...


...while others are just insane!

Mr Rabbit wasn't too bad, all things considered, but he was without a doubt, one of the haughtiest looking creatures I've ever seen.
Laurence cut the MDF for me and explained the basics but from then on I was pretty much left to my own devices as far as actually doing it was concerned. I was expecting it to be really technical but all it amounted to really was blobbing on a lot of wood glue and adding on the groundwork.
Fun Fact! - Anything used in this kind of display must first be put in the freezer at very low temperatures for several weeks to kill off any lingering invertebrates or bacteria which may prove harmful to the specimens.
Mr Rabbit needed his leg wires straightened a bit but after a few minutes of gentle positioning was ready to be wired in. We marked out on the base where the wires were to go in, then drilled four holes - one for each leg - and carved out 'channels' for the wires to sit along on the underside of the base. Label on, ID number scrawled on the underside in case it got lost and wayhey, grumpy-bun had a base!


The following week I made a slightly more interesting base for a Rook, seen here...

Alas, all the photos I took with him actually perched on the post have gone AWOL so you'll just have to imagine it I'm afraid.

I love crows and the like and that particular specimen was gorgeous - I kept stroking his head feathers as they were so soft and lovely.
 Next up was the base for the Adder. (who you can see behind the container with the blue lid in the workshop photo from earlier)
This one was left entirely up to me to design and put together and I really couldn't be more pleased with it.
The groundwork had to be mostly flat so the snake had enough space to be displayed but I thought having the bracken rise up at the back would add visual interest as well as giving an instant snapshot of the kind of habitat they live in.
Everything probably looks like it'll just blow away but it's all stuck down incredibly firmly with copious sprayings of watered down PVA! Mrs Adder hasn't been wired in yet so you'll be able to see finished photos next time I'm there.
Now, what about that Mallard from the first photo? You'll notice I called him 'Matisse', well, that was due to the state of his original base...

The person who mounted him had been using it as a palette when painting his feet and beak and I thought it wouldn't have looked out of place in a Fauvist's studio. XD You can actually see where he just painted over his feet - the underside of them are actually a totally different colour! lol
This base had to be simple so I decided to do it like a riverbank with some very fine gravel and a few choice rocks and pebbles to add interest. Gluing on the gravel was a feat in itself - it was so fine it got EVERYWHERE and if I picked the whole thing up before it had dried, big chunks of the stuff came off in my hands.
I think it worked out ok in the end however...


Matisse's leg wires were waaaaay too long so Laurence clipped them down to size and used one of the sanding wheels to give the ends points so they'd have a firmer hold on the MDF.
(Observe the colour of the feet, lol)


Before long he was wired in and I took him off to photograph...

His unfortunate leaning stance makes it look like he's laid all those stones... XD

...and finally, my absolute favourite...

...what's this?...

...a cactus?...

Nope, a hedgepig! :D :D
I absolutely love hedgehogs and this one was adorable. He was a juvenile, so was a lot smaller than I was expecting. (pocketsized, heh)
Again, the base wasn't very big but I wanted to make it look like it had just been lifted from the forest floor and was interesting to look at from every angle. I had great fun scrunching up a big pile of leaf litter and sprinkling it artistically over the whole thing! I finished it the week before last but ran out of time to put the hodgeheg in place.

My favourite part is the moss and lichen covered stick on the left.

Here, I present to you the one, the only, the incredible levitating hedgehog!


XD We needed to mark out where the leg wires would go you see...

...and doesn't he look perfectly at home there?

Genuinely, I would have taken him and the base home if I'd been allowed, I'm SO pleased with it all.


So yeah, that's what I've been doing recently! XD I start back at college this coming monday (eeek!) and will hopefully be continuing with this on fridays. My next base to tackle is for a Common Gull and then, possibly a Barn Owl!


