
Yet another post I started years ago (2022 for this one!) and never got round to actually publishing!
Here's how I remade my 1/6 scale dog, Baxter, with much better articulation than ever before.

Several years ago I made Max and Juno a dog - Baxter - out of wire, polymer clay and fur fabric. He was cute in a derpy way, and posed pretty well, but over time I was concerned about the longevity of the wire armature, and as sweet as he was, I wanted him to be a little more realistic too.

Baxter 2.0 was born a couple of years later; this time made up of a very much homemade plastic armature of tubing and vintage Action Man joints, along with a new and greatly improved head. This worked pretty well, and after some minor cosmetic surgery a few months later to fix a few bits and pieces, I was really pleased with him.

Unfortunately as time went on, the armature proved to be far less stable than I’d hoped, and his hip joints kept popping out. In addition, the padding I’d added actually hampered the articulation, making him stand really awkwardly all the time, and despite my best efforts I just couldn't look past his dead shark-like eyes and stilt legs.
Whenever I go out on a walk I always take some dolls with me in case the opportunity for a photoshoot presented itself, but after a while I realised I’d been deliberately avoiding bringing Baxter because he just wasn’t flexible enough and I really didn't like looking at him.
I knew I’d have to do something to improve him at some point, but I just didn’t know what or indeed, when. Eventually I found the motivation I needed and at nearly 2am one night I got out the scalpel and hacksaw and started some extreme and much needed plastic surgery... 😈
In true ‘me’ fashion, I didn’t plan anything, or even check what supplies I had first, I just got stuck in, only to panic later on when I suddenly couldn’t remember if I had any of that exact fur fabric left. (I checked later on and by some miracle I had literally *just* enough)
I was due to go on holiday at the weekend and I hoped I could get him done by then so I could take him with me for photos, but unfortunately I came down with the worst head cold I’d had in years, and the holiday ended up being cancelled as a result. 😩 I ended up finishing him just in time to spend the weekend stuck in bed! 😂😂
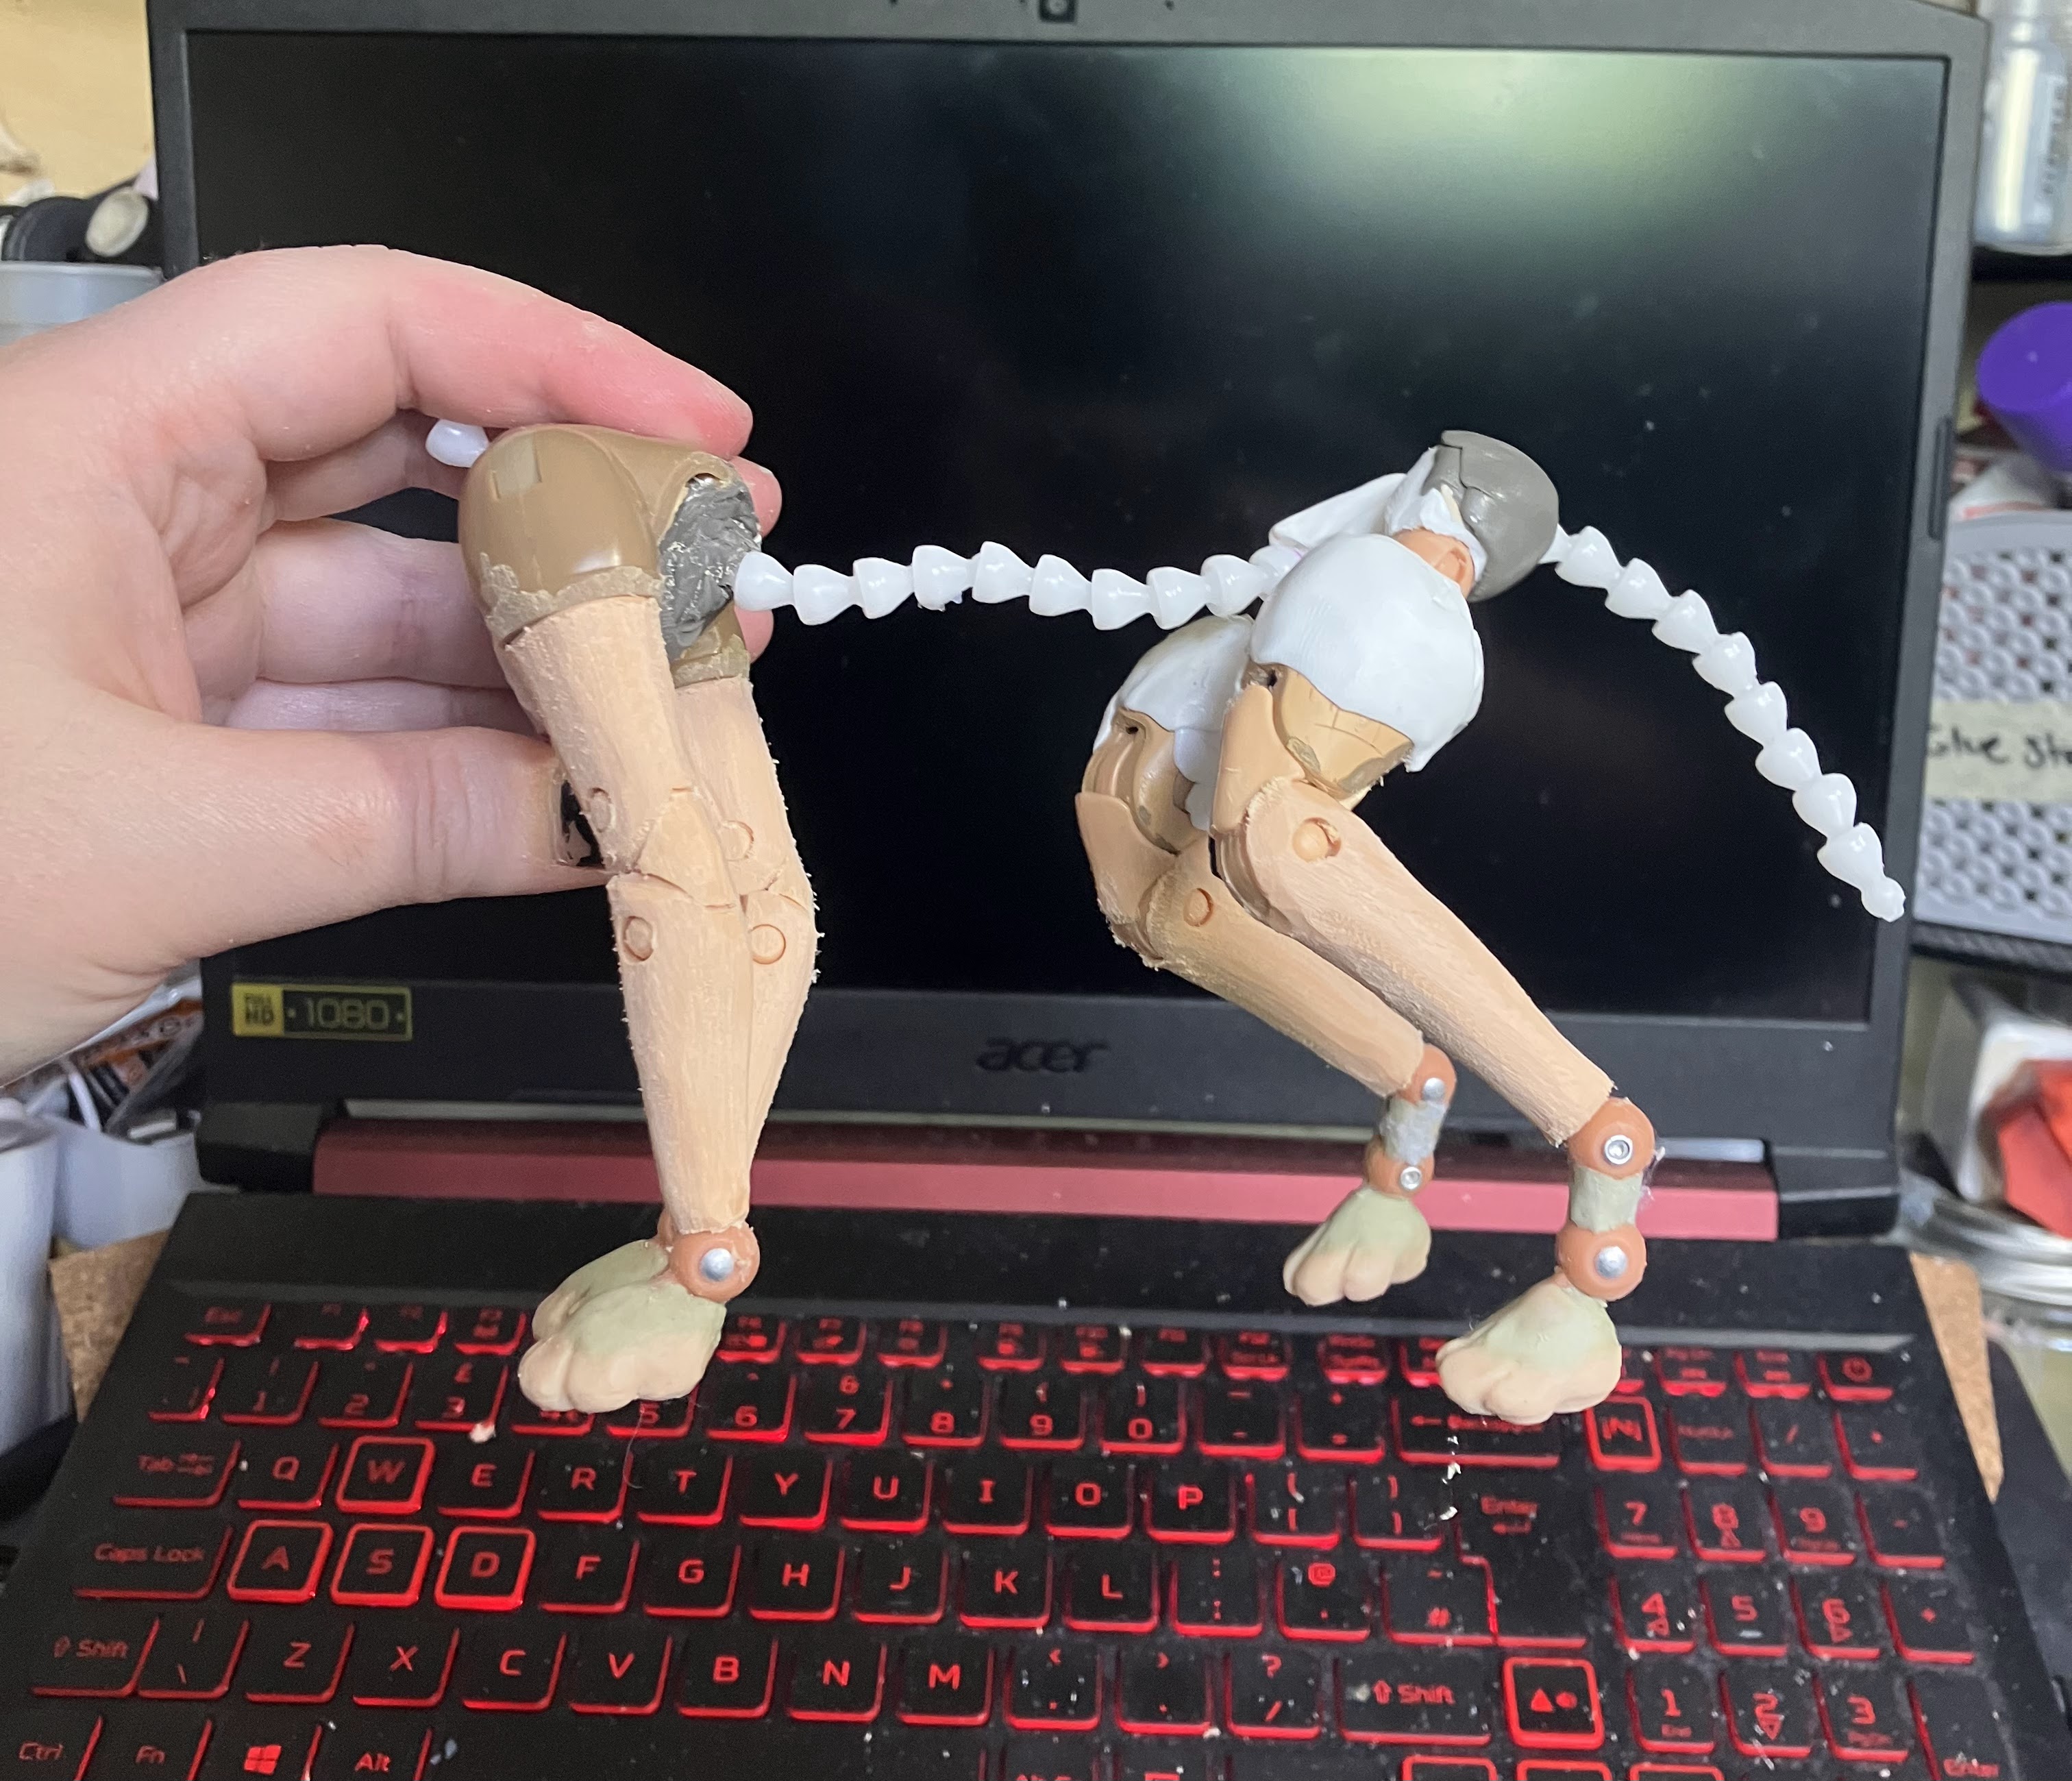
To begin with I unpicked the stitches on his belly fur to reveal the armature. I’d used plastic tubing/epoxy for the joints to sink into, but they’d come loose, and upon further investigation, so had a couple on his legs. It was at this point I just thought ‘sod it’, and did a full dissection. 🙈


 |
| He never expected this when he signed up... |
I’d been toying with the idea of doing something entirely different with his joints this time, which I thought would be far more effective and reliable long term. By using a pre-existing articulated figure rather than individual joints, I hoped that the end result would be a lot more stable, and I wouldn't have to worry about limbs getting loose over time or bits falling off.
In one of my many parts boxes, I had an ‘HM Armed Forces’ figure I’d picked up at a charity shop. They’ve got really nice articulation but are a lot smaller than your average 1/6 figure, and as they're very muscular, I couldn’t even use the body for a child or teenager, so I was a little lost on what to do with him at first…but then inspiration struck and his fate was sealed... 😈
Proportionally he wasn’t far off from the current Baxter, so I got out my trusty hacksaw and Dremel and did some chopping to make things fit!
(I feel it’s only right that I confess I was happily listening to true crime documentaries about serial killers whilst doing all this, and I’m not sure what that says about me 😂😂😂🙈)
 |
| Nightmare fuel? Yes, sorry. |


I thought his human legs would make good hind legs with a few tweaks, so to begin with I dremelled away some of the bulk so they wouldn’t be so thick, and also to increase the range of motion of the joints. I wanted to keep the swivel joint at the top of the thigh but when I tried to separate the legs from the hip, one got broken, so I had to improvise.
In hindsight, I wish I’d bitten the bullet and chopped up a MTM Barbie instead, as the limbs are much slimmer and would have required less work but you live and learn!

The forearms were perfect as they were, but the torso was far too wide, so I chopped out a big chunk of the middle, then smooshed it together again with my new favourite material: FORMcard thermoplastic.
You just pop it in hot water (or pass a heat gun over it briefly) and it changes to the consistency of chewing gum, which you can then mould and shape until it cools, then reheat to undo or alter it further. This stuff is an absolute gamechanger, especially for someone like me who often doesn’t plan or think things through, and ends up making big mistakes. I did this several times during the process and if I’d used epoxy as usual, I’d have found it almost impossible to correct them.
I ended up getting rid of most of the torso and only keeping the part that held the arms in place for extra articulation. In hindsight I should have taken more off the chest when I cut it in half as he turned out very broad at the front.

The plastic armature spine was salvaged from the previous Baxter body, and I attached the front legs to it using more of the thermoplastic.
My first attempt with the hind legs involved using some doll shoulder
joints stuffed into the thighs and a bamboo skewer for the swivel and hinge, but I completely forgot it
would leave him with really limited sideways motion at the hips so later on I
scrapped that idea and dunked his butt in a mug of hot water so I could
get the plastic back and start again.
I also didn’t like the way it
looked, as the hinge was lower down than it should be and the whole
thing looked super clunky, so I’m glad I did it.
I also made him some new feet with more vintage Action Man joints, polymer clay and Apoxie sculpt. Next time I think I’d like to try making the feet entirely from thermoplastic for durability, and as I made a mould of the paw pads, that's always an option.


Proportionally he did look pretty good - I had a dog skeleton up on my laptop for reference at all times as I’m much more used to horse anatomy and I worried I’d end up making him a little too equine 😂


It was at this point that I decided I wanted to change the hips, so
after a quick hot water dunk to remelt the thermoplastic I started
again, this time with the hips and upper thighs from an Ever After High
doll, which had a
better range of motion.
I'm sure there was probably a much more straightforward method of doing all this, but half the fun for me is in trying out new techniques, and in many cases, just straight up experimenting. I've got no shortage of spare and broken and dolls in my stash to try things with, so it wasn't like I was wasting things.
(I literally have a box above my desk labelled 'Mangled Bodies + Body Parts and Assorted Limbs' - make of that what you will! 😂)
I carved out the original thigh with the dremel to make space for the upper thigh of the EAH doll leg to slot into, then used more trusty thermoplastic to hold it all together.


In using the new thigh, I'd completely got rid of the swivel joint I wanted to keep in the first place, so the leg wouldn't be able to twist properly. 🙈

This was very annoying, but luckily I remembered I had a few K’Nex parts in one of my boxes of useful things, and thought they’d make perfect swivel joints.
I shortened the purple part and scored it up with coarse sandpaper and files to give the plastic more to grip, then sank it into the thigh part with lots of melted thermoplastic to hold it securely. This took a bit of finagling but eventually I managed to get it so the purple part sat flush with the cut end of the thigh, and the green peg could spin freely.
For the new hip joint I dismembered a random old Barbie Fashionista I had knocking around in the body box. In hindsight, I wish I’d used a different one as the shoulders didn’t have quite the range of motion I would have liked, but it worked better than before anyway.

I chopped her upper arms off halfway up, then sank the green part of the swivel joint into the inside of the arms and glued it into place. I kept the upper back part of the torso and shaped it a little with the dremel, then fixed it to the armature with more FORMcard. The neck hole was the perfect diameter to thread the spine though which felt apt somehow. 😂


(I hope that makes sense, I've been trying to re-write this bit for five minutes!)

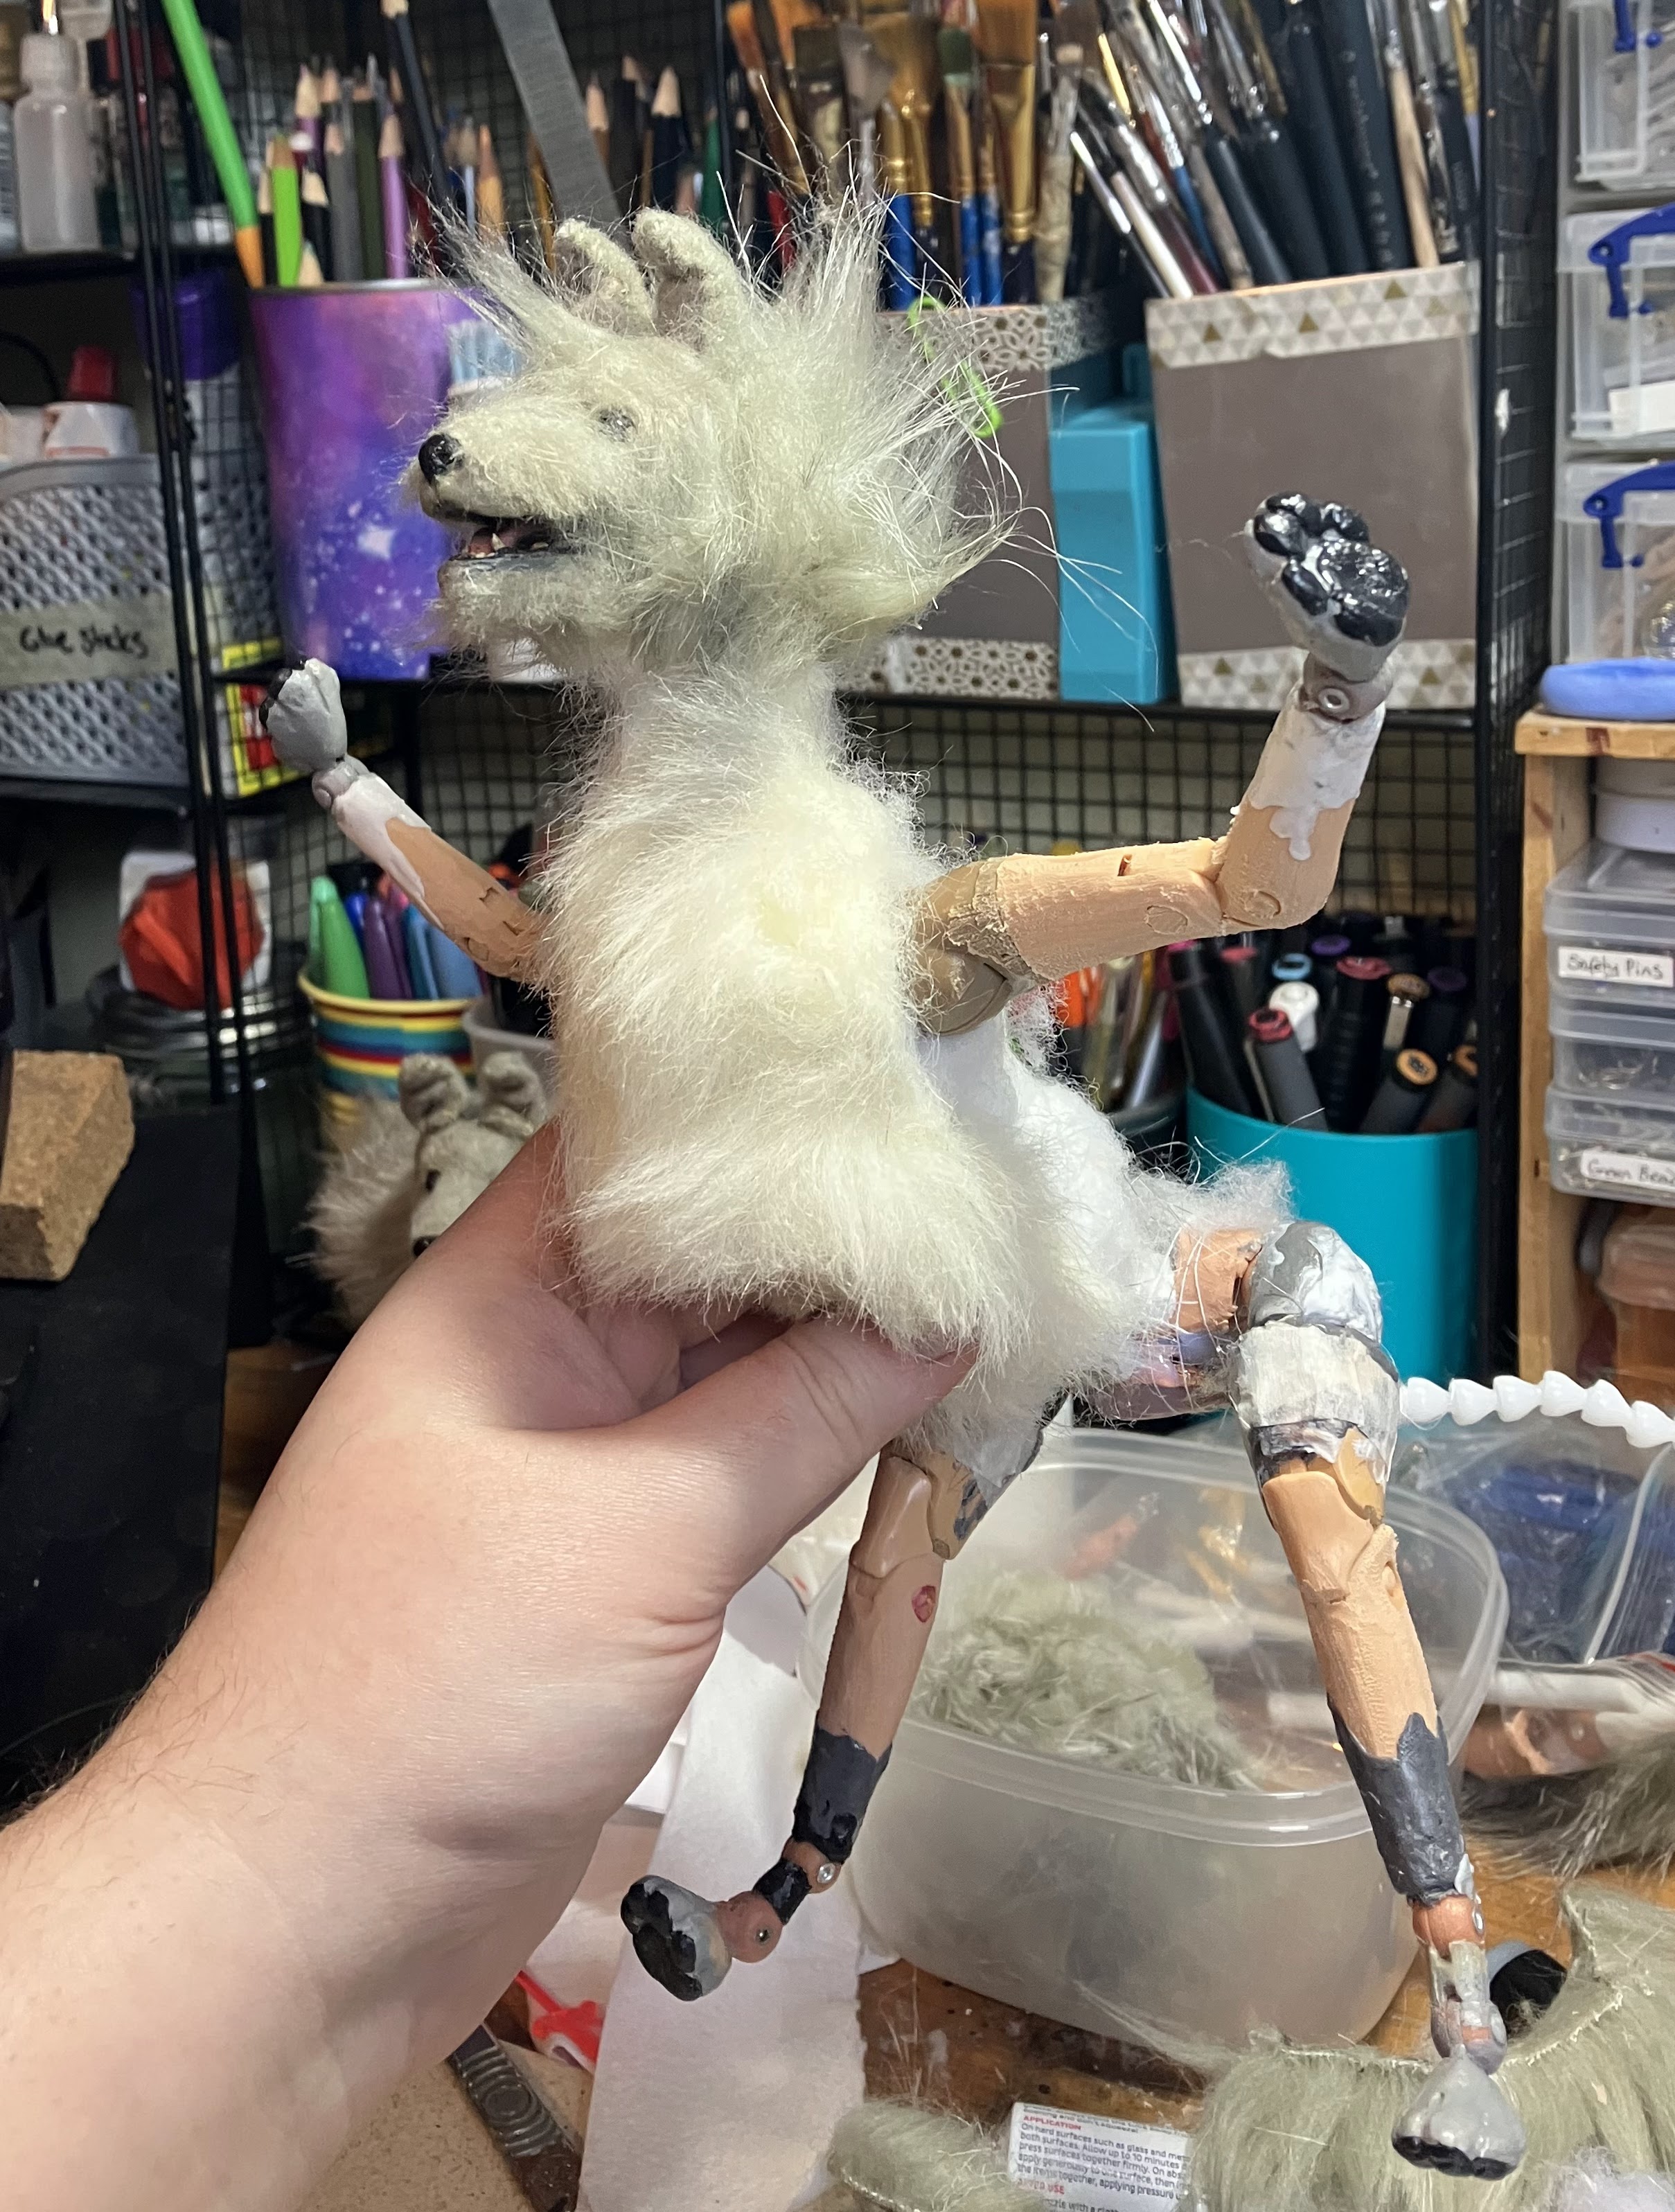
I was so much happier with these joints; it looked far more proportional and the poseability was great. I wrapped some wadding around the spine a few times to give him a nicely padded torso, but not too much as I knew the faux fur later would bulk him out even more.
Here's a quick video showing his range of motion - not too shabby I reckon!
-click here-
It just goes to show that your first or even second attempt may not
always be the best one, and even if you think 'oh well, it's done now,
I'll just have to put up with it', that's not necessarily true. You can
always tweak things, even if they seem daunting!


With the head back on he was a little unbalanced, so I hot glued a few pennies under his pelvis to act as a counterweight. Not the most flattering or complicated of solutions, but it worked!
I also painted his paws, and finished them with some matte sealer to protect them from any scuffs or paint damage. After adding the fur to his body later on I added some flocking in-between the paw pads for a bit of extra realism. In any future dog projects I'd probably either cast them in resin or epoxy, or use thermoplastic to make them sturdier, but surprisingly they've held up really well over the years.
His head is in a bag here just to protect it from damage while I was faffing about with the joints earlier, but don't worry, he could breathe perfectly fine! 😉
After finalising the skeleton it was time for one of the most stressful parts of the whole endeavour…the fur. 😩
When I made Baxter Prime, I used what turned out to be incredibly cheap
and low quality fur which I already had in my stash, and I obviously couldn't
change his colour at this point when he was an already established character, but it did cause its own set of issues.
As I said, I went into this project somewhat impulsively, and didn’t even check if I had enough of the matching fur fabric left. Luckily I did, but I didn’t have any more of the white fur I used for his chest and belly, so I had to scramble to reuse what was left of his old pelt. Unfortunately some of it was unsalvageable so he’s not as floofy there as he used to be. (but he more than makes up for it in floof elsewhere!)
I felt it would be easier to add the white fur first, and then sew into and around it with the rest of the fur. I'm not exactly sure if it made any difference in the end, but oh well.
 |
'Give 'em the ol' razzle dazzle' |
 |

I sew quite a lot, usually by hand when I can’t be bothered to get the machine out, and I make patterns for doll clothes all the time, so those parts don’t faze me, but working with fur fabric really is The Worst.
I tried making a pattern with scrap fabric and tissue, but it proved to be more time consuming and awkward than useful, so I did my usual and just made it up as I went along. I started off with the forelegs, then the hind, then one big piece over the back which linked everything together and a few random patches here and there when bits didn’t fit.
This particular faux fur is exceptionally cheap and nasty, and I really wish I’d chosen better when I made him originally but I was committed to it now so there was no going back! 😂 It’s very plasticky and has a long pile which needed to be trimmed down as I went along. Despite my best efforts to cut it into a box to avoid mess, there were fibres EVERYWHERE, and I was finding them in my stuff for weeks, even after two rounds of vacuuming! 😂
His Godzilla stage was fun though. 😂😂


 |
| peets! |

One aspect of the crappy faux fur I hate is that to make it have a realistic variation of colour, there are lighter hairs interspersed throughout, but when you trim the hair short, as I have on the legs here, you can see them as little white spots, and I don't really like them.
I could potentially have used a grey sharpie or something to colour them in, but I've had mixed results in the past so I've just chosen to live with it.
Next to the OG Baxter he looks miles more realistic, which I’m really pleased with, but next to Max and Juno he looks hilariously huge. He’s by far the biggest of the three Baxters (and lol, doesn’t that sound like an Agatha Christie novel or something? ‘The Mystery of The Three Baxters’ 😂) and I do regret not making him a little smaller.


I don’t know the first thing about dogs really, I’m 100% a cat person, and I don’t have many dogs I interact with regularly, so my sense of scale has been getting gradually worse. I originally envisaged Baxter as being a collie cross of some kind, but now I’m wondering if the other half was Newfoundland or Irish Wolfhound to account for the sheer size of him! 😂 (In fact, if you Google ‘collie Irish wolfhound mix’ there’s a grey dog that bears an uncanny similarity to him, if considerably less floofy.)
He looks great from the side but I accidentally made him really bandy legged at the front which is unfortunate, and he's definitely much more chonky - I'll need to make sure Max and Juno aren't feeding him too much protein from now on I think!
😂
Size aside, I’m super happy with his articulation.


 The only parts which might fail are his ankles, but having already
repaired one with thermoplastic when it decided to break juuuust as I
was finishing up, I think they’ll be easy enough to fix if there’s any
problems.
The only parts which might fail are his ankles, but having already
repaired one with thermoplastic when it decided to break juuuust as I
was finishing up, I think they’ll be easy enough to fix if there’s any
problems. I deliberately left those joints exposed this time, and simply glued on chopped up fur ‘flock’ rather than completely cover with the fur fabric. This allows for a much wider range of motion and leaves easy access in case of issues.
All in all he took about a solid week to do, with the fur taking the longest. The resculpting flew by, and I actually bought some more thermoplastic pellets to play with afterwards as I have so many ideas of how to use them in future projects. If epoxy intimidates you but you want to do some drastic resculpts, I’d highly recommend this stuff!
I’m so glad my impulsive decision to remake him worked out so well, and I'm just annoyed it's taken me so long to share the process!
I couldn't resist doing a little bit of stopmotion animation after I finished him to show off his articulation - he's a very good boy!


You always publish the best posts and I look forward to reading them!
ReplyDeleteI'm totally in awe of your creativity and your fearless-ness!
As good as ever a post of yours, and a deep glimpse into your creative process. Have you ever considered taking notes as you went along? I know that slows things down a bit, but the "harvest" of ideas is worth it to me,... One cannot depend on one's memory forever, alas! Three years is just how long my next book is taking, g'rrrr.... I am a dog person much more than cat. I think you've captured the canine beautifully. Irish Wolfhound, wolf even! Yes, his articulation is astounding, top notch. I love the movie! Juno and Max are amazingly lucky! Pat him for me... !
ReplyDeleteOh you misunderstand, I typed this all up pretty much immediately after I made him, I just procrastinated on posting it for years. 😂 I definitely do get ‘in the zone’ when I work so I do find it difficult to take notes, but it definitely helps!
DeleteThis is so good! I've never seen anything like this and it's so awesome to see your whole process. First bookmarked your blog when I found your mini salad bag tutorial and finally started to have a look around your other posts, loving all of it :)
ReplyDeleteAwww, thank you so much! I have so many posts half written that I need to finish - I do so many projects and then never actually get round to showing them off. 😂
Delete