
2020 has been, as most folk I'm sure would agree, something of a disaster.

While live shows and other meetups have been avoided for obvious reasons, one thing the model horse hobby has succeeded with this year are community challenges and events. Photo showing has had a huge comeback, and there have been so many groups dedicated to customising and propmaking which is really great to see.
My dolls have kind of taken over in recent years, and while I still love my horses, I don't have the space for the kind of stables I want to make for my Julips, so they've unfortunately been put on the back burner for a long time. However, once I heard about the Bridle Tree Barn Raising Challenge on facebook, I couldn't resist joining in! The idea of it all was either to make or customise a barn, stable or arena for your models through the month of December, with fun classes to enter including one for festively decorated scenes.
A couple of years ago my friend Heather had gifted me a vintage flatpack Magpie Models stable, and until now it had been languishing on a shelf as I didn't have the inspiration to start on it. With this challenge however, it seemed like the perfect opportunity, and as it broke down into pieces, and could be assembled without any glue, it could be stored in exactly the same way as before, so I wasn't losing any extra space. Because it was designed for Magpies, it's a little underscale for my
Julips or other brands, but some of the larger Collectas look pretty
good in it. (My little roan model here is Damson, a Magpie Welsh pony I customised earlier this year)

It's a great design - MDF walls, floor and roof, held together with small plastic pegs so there's no glue required and it takes less than a minute to assemble. This particular one didn't come with doors, as the style was intended to have a chain across the door instead. Luckily I had a lot of wood in my stash, and managed to find a piece exactly the right size to make into doors. I cut them to size and scored planks into it with a metal dotting tool so it looked like it was made up of several pieces of wood rather than one solid piece.

...but more on that later, next up we have the most time consuming, yet fulfilling part of the project, the bricks!
As long time readers of this blog will know, I used to do a lot of photography with my Julips and their many stable set-ups. Unfortunately they took up far too much space and have been packed away in the loft for years as a result. They were also far too clean and modern looking, which, while I didn't dislike, never really fitted my aesthetic for how I envisaged the yard to be. I imagined a yard with chipped paint on the stable doors, moss in the bricks and just a general layer of grime from use and the passage of time. At some point in the future I'd love to make a proper stable block for them, perhaps using the same construction techniques as this one! Anyway, tl;dr, I like weathering!
I
began by painting some thin cork sheet with various browns,
reds, off whites and yellows roughly daubed on with a paintbrush and sponge. Originally I wanted to use egg cartons because they have a really lovely texture but we didn't have nearly enough, and the cork turned out to be really nice so I'm glad it worked out this way.
I didn't take a photo of this stage unfortunately, but there was no real technique to it, I just smooshed the paint on and mixed it up as I went along. Once fully dry, I guesstimated the size of bricks I'd need, (which in hindsight was still way too big!) made marks on both sides of the sheet and then used a metal ruler and scalpel to cut it into strips. Each brick was then cut out individually using scissors (because by then I was sick of measuring everything and wanted to start sticking stuff on (Hot Tip! Don't do that if you don't want wonky bricks!) and I started gluing them into the walls with tacky glue.
At first I did the sensible thing and measured out precisely where I wanted each layer to go, with a gap for the grouting, but by the time I got started I'd realised I'd cut some of the bricks wonky, (see!) so in the end I just kind of winged it.


There was something really quite soothing about this stage. It took ages, but I had my laptop set up on the same desk and decided to binge ER as the full boxset was available to watch on All 4 and I'd never watched it from the very beginning. (seeing as I was literally 4 when it first came out XD) I'd highly recommend having something like that on in the background whilst doing really tedious tasks like this as it makes the hours fly by!
Often when I see people make bricks for doll's houses and things, they just paint them red or orange with no variation, and while you can get bricks like that, if you want something a bit more realistic, you really need to add in more colours. Dabbing on some off white and black in places looked really good, and I made sure that I mixed up all the bricks once they were cut out so I'd select the next one at random every time. Of course there was the odd time I chose specific ones if they looked particularly nice and I wanted to highlight them, or I had an awkward space to fill, but for the most part I didn't and I really love the natural variation that created.


Once they were secured, I gave them a few coats of Mod Podge to seal them in.While I waited for that to dry I made a start on the doors. While the kit didn't come with them, they did have some really nice plastic hinges and a faux bolt.

I started out by measuring out the
planks, then scoring them with a metal dotting tool for some added
dimension. I added a few dents and scratches here and there to add to
the overall wear and tear. I then gave them a few coats of Citadel
washes (now known as 'Shade' paints in the range) in Agrax Earthshade and a touch of Nuln Oil, and a couple of layers
of varnish to seal it in.

After that was dry, I decided to try out a
technique I’d seen on Pinterest ages ago for weathered paint effects.
Simply brush on some Vaseline in areas you want the paint to chip off,
then paint over everything in the colour of your choice. I went for this
lovely sage green coloured emulsion I picked up from my local DIY shop when
it closed down.


I used my heat gun to speed up the drying time on
everything because I'm ridiculously impatient and wanted to get to the fun parts, and after a couple more layers of paint, I got a tissue and simply
rubbed off the Vaseline covered areas which exposed the weathered wood
beneath! It’s such a simple technique but it has so much scope! I then
went in with more of the washes, and added a little more grime to the bottom, where it would naturally accumulate dirt and staining.


I forgot to photograph the next part but I raided my metal stash and found some thin metal that I think had originally been around the cork of a fancy wine bottle or something. It was nice and malleable, but still quite sturdy, so I cut out a rectangle the width of the door and folded it over the top to make one of those anti-bite strips you see on a lot of stable doors and windows. The glue didn't like it much and there's a few bits on the back where it parted company with the wood but luckily it isn't too noticeable. The downside of doing this was that it inadvertantly made the bottom door look too short which I hadn't anticipated. The floor of the stable is raised a little as well which makes it worse. In hindsight I should have made the bottom door a little taller, but never mind.
Back to the bricks!
I didn't have any Polyfilla so I mixed up some homemade grout (plaster of Paris and PVA glue) and covered up all the brickwork, then scraped off the excess with a ruler and scrubbed it off the bricks with a stiff paintbrush and a little water. It’s important to note that I gave all the bricks several coats of Mod Podge beforehand so they were sealed nicely. I was really worried that either the paint or the bricks themselves would come off, so I made a little test piece on a separate piece of wood so I could try out the technique in advance.
Once the grouting was dry, I felt it looked a little too clean, so I diluted a little more Agrax Earthshade and roughly applied it everywhere, using a bit of tissue to soak up any excess. The difference was pretty striking and I'm really glad I did it because it makes the bricks look much more established, like it's a building that's been around for decades. This step is really easy to overdo, so if you're trying it yourself I'd recommend lots of thin layers so you can control the level of grime. Too much and it looks really fake. I tried to think about which areas would have the most dirt, so the bottom of the walls were the worst, and the top wasn't quite as bad, especially on the front, where the overhanging roof would stop any water trickling down from above.


Once the walls were all done, I glued on the hinges to the doors and laid them into place so I could mark out where I wanted them to sit on the brickwork. I then cut out the bricks so the hinges could be sunk into place and glued them in as well. Unfortunately it was at this point that I realised the door looked too low, so I carefully trimmed a little off the top door and replaced the hinges so the bottom door was now situated a little higher up with a gap at the bottom which helped a lot. Because I'd cut out some of the brickwork there were now some really obvious gaps. I was able to fill a couple of them with leftover bricks, but the rest I was able to disguise later on with some moss. This is a clear example of why taking accurate measurements and dry fitting things is super duper important!


There was a noticable edge to the front wall when everyrthing was assembled, and making the bricks match up was going to be tricky, so instead, I weathered up some wooden coffee stirrers and glued them onto the edges so they looked like part of the structure itself.

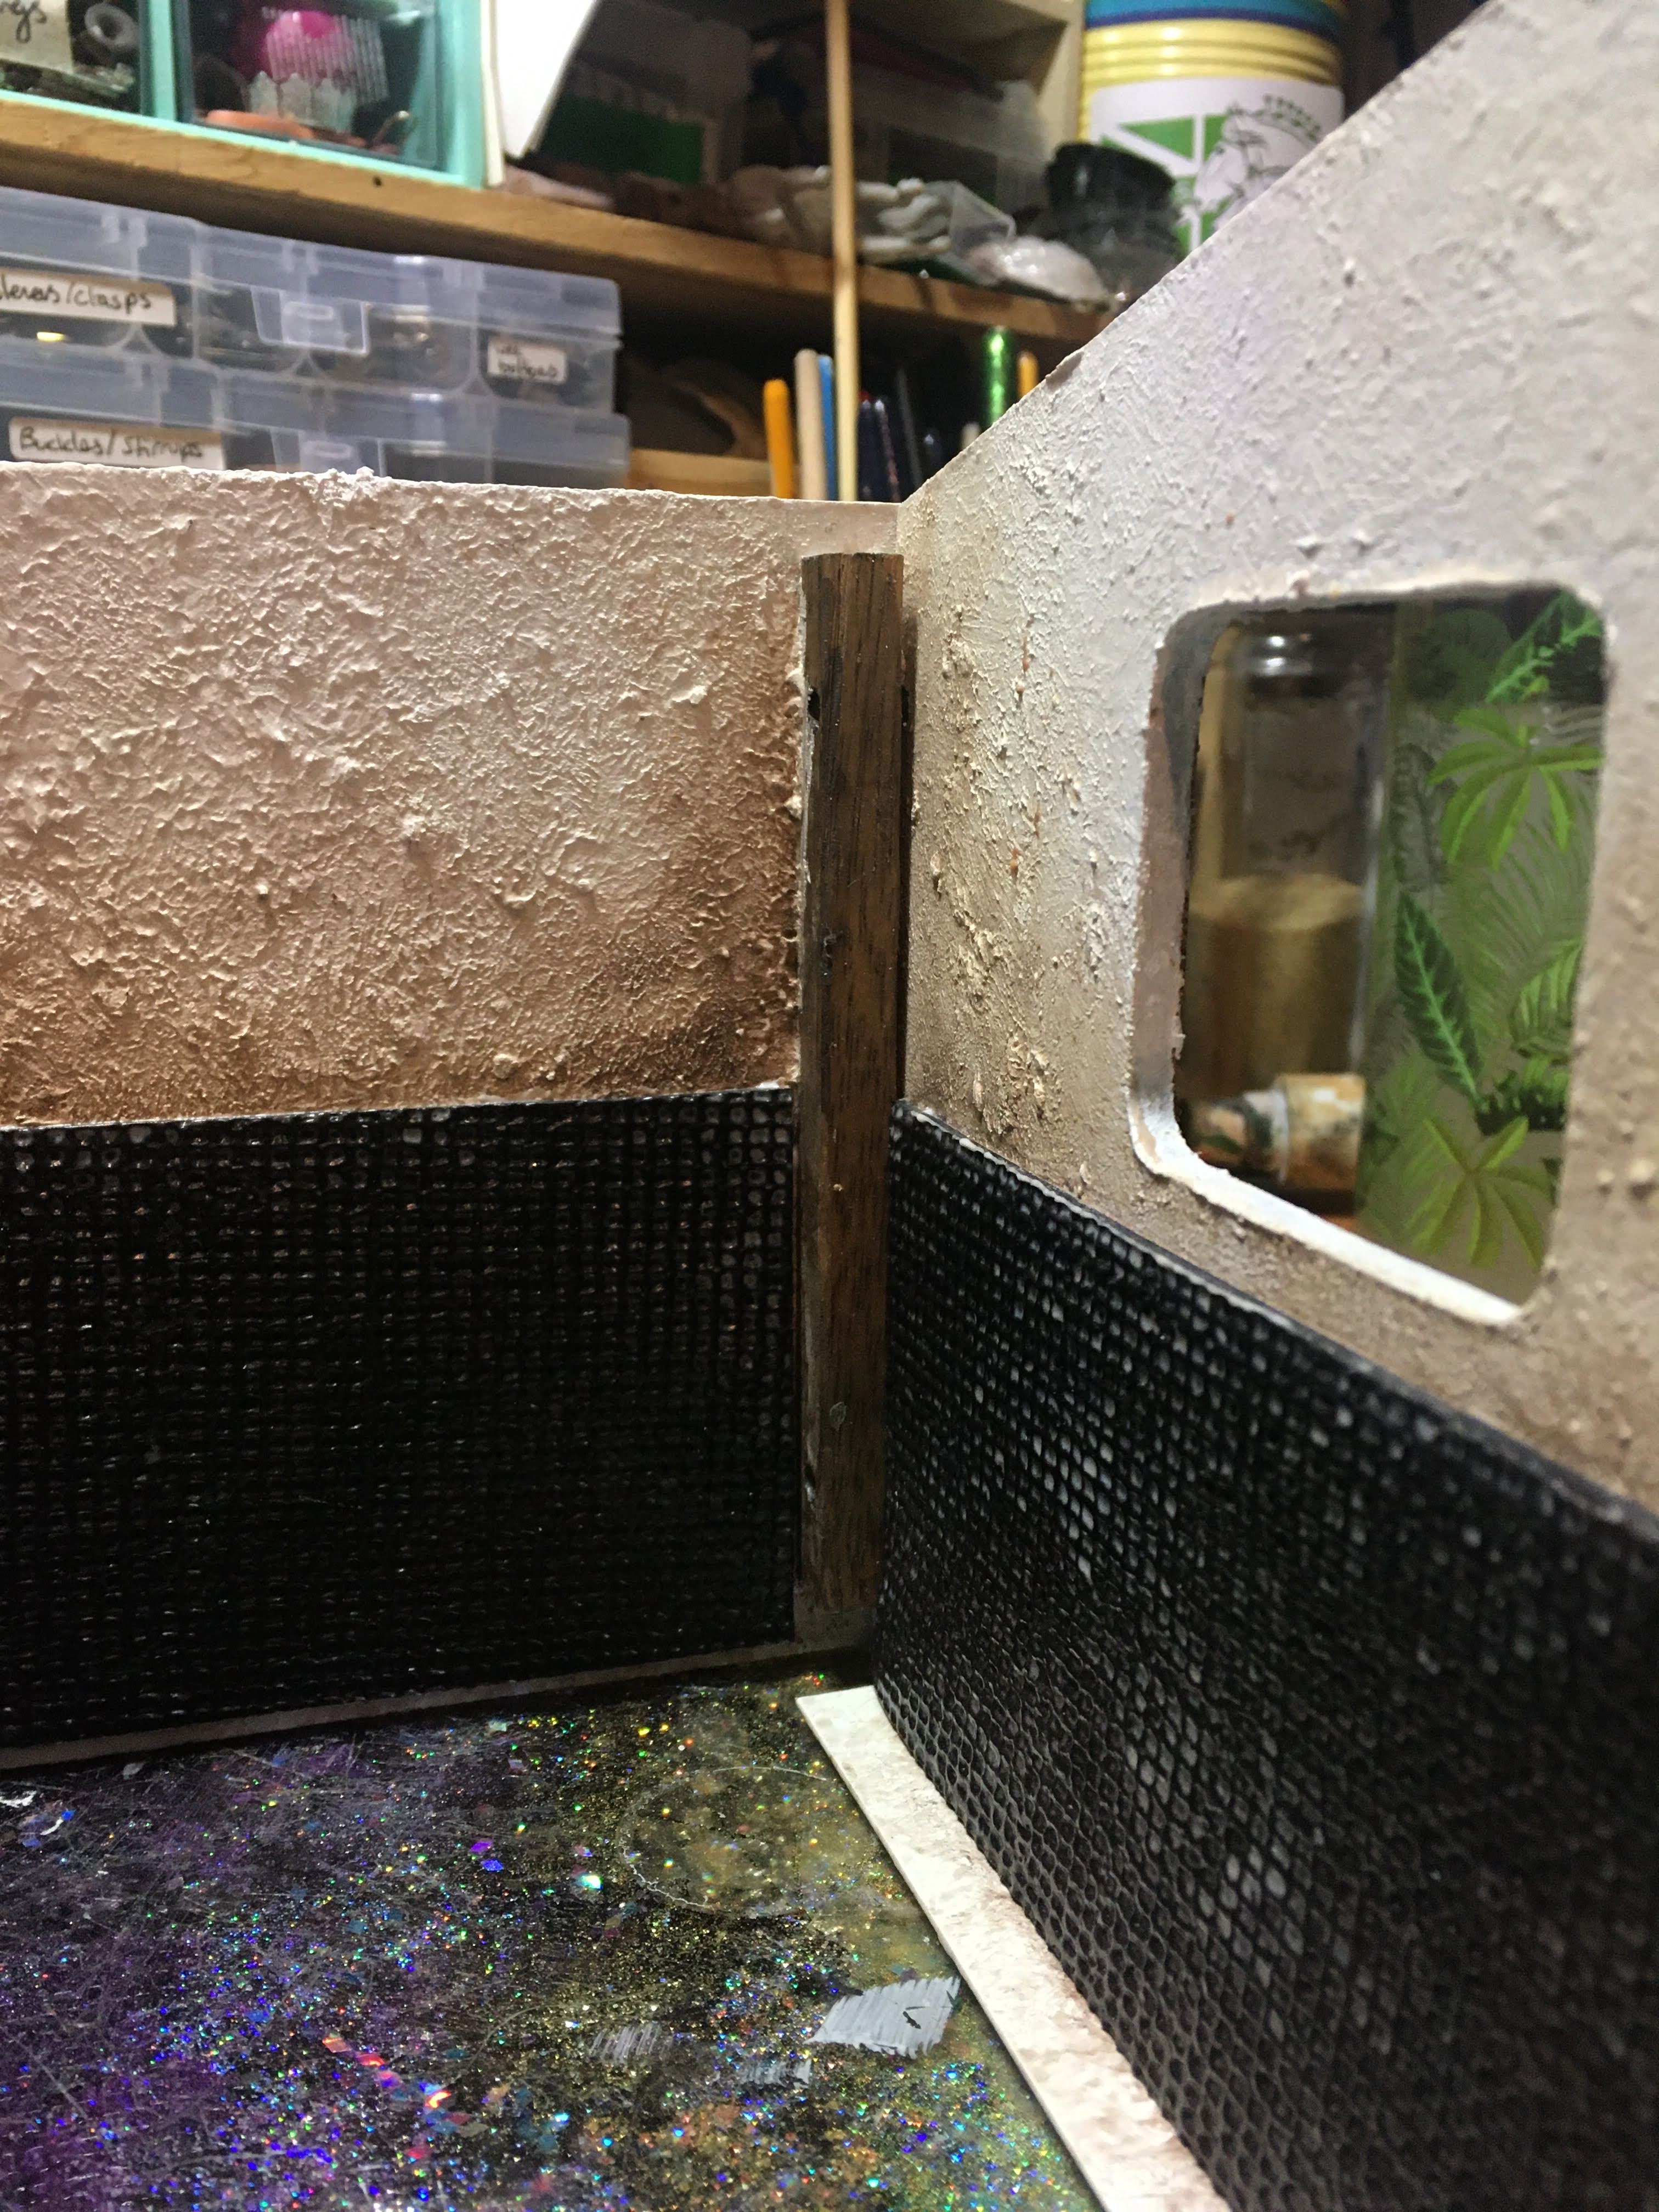
I wasn't sure what to do with the windows for the longest time. The corners were rounded off already which looked nice when it was just plain MDF, but I wasn't as keen now that everything was bricked over. I toyed with the idea of glazing them with clear plastic from packaging, or making some kind of shutters, but in the end I went for some wire mesh I had in my stash. I think it came from a garden centre or something originally. I clipped out a piece big enough to fit over the window, then cut around it with a scalpel so I could remove the bricks and allow the mesh to fit snugly into the wall.


I used tacky glue to fix it in place, (with a heavy jar on top overnight to hold it down) then made a simple wooden frame
out of yet more coffee stirrers and glued that over the top. I didn't
bother making a matching frame for the inside as in my experience, they tend to be pretty basic. I did a little more weathering once it was firmly affixed, and it's still drying here, hence the massive patch on the bottom.

Time for the inside!
I wanted the interior to have a kind of rustic stucco/plaster walls with rubber matting on the floor and wall panelling. The former was pretty easy to do, I just got some acrylic gesso and a chunky brush and applied it thickly in a stippling motion to get lots of texture. I may have overdone it a little in places, but it adds to the rustic aesthetic I think! Once that was dry I scrubbed pastels into the corners and up the sides to emulate the buildup of dust and manure and general foost that every stable must acquire over time. The day I did it was wet, so rather than attempting to dodge the rain outside and spray it all with sealer, I used mod podge and stippled it on with a brush. This made some of it a little darker and more contrasty than I'd intended and in hindsight I really ought to have used a lighter shade of pastels. It's one of the only parts of this build I wish I'd done differently, but hey-ho, maybe the stable owner is really lazy when it comes to mucking out. XD
For the rubber matting, I did initially settle on some really nice textured black foam I bought a few years ago at Hobbycraft, but it was quite thick, and combined with the MDF base and the low door issue from earlier, I decided against it in the end because it only added to the problem. After a lot of back and forth I just used some very thin foam I glued to a piece of card for stability, painted black and added a little weathering to. It wasn't ideal, but sometimes you just have to compromise.
If I couldn't have a textured floor I was determined to have textured wall panels, so this time I took a trip up to the loft and raided my wallpaper stash. Any time I visit a DIY store like B&Q or Homebase, I always make a bee-line for the wallpaper section as you're allowed to take free samples. Obviously they want you to buy full rolls of the stuff, and sometimes I do if it's a really useful texture. You can use it for, well, wallpaper, obviously, but in recent years there's been a lot that have wood or stone textures, and they're incredibly handy for miniatures, especially if you want the illusion of stone without the weight. I actually used some to make bricks for Max and Juno's kitchen, and very nearly used the same technique for this stable.
Anyway, I had a good rummage and eventually settled on this kind of crinkly silver stuff that reminds me of old ceiling tiles. I glued it to some more of the thin craft foam, painted it black and glued it into place on the walls. The panels got the pastel and mod podge treatment as well, but the dirt doesn't show up too well in photos unfortunately. Oh and I added a doorframe on the inside with coffee stirrers too at some point. The walls have wooden uprights in the corners for the plastic pegs to go into, so I blunted the corners with a scalpel and sandpaper, then gave them some weathering and staining with the Citadel washes too.


The two side walls had a kind of right angled piece of plastic glued to the bottom so the floor wouldn't fall out if you lifted the stable once assembled. As a result, those panels were a little uneven but as it was foam, it was easily disguised, and once the floor was put in you really couldn't notice it. I really wanted the panels to be in line with the top of the door, but if I did they'd be level with the windows and I wasn't sure if I'd ever add an inner frame at that point so I made them a little shorter.

The roof was super fun to customise. It started out as just a plain piece of MDF with a wooden square ended dowel at the back to stop it from sliding off the top. It's a great bit of design, that!
Anyway, I wanted the inside to look a little more interesting, so I rummaged in my wood stash again and glued on some of my own thinner square ended dowels (I think they were sold as toffee apple sticks?) to make rafters. I had to take the thickness of the outside walls into account, so there was a gap left around the sides. Once fully dry, they were given a quick sand and some more of the wash, along with some diluted acrylic paint to add a little more depth in places.

There was a slight overhang at the front, but it wasn't quite enough for me, so I used a thick piece of mountboard glued on top to extend it, then added on a sheet of textured card (used for scrapbooking) to emulate a corrugated metal roof. It started off as navy blue, but I painted it black and drybrushed on some copper, silver and rusty brown paint, then actually went back and added back in some blue which turned out to be incredibly effective! I didn't want it to look totally dilapidated, but have just enough decay that shows it's been up there for a good long while but could last a few more years until it needs to be replaced. I also added a strip of wood to the front of the overhang to give it a more polished look and also to disguise the fact I'd extended it in the first place. The moundboard warped a little at one point, which gives it a bit of unintended character.


Back to the doors!
Yes, I know I'm doing this in a weird order but that's apparently just how I roll.
The kit did come with a (non working) latch which I cut the end off and glued to the wall, (excising the bricks where needed) then lined up the rest and glued that to the door.

Obviously it couldn't lock as there was no actual bolt inside, but I really wanted to be able to close the door and have it stay closed without having to resort to blue-tack or something, soooo....

I did some googling for the kick-bolts you find at the bottom of every stable door, and made my own out of scraps of styrene and a flat-headed pin. I broke several pieces when I tried to make the hole for the pin to go in until I figured out it was much easier to make the hole first, then cut the shape around it.
It works exactly like the real thing, and it's way too much fun to flick open and closed with your finger.

You're probably now wondering, 'but Christine, where did all that moss come from? How could you skip over that part, it's the only thing I wanted to know?!' and well, now I'll tell you!
This was easily my favourite part of the entire build, and it's actually ridiculous how easy it was to do!
You can buy all manner of scatter and foliage for miniatures, most of which is well known in the model railway and wargaming communities - painted sawdust, dyed foam, natural fibres etc, but this one was a little different. Flocking powder! I have a stash of various colours I bought a few years ago for another project, and unfortunately I used up all my greens on this so I'll need to buy more if I want to do something similar. It comes in a variety of lengths (Its basically very finely chopped up acrylic fibre I think) but the stuff I have is more like powder and is very fine. I think I bought all mine from a nail art supplier as apparently there was a fad a few years back for 'velvet' manicures of all things and as a result there's a huge variation in colours you can get.
Anyway, all I did was brush on a little glue in the areas I wanted moss, and sprinkle it on. I tried to focus in on where water would naturally flow to and moss would be most likely to grow. Once the first layer had dried I brushed off the excess, reapplied where needed, and added in some green foam for larger clumps in a few places.

The area around the hinges wasn't originally going to have quite as much, but I really needed a way to hide the areas where I'd cut out the brick and this turned out to be it. Once that was all fully dried, I went in with more of the Citadel wash, this time in Seraphim Sepia and a little Agrax Earthshade to break up the colour a little. Real moss comes in a huge variety of shades and there's nothing guaranteed to make your building look fake than neon green moss everywhere! I scraped off some areas where there was a little too much though.


Once again I paid attention to what areas would see the most moisture and dirt, so the bottom of the walls are especially grimy.

My workspace isn't exactly the tidiest but it does the job!
(I posted this photo in the FB group and everyone got a kick out of my random sandwich. XD)

At this point the main structure was more or less done, and it was time to move on to some of the accessories.

I made an off brand 'Likit' stable toy for my Julips years ago using a couple of buttons and some Parma Violet sweets, but I wanted something different this time around. I used some of the same buttons though. (I'm not sure of their actual name but they don't have holes in the middle, just a flat disc with a loop at the back) A couple of those, a couple of normal metal buttons, some epoxy glue and a scrap of resin I had knocking around from my college days were the perfect ingredients. I painted the metal parts with dark green nail polish afterwards. I thought about choosing a brighter colour but I liked how muted the rest of the stable was and didn't want to overshadow that with a pastel treat or something.


I made a little rope from a piece of cord, thread and a Rio Rondo clip and glued the other flat hooped button to the ceiling so it could hang down nicely. It looks great when the light hits it from behind and you get that lovely golden glow.


Once dry, I went in again with, yes, you've guessed it, more Agrax Earthshade (seriously, Citadel, sponsor meeeee!) to add a little grime. Later I dabbed a little glue to the bottom and sprinkled on some dried tea for extra dirt.


I was really happy with it, but one thing was missing...


(unintentionally sexy banana for scale)

Lighting!
I ordered up a couple of LED strip lights on ebay, but with Christmas looming and all the pandemic related posting shenanigans, I wasn't sure if they'd arrive in time, so I got bodging. Using my old standby of micro LEDs for balloons, I (very) roughly put together a light for above the stable door.
I don't have a soldering iron or really any great knowledge of how LEDs function other than LED + wire + battery = light, so apologies to anyone who cringes when you see how I make them work. The lights I use are very small, with two tiny coin batteries all crammed into a little plastic ball. They're permanently 'on' unless you push a tiny bit of plastic into the hole at the back which separates the batteries just enough to break the circuit. With this in mind, I took the whole thing apart and elongated the LED by wrapping wire around the 'legs'.
I made the light fitting out of a scrap of plastic packaging I filled with hot glue, then pushed the LED into it before it cooled. I hoped the glue would help to diffuse the light and give it a kind of frosted glass look, which kind of worked, but I accidentally used one of the 'cool white' LEDs instead of the 'warm white' one, so it gives a much more blue toned illumination which wasn't my original intention.


I purposefully used plastic covered wire to extend the LED so I could twist both ends together to form one cord, which I'd run along the inside of the roof, right to the back where it'd meet the battery. I kept the half of the original casing that held the batteries, and wedged the end of the wires on either side. To avoid any accidental short circuiting, I kept it on while I carefully taped the wires down and got everything into position. The light was hot glued rather unattractively to the roof, but as it would be hidden by the overhang it didn't really matter, and I superglued the wiring in place as well. The battery pack took a bit of faffing to fit in place as I wanted it to be as unobtrusive as possible, while still remaining on the inside of the roof. If this was a permanent setup and the stable was glued together, I could have rigged up something on the back wall, but as each piece needed to be taken apart, it had to be attached to the roof only. As on the original, the 'off' switch is just a scrap of plastic shoved in the gap, so even if it gets lost it's easy to replace. Once I was sure everything was secure, I painted the wires and battery pack black to help it blend in.


Other than the temperature being a little cold, I was really happy with my lighting, but it still wasn't entirely as I planned. I'd imagined having a warm strip light on the inside, like in real stables, and I struggled with how to rig up more of these little lights until, finally, the ones I'd ordered arrived from ebay. They came without batteries, but the little box specified it required two 2032 coin batteries, of which I have many. So, I put the first lot in, flicked the switch and...nothing happened. Oh, maybe I put them in upside down, that's easy to do, so I flipped them around and tried again and still, nothing happened. I put this failure down to old batteries so I switched out a pair from another LED set I had that I know worked but that didn't work either! At this point I was getting decidedly Stressed Out.
I looked back at the listing and discovered they were sold as 5v LEDs and all the batteries I had were 3v, so if I used two in one, were they overloading the LED? I was getting myself in a right stouchie as they say, and after scouring all the local supermarkets for anything that might work, and emailing the seller (who rather unhelpfully told me to check the manual...which wasn't a thing) I tried out a new set of batteries and it suddenly worked, so it must be really picky about how much power is left in the batteries or something. It kind of cracked me up that the super simple 'just add batteries' light turned out to be more of a hassle than the frankensteined contraption I came up with!
I then discovered that the battery box was too big to fit behind the overhang at the front of the roof which is where I'd intended on putting it, so I had to adapt once again. The LED strips come with a self adhesive at the back, so I was able to stick it directly to the ceiling without any glue.

At a later date I plan to make an actual 'glass' fitting to go over it like a fluorescent tube light has, but I thought I'd run out of time so I didn't bother at this point. I just fed the wires through a hole I made at the side of the roof and let them hang out at the back. It isn't ideal of course, but the warmer light on the inside looks SO GOOD and I can't get over how cosy it makes the stable look.
This post has already been ridiculously long, so I'll leave it at
that and make the next post all about the shiny pictures of it complete!

Professional and perfect customer service system, our products are acrylic food box manufacturer deeply trusted by the majority of users.
ReplyDeleteAwesome!
ReplyDeleteI have to say I adore how filthy and grotty and worn out this looks, I'm as guilty as anyone for making things look way too newly built and crisp, but this is weathery perfection! If I ever get round to making any buildings, or even fake building-fronts (I had the idea for making just the front wall of a row of stables, for photographing horses in front of or peeping through the doors of, but like many of my projects it stopped at the 'idea' stage several years ago) I'm going to have to try that vaseline tip.
ReplyDeleteThe bricks with grout and muck and moss give it such a heavy, solid look, a million times better than the brick print paper, I bet it feels pretty heavy being a wooden box inside? If I ever did one it'd be based on cardboard without any structure inside (cos I'm cheap, not cos yours doesn't look fantastic made this way) and I always think LIGHT model props somehow look less realistic than ones with a proper solid heft to them, even if you can't tell how they feel or move in still photos, heh.
Finally got around to reading this and it is a delight! Wonderful! I've only encountered this level of detail in building miniature buildings in books, so you should think about publishing. I confess I'm puzzled about the 'resin' stable toy... Ah, it's a toy, not an insecticide (!) or a lamp... Like a stall ball. Okay. I also couldn't follow the LED stuff the first time round, but with study it's clearer. I LOVE how you solved so many problems with what you had on hand. Rummage away! Long live MDF improv.
ReplyDelete