
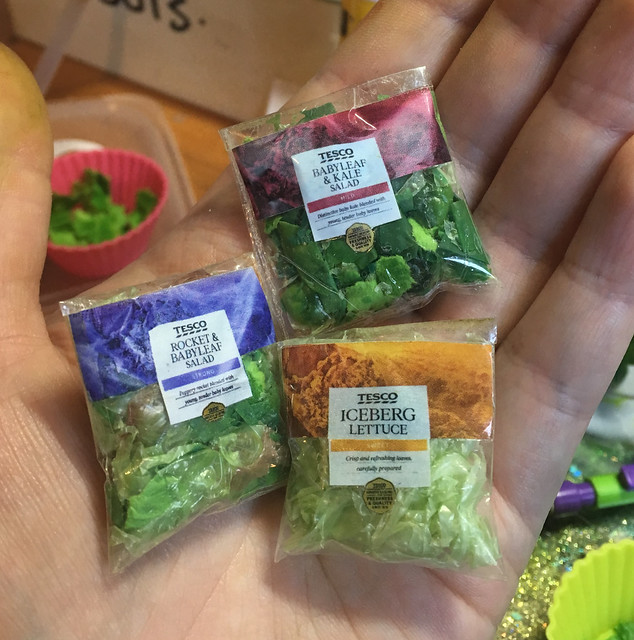
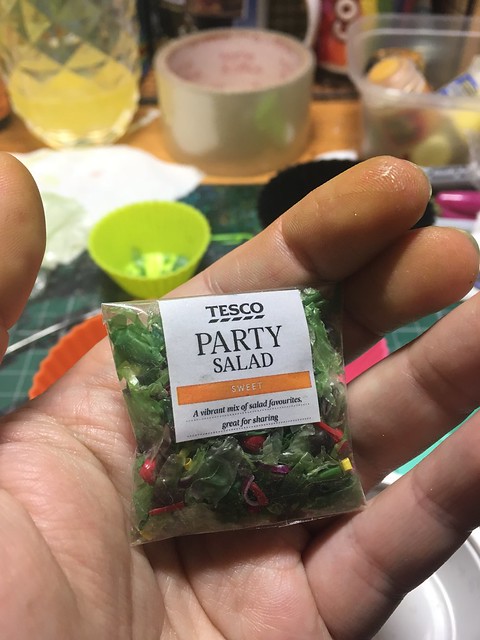
I've been in the mood for making food recently, and after posting photos of these on Instagram and Facebook, got lots of requests for a tutorial, so here it is!
You Will Need:
Labels from packaging or printables,
Vinyl gloves
Plastic bags from packaging
Green/red/brown markers
Clear tape
Glue stick (like PrittStick)
Hot glue stick
Acrylic paint
Red beads (nail polish optional)
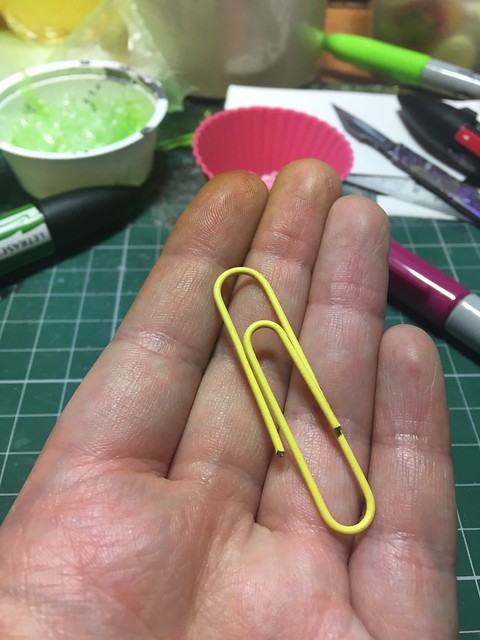
Plastic covered paperclips
Scissors
Step 1.
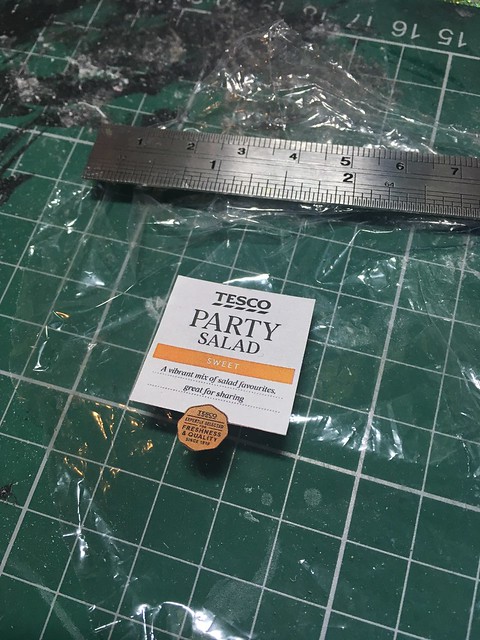
Find yourself some labels. I used whatever I could find from advertisements and free supermarket magazines, but of course you could easily source some photos of packaging online and print them out. I didn't have any more of the ones I used to make the original three but the technique is exactly the same.

Step 2
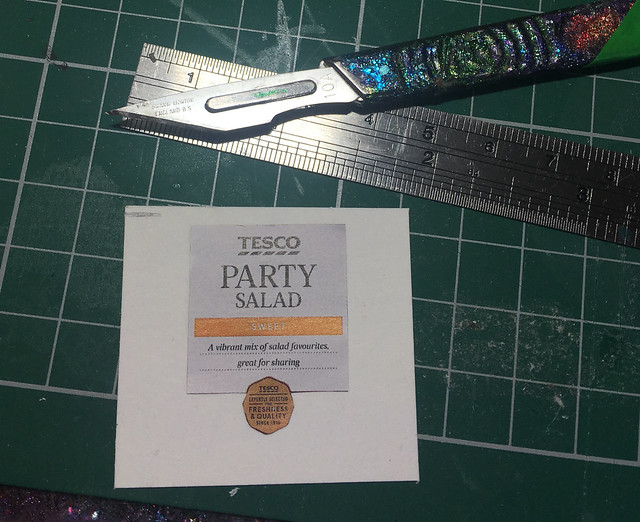
Cut out the label. I use fine sewing scissors for fussy cutting and a scalpel and metal rule for anything with large straight lines.
Step 3.
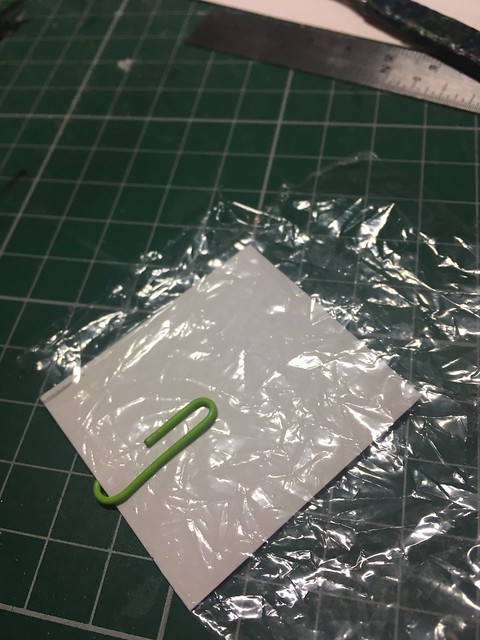
Make a template for the plastic bag. I just used a scrap of paper and guesstimated what looked right with the label. Obviously you could take measurements of the real thing and downscale it but I'm more of a bodger than anything else! Alternatively, if you have any really tiny resealable plastic bags you could skip these steps and just use them
Step 4.
Using the paper template, fold a piece of clear plastic bag over it and secure with a paperclip. I just used a sandwich bag but really any flexible plastic will do, and it's a good way of recycling otherwise non-recyclable packaging.
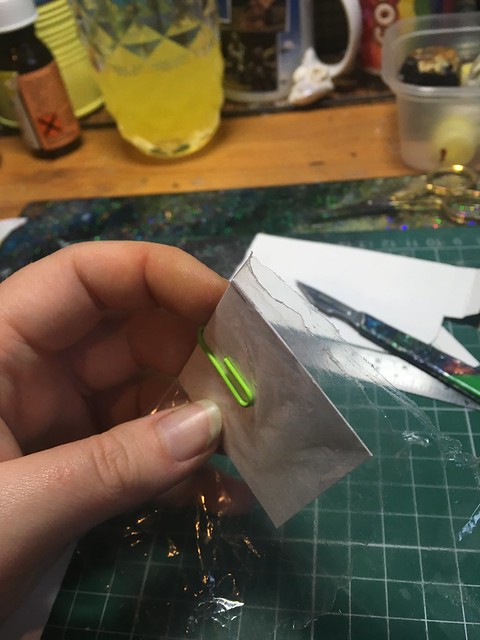
Step 5.
Trim the edges flush with the template on the three non folded sides, leaving a little extra on the top edge for folding over later.
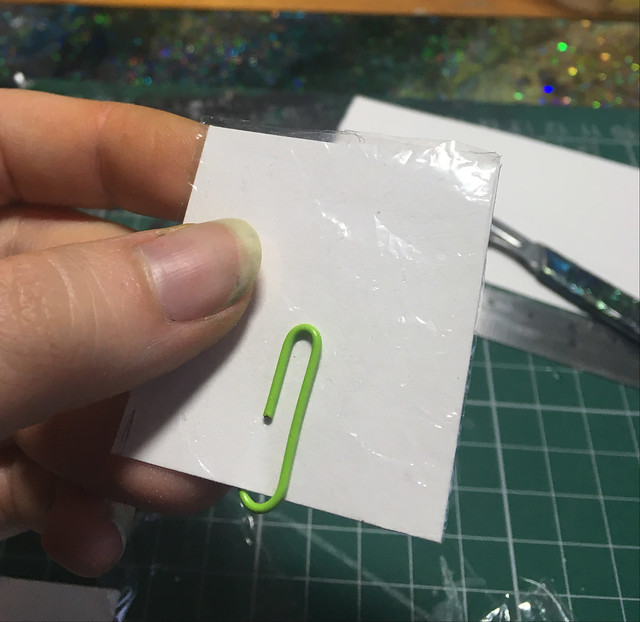
Step 6.
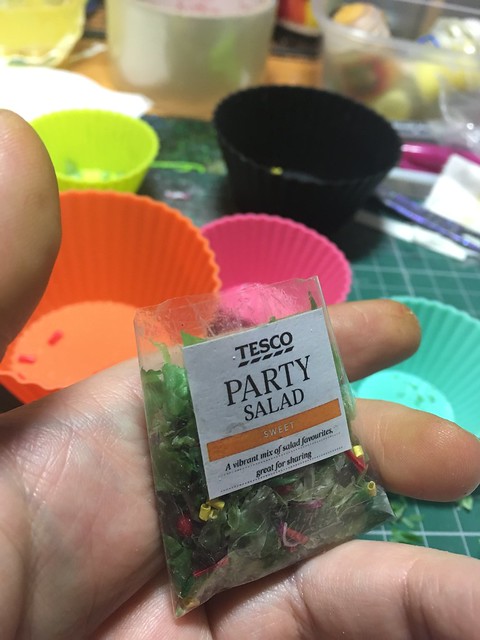
Position the label where you want it and using a glue stick, glue in place.
Step 7.
Using a strip of wide clear packing tape, carefully place it over the front of the bag, smoothing out any air pockets as you go.

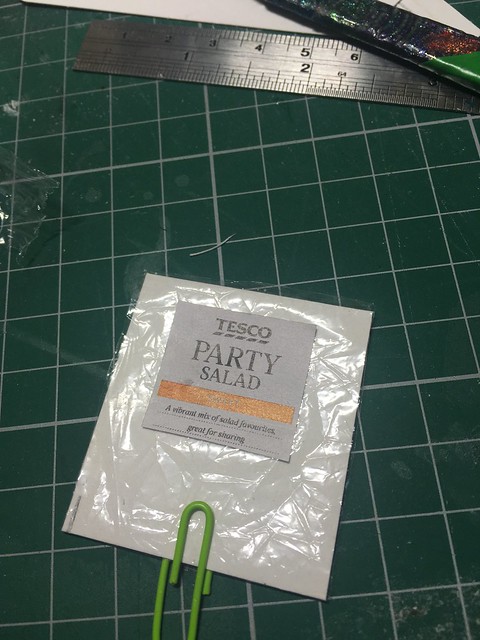
Step 8.
Carefully fold the sides of the tape over and trim off any excess. Make sure the top part is open so the bag isn't sealed completely.

Now you can remove the template and ta-da, you now have a finished plastic bag!
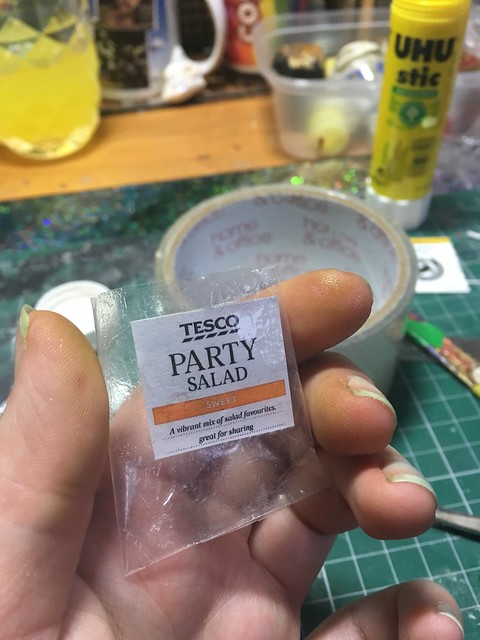
Now for the contents - the salad!
Step 1.
For this I used a combination of materials, but the most important are these - vinyl gloves and green food bags. I use blue vinyl gloves whenever I'm using spray primer or paint and the fingers always end up getting all sticky from where they've been covered in paint, but the rest of the gloves are usually pretty clean. Rather than see them go entirely to waste, I wondered if I could use them in a miniature, and I was very pleasantly surprised to find out that I could!

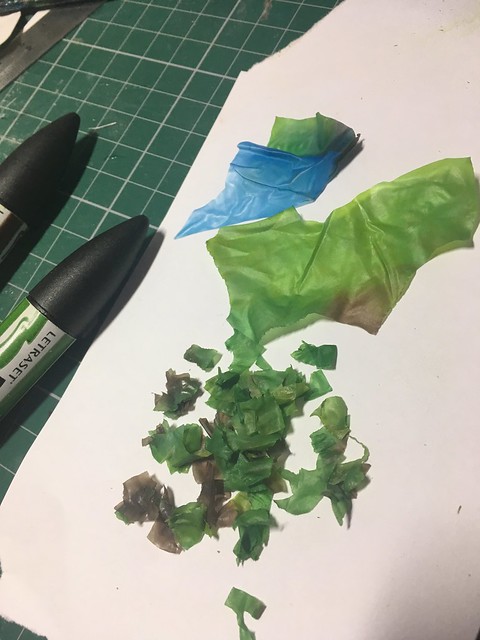
Step 2.
Using a selection of markers, I added colour to both - I did both sides of the glove material to cover up the blue, but only one side on the already green hued bag.

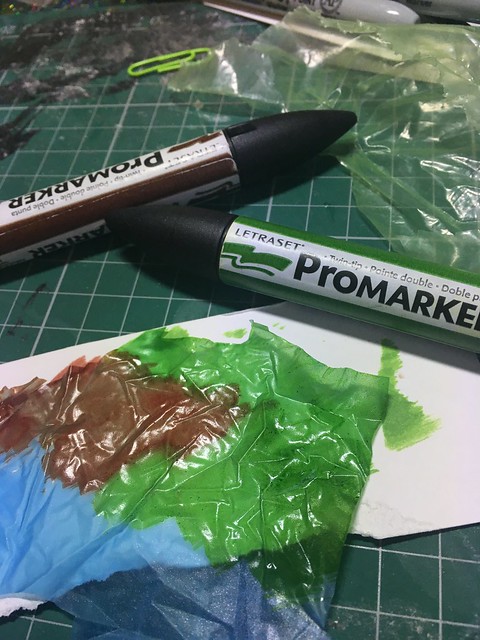
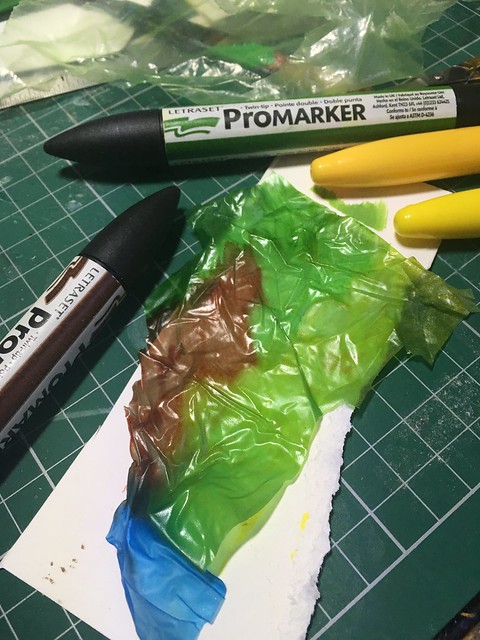

The ink can be a little sticky, so after letting them dry for a couple of minutes, I blotted them with a scrap of tissue and dusted on a little talc to get rid of any residual stickiness.
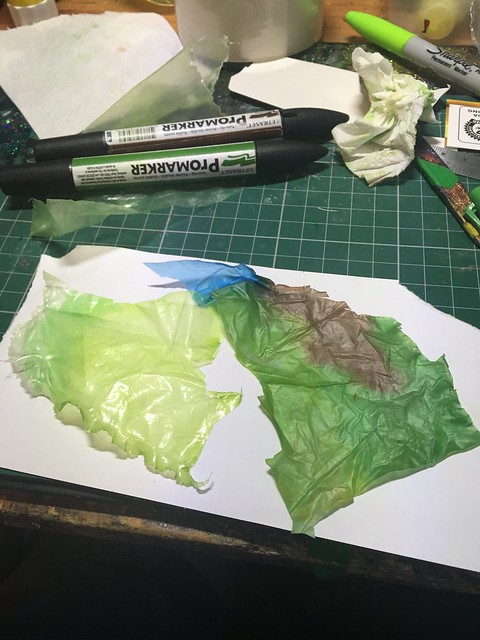
Step 3.
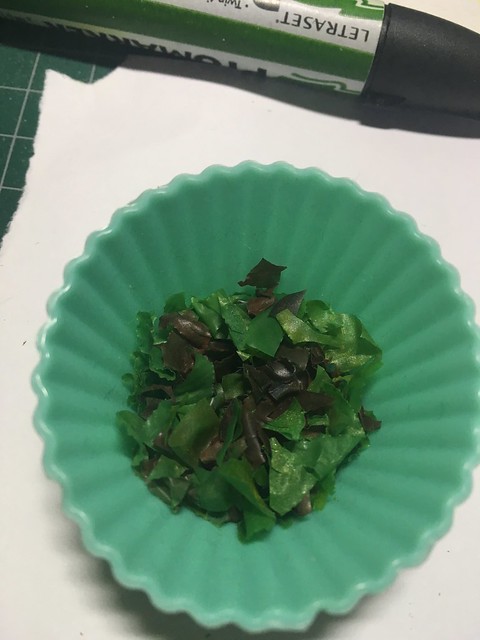
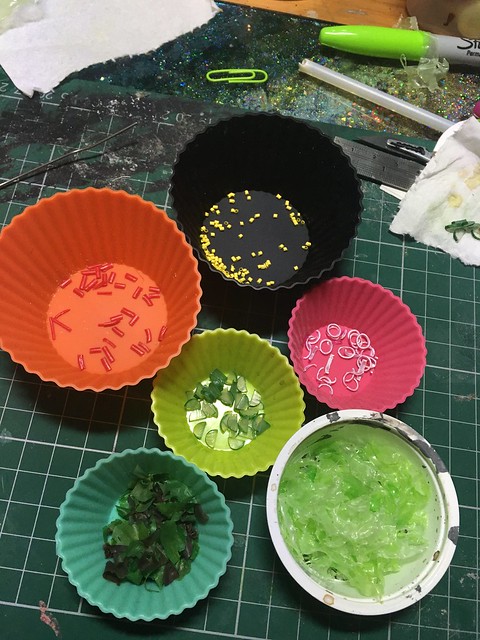
Now for the fun bit! Some types of plastic bags do this better than others, but unfortunately I don't know why, although I think ones that are a little thicker are probably best. Anyway, the green bags can be torn and as you pull the plastic apart, it naturally develops a wonderfully frizzy edge, which makes very convincing lettuce!
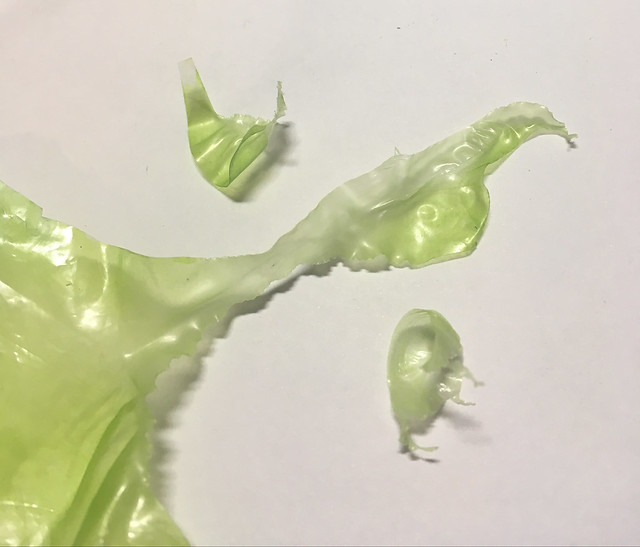
The untinted plastic, seen below on the right, makes excellent Iceberg lettuce.

The vinyl doesn't tear quite as nicely, and tends to break into much more angular pieces, but it cuts beautifully with scissors, so it would be very simple to cut them into more leaf-like shapes. I didn't on this occasion however.
Step 4.
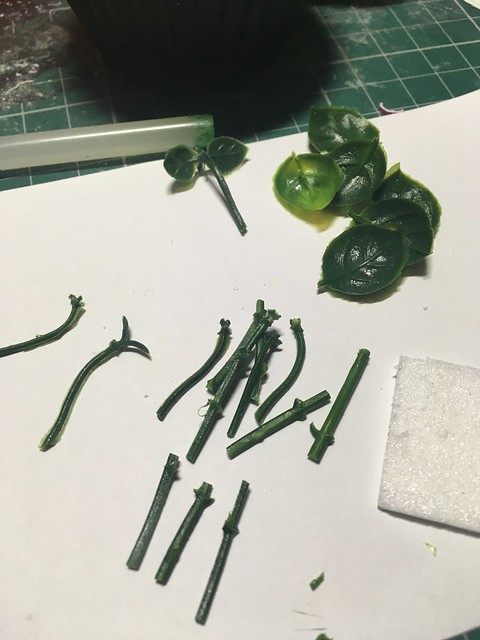
You could just easily leave it there with the lettuce, but I wanted to go all out on this one, so I looked up the ingredients of this particular salad, and decided to make not only the lettuce but the red onion, pepper, sweetcorn, cucumber and tomatoes as well.
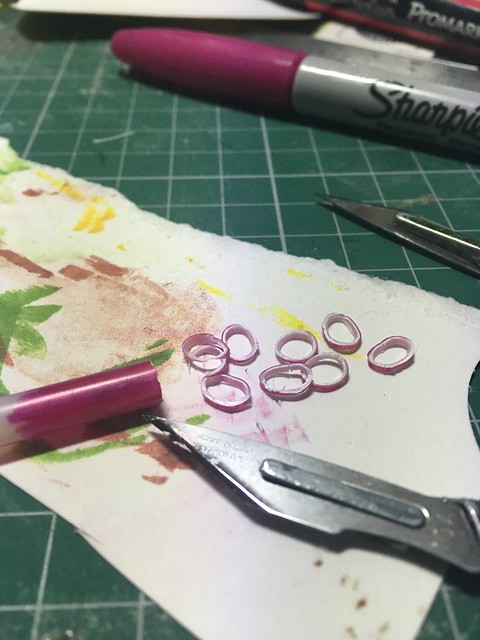
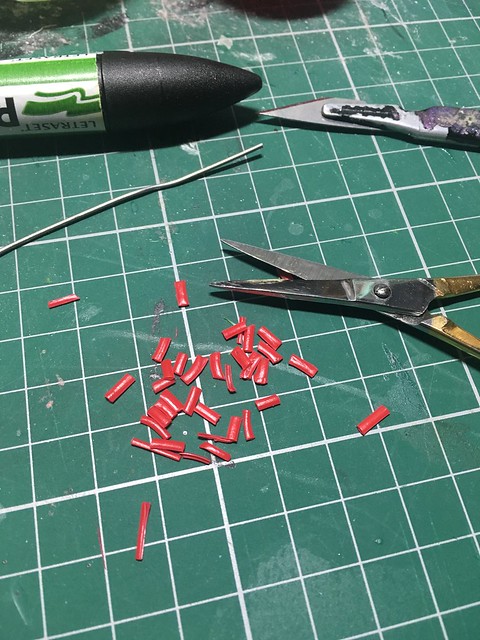
First up, the red onion. You could easily make a cane with polymer clay but who has time for that when you could use a plastic tube and sharpies instead? 😋
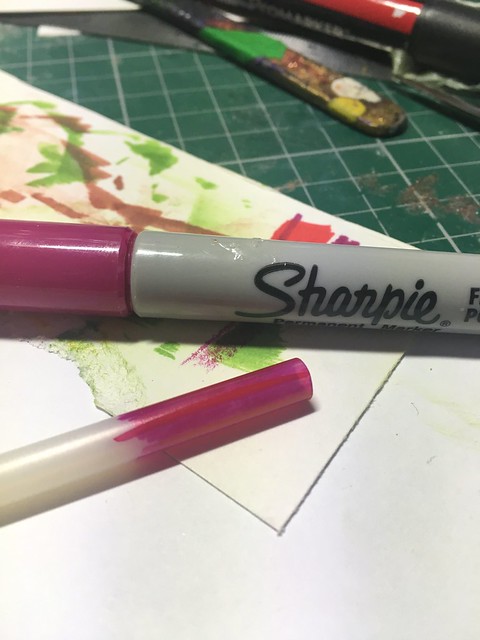
I'm pretty sure this was originally a balloon stick I salvaged from somewhere, but it was about the same diameter as a drinking straw, only a little thicker and in sturdier plastic. I coloured the outside with sharpies and once dry, cut it into slices with a scalpel.
Step 5.
The sweetcorn was nice and easy - take a yellow plastic covered paperclip, unfold and straighten it out, then carefully slice the plastic in the middle to free it from the rest of the clip. Use pliers or the back of the scalpel blade to push the plastic off the wire.
(I'd also really recommend wearing gloves when using sharpies and markers or you'll end up with horribly stained fingers like mine, lmao)
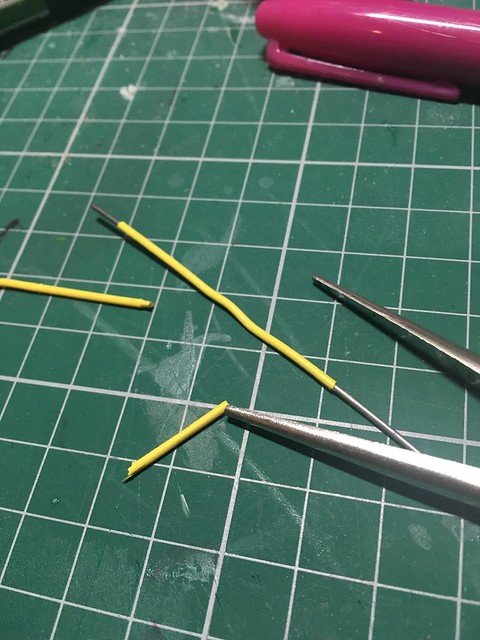
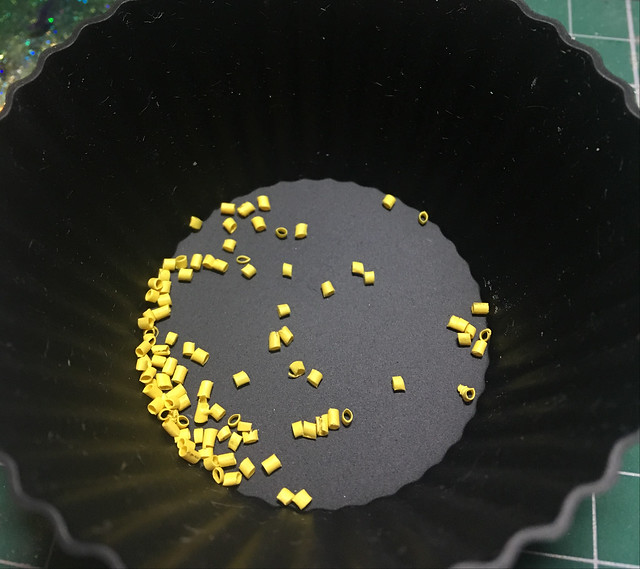
All you need to do now is chop it into tiny bits with scissors. In hindsight, I should have flattened the tubing with pliers, prior to cutting it up, so I'd advise doing that as it looks much better! If I'd done this with a white one, I think it would have made quite nice
spring onion, especially with a hint of green sharpie added to the
paperclip before cutting.
Alternatively, chopping up a yellow elastic band would be another good way of making sweetcorn.
Step 6.
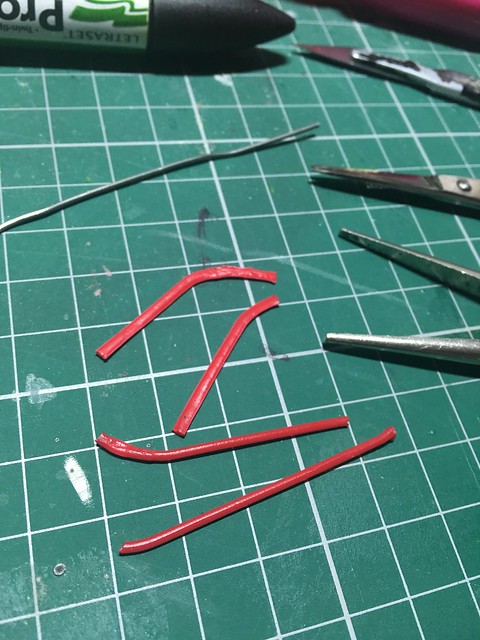
I used the same technique for the peppers, this time flattening the plastic with pliers and cutting it into strips.
Step 7.
For the tomatoes I painted some plastic beads using nail polish as I somehow didn't have any the right size and colour! If I were making a salad to be displayed in a bowl or something, I'd have made some out of clay for realism, but as they'd be in a bag where you were unlikely to see the holes, I didn't mind simplifying them and the polish gave them a really nice fresh off the vine sheen.

Step 8.
The cucumber proved a little tricky, but I'm super pleased with how it turned out. I used a hot glue stick, one that had gone a little yellow and opaque as opposed to the highly translucent ones that make up most of my stash. I painted the outside with green acrylic in a series of quite thick layers to build up texture.
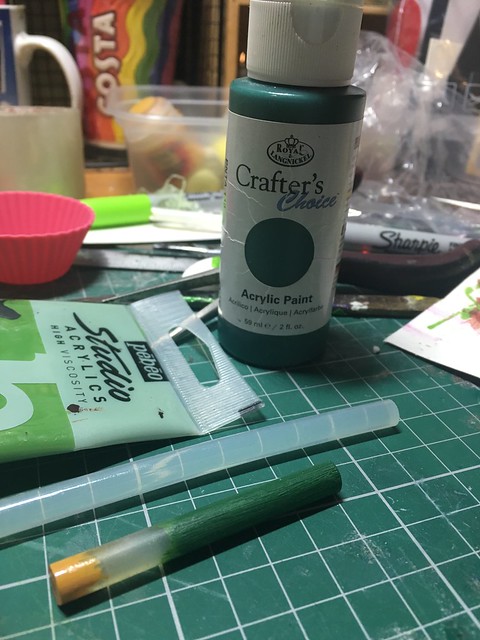
I actually made this twice as the first time the glue stick was too clear, so I redid it with a more opaque one, hence the WIP photos looking a little different to the final work.
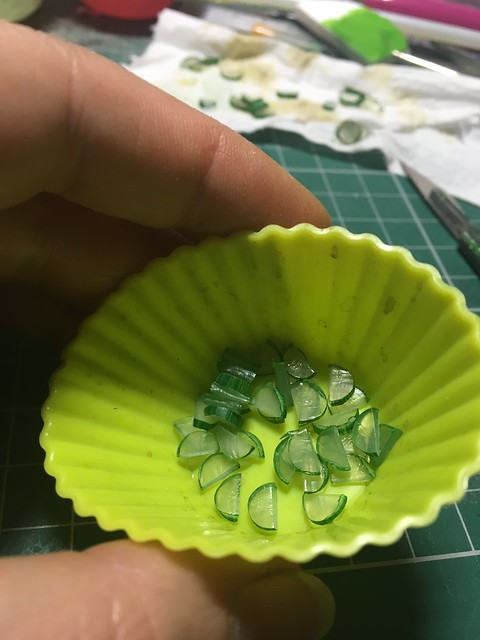
Once it was 100% dry, I chopped them into slices with a scalpel and halved them.
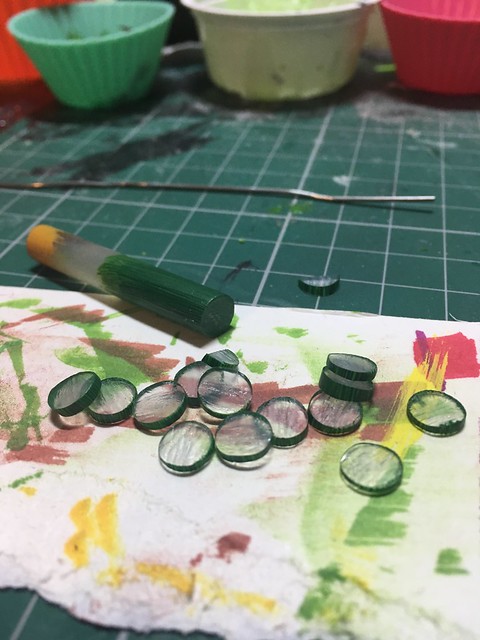
Having them more opaque makes a huge difference!
Step 9.
We now have all the ingredients, so it's time to assemble!

I ended up really craving a salad bowl after this, lol
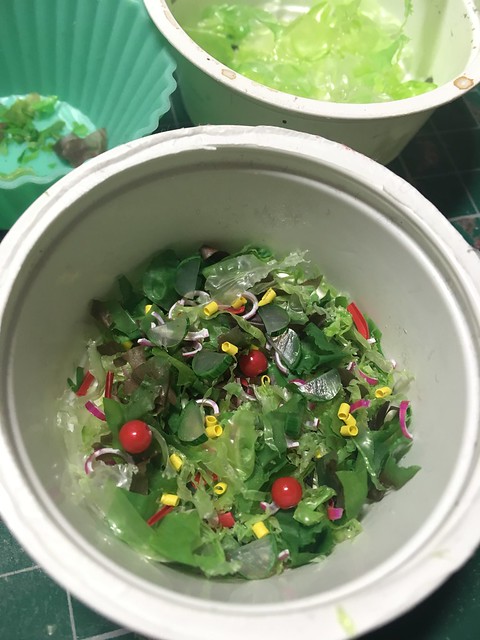
Rather than just stuffing everything into the bag, I was careful to put my best looking bits at the front, and rearranged things with a cocktail stick so it looked more realistic.
Always make more salad than you think you'll need because trust me, you won't have made enough!
Step 10.
Once filled to capacity, gently place a strip of clear tape over the open top, trim the side parts and fold over to seal the bag. You could also fold the top part over before applying the tape for a cleaner finish.

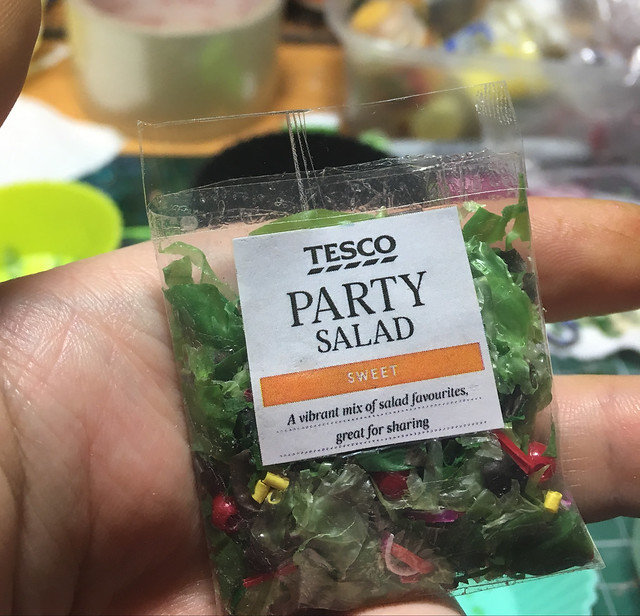
Aaaaand you're done!
Overall I'm really happy with this, and I'd love to make more as it's a really rewarding thing to create. In hindsight I'm not happy with the sweetcorn, but it's not too bad really. Ideally I'd like to get some tiny plastic bags so I don't have to faff around and make them from scratch but I do like the look of them so I don't mind putting in the extra effort.
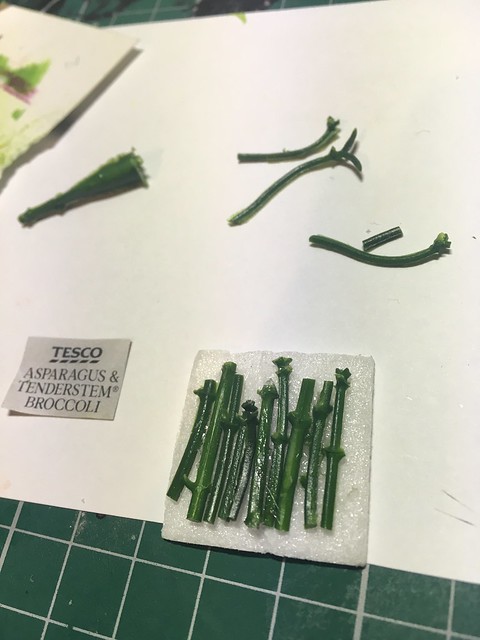
While I was in the mood, I also put together another couple of foody things using a similar technique. I made asparagus using offcuts from artificial plants, a scrap of foamboard and clear tape.

I glued the stalks onto the foamboard using UHU glue, then wrapped a scrap of plastic around it, gluing it in place at the back.


I also made a packet of mozzarella by cutting out the label, gluing it to a sheet of paper, folding it over and sealing the edges with tape as before, leaving one side open to stuff with scrunched up paper, before sealing with more tape.

I'm (finally) working on a kitchen for Max and Juno, so this probably won't be the last food tutorial you'll see for a while!
That's great! Love it! Thanks for sharing this DIY with us :D
ReplyDeleteThis is lovely and reminds me to “think outside the box” when it comes to materials in miniature! Thank you for sharing!
ReplyDeleteVERY Professional Results and an EXCELLENT tutorial Christine!
ReplyDeleteWonderful! I might actually be able to do some of this. Thank you for such a great step by step tutorial.
ReplyDeleteHello there! I'm the one that posted the whole blog thread on Facebook.
ReplyDeleteYour saldad and asparragus look amazing, very detailed. I wish I could do such detailed miniatures, but sadly I don't have much time.
I've just subscribed to your blog and I hope to see more posts like this in the future. Take care.
Gorgeuos salad :-D
ReplyDeleteHi I am Leann Castillo CEO of Shandong Zhushi Pharmaceutical Group Co., Ltd. We are among the most reliable protective clothing manufacturers serving with the great quality and satisfaction to our clients.
ReplyDeleteI love this! Your technique is fabulous! Don't worry about the sweetcorn! It's amazing! I wish I had your skills! I just love miniature arts and I've been looking at a lot of it.... So far, yours is one of the best that I've seen today! This is just...so amazing that I can't even put it into words, I'm not joking! This is just a brilliant piece of miniature art! Keep going! Don't give up!
ReplyDeleteawww so cute obsessed!
ReplyDeleteThis is fantastic! I love your creativity and your eye for the exact replicas of these items! Thank you for sharing this info.
ReplyDeleteVery imaginative! I'm always looking for ideas for small food items. By the way, after you put the "tomatoes" on the toothpicks to dry after coating with nail polish, you can also fill in the holes with a little more polish. Takes a bit longer to dry, but worth it IMO.
ReplyDelete